Keeping ClickHouse® Open and Portable in Altinity.Cloud®
ClickHouse is on the fast track to become the most popular analytic database on the planet. Much of the growth is due to outstanding performance. ClickHouse offers a unique combination of real-time query response combined with the ability to keep months or even years of data available for deep analysis in a single database store.
Speed is of course critical, but it’s not everything. Our experience working with hundreds of customers since 2017 has taught us that users want to run ClickHouse anywhere and for any business purpose. The reasons are as varied as ClickHouse users, but include everything from optimizing price/performance to security compliance to previous IT decisions about data location. There is simply no one-size-fits all model for modern analytic applications.
We designed Altinity.Cloud to uphold two key properties of ClickHouse that users depend on:
- It’s open source and uses the permissive Apache 2.0 license. Applications built on ClickHouse can serve any business purpose from SaaS services to embedded software.
- It’s portable. ClickHouse can run anywhere users need to analyze data: from Raspberry Pi 4s’ to cloud-based clusters with hundreds of nodes.
It’s one thing to boast about flexibility and another thing to show it. This blog first explores the Altinity.Cloud architecture and explains how the design upholds customer choice. Next, we’ll demonstrate there’s no lock-in. We’ll take a cluster created in Altinity.Cloud and show how to deploy analogous capabilities in a self-managed environment on Google Cloud Platform. Any GCP user can replicate the example.
Altinity.Cloud Architecture
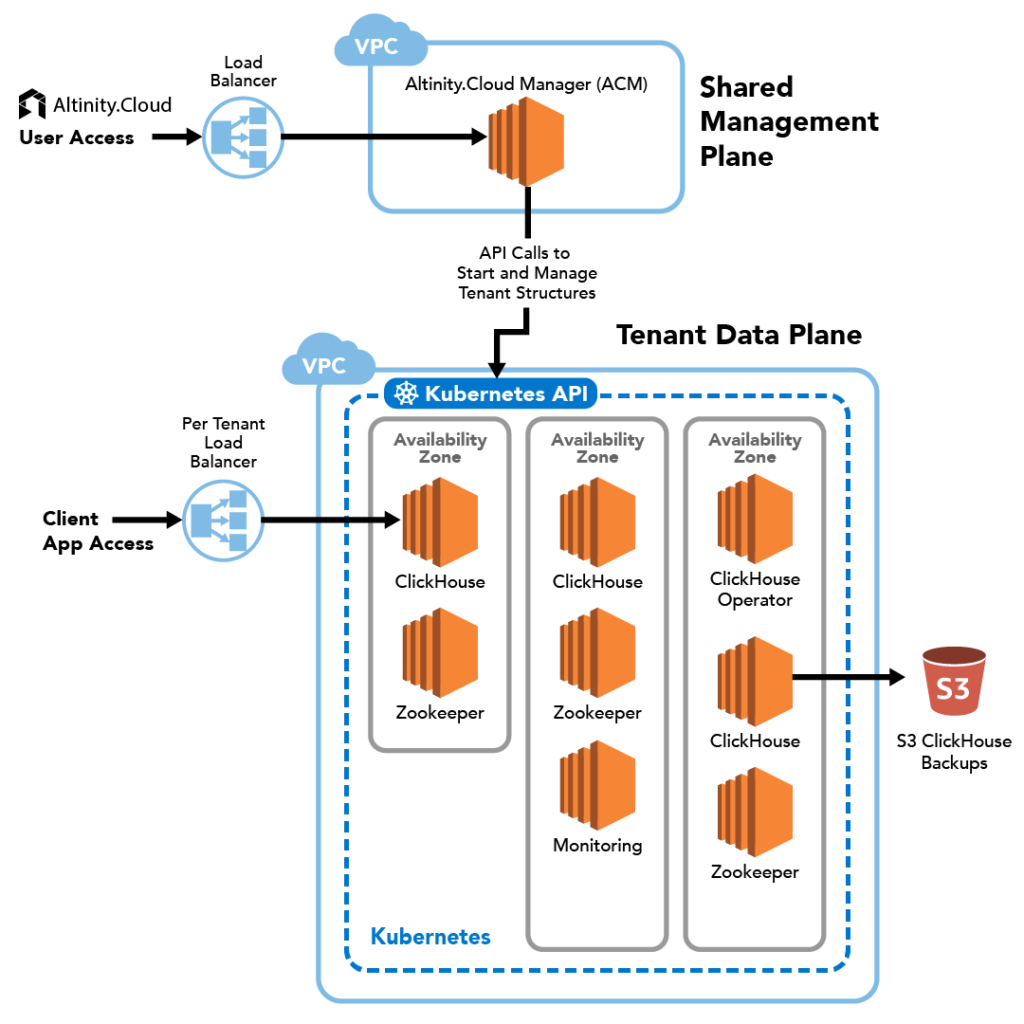
The Altinity.Cloud service has separate management and data planes, which is common in cloud services. The management plan is shared across all tenants. It administers the data plane, which consists of separate environments for each tenant. Each tenant environment is a Kubernetes cluster running over multiple availability zones.
Here is a simplified illustration of the Altinity.Cloud architecture, showing the management plane and a tenant environment in the data plane.
The Altinity.Cloud design maintains ClickHouse flexibility in two fundamental ways.
- Fully open: All base components are freely available under permissive licenses including:
- ClickHouse — Available as Apache 2.0-licensed Altinity Stable Builds or Community Builds
- Altinity ClickHouse Operator — Apache 2.0 license
- Zookeeper — Apache 2.0 license
- Portable: Altinity.Cloud runs clusters on Kubernetes, which is both open source as well as widely available in convenient managed environments like AWS EKS and Google GKE.
As a result, any ClickHouse workload that runs in Altinity.Cloud will run in self-managed environments as well. All you need is Kubernetes. Conversely, any workload that runs on Kubernetes will run in Altinity.Cloud.
That’s a strong claim. Let’s prove it.
Building an Altinity.Cloud Cluster without Altinity.Cloud
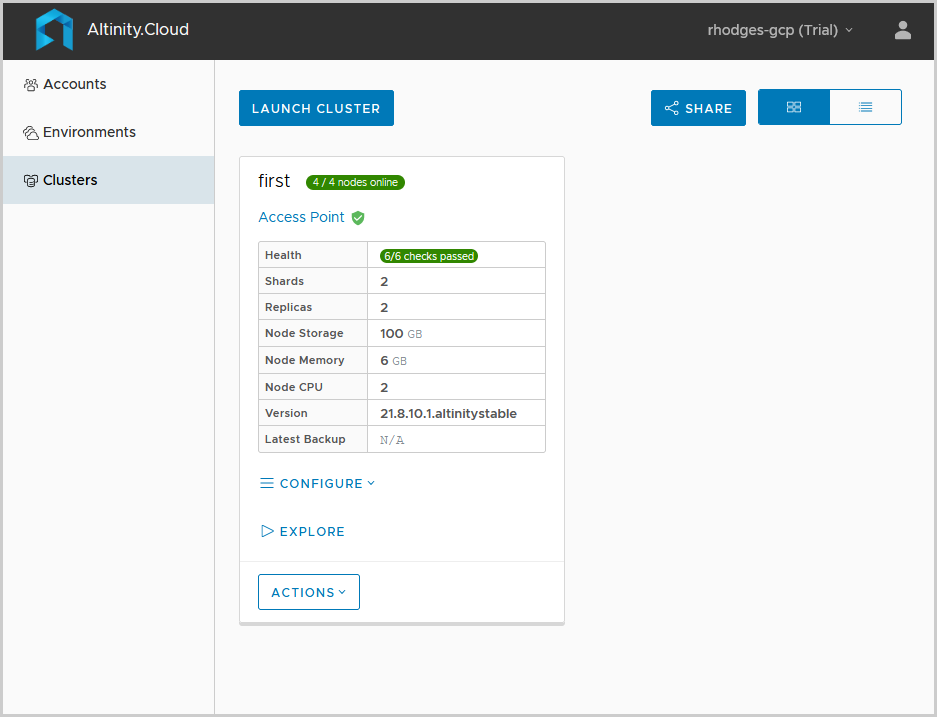
In my previous blog article, I used Altinity.Cloud to create a ClickHouse cluster on Google Cloud Platform, also known as GCP. Let’s have a look at the finished cluster again.
We will build the same cluster in Google Cloud Platform. There are three steps.
- Stand up a Kubernetes Cluster using GKE, which is the managed services for Kubernetes in GCP.
- Install required prerequisites: Altinity’s Kubernetes Operator and Zookeeper.
- Create a ClickHouse CRD and apply it to Kubernetes to stand up the cluster.
To keep the demonstration short we’re going to deploy a simplified ClickHouse configuration with the following properties:
- Two shards and two replicas.
- Altinity Stable Build 21.8.10.1.
- 100GB of high performance storage per node.
- Basic storage protections to avoid loss of data if the ClickHouse installation is deleted.
- A ClickHouse login for applications.
We’ll of course comment on what else would be needed for a production cluster and provide hints for how to get there.
Setting up a GKE Kubernetes cluster using the command line
GCP provides the gcloud command line interface for setting up clusters. I recommend using this instead of the web console. Besides being more repeatable, the command line allows you to control things like the VM types GKE uses for worker nodes. This particular example requires a minimum VM size of n2-standard-4 to ensure all services can run.
Start by installing ‘gcloud’ itself. I’m running on Ubuntu 18.04 LTS and used the instructions here. After gcloud is set up, you’ll need to initialize it to set your GCP account and a default region for operation. Here’s the command I used.
gcloud init --console-onlyNext we need to set up a network and then spin up a GKE cluster that uses it. Here are sample gcloud commands. For more background on what’s happening, check out the GKE docs here.
gcloud compute networks create kubernetes-1 \
    --bgp-routing-mode regional \
    --subnet-mode custom

gcloud container clusters create cluster-1 \
    --region us-west1 \
    --node-locations us-west1-a,us-west1-b \
    --machine-type n2-standard-4 \
    --network kubernetes-1 \
    --create-subnetwork name=k-subnet-1 \
    --enable-ip-alias
At this point things will get quiet for a while. You can check status of the cluster using the following command.
gcloud container clusters listWhile the cluster is baking, we’ll go ahead and install kubectl. The following works for Ubuntu.
# Download binary
curl -LO "https://dl.k8s.io/release/$(curl -L -s https://dl.k8s.io/release/stable.txt)/bin/linux/amd64/kubectl"

# Install.
sudo install -o root -g root -m 0755 kubectl /usr/local/bin/kubectl
Once the cluster is ready we can get the credentials that allow kubectl to issue commands to Kubernetes.
gcloud container clusters get-credentials cluster-1 \
    --region us-west1 \
    --project my-project
We should be able to connect with kubectl and start running commands. Let’s just check the cluster.
kubectl cluster-info
This should dump out the location of the Kubernetes control plane and services in the cluster. If so, you are done. Otherwise, you’ll need to take a step back and debug what went wrong.
Installing prerequisites for running ClickHouse clusters
Now that Kubernetes is available, we can install the Altinity ClickHouse Operator. The operator is an open source project that creates and manages ClickHouse clusters in Kubernetes. The installation procedure is documented here. It consists of one line:
kubectl apply -f https://raw.githubusercontent.com/Altinity/clickhouse-operator/master/deploy/operator/clickhouse-operator-install-bundle.yaml
You can verify that the operator is up and running with the following command. Sample output is shown.
kubectl get pod --selector=app=clickhouse-operator -n kube-system
NAME                                   READY   STATUS    RESTARTS   AGE
clickhouse-operator-6fd75cbd68-7ttsz   2/2     Running   0          58s
Next, let’s add Zookeeper. ClickHouse needs it to manage replication. Installation is documented here. Here’s a quick command example from the Altinity docs. It installs Zookeeper in namespace zoo1ns.
git clone https://github.com/Altinity/clickhouse-operator
cd clickhouse-operator/deploy/zookeeper
./quick-start-volume-emptyDir/zookeeper-1-node-create.sh
You’ll want to check that Zookeeper is alive and running. Once the single zookeeper pod is up and running, you can keep going to the next main event in the next section.
kubectl get all -n zoo1nsBringing up your first ClickHouse cluster
It’s time to bring up a ClickHouse cluster! Here is a custom resource definition that matches the cluster topology we created in Altinity.Cloud and our simplified requirements from above. Reading in order through the definition:
- There are 2 shards with 2 replicas per shard.
- There is a user demo with password topsecret for applications.
- All servers use Altinity Stable Build version 21.8.10.1.
- Servers are placed on different workers.
- All servers have 100GB of pd-ssd high performance block storage. Persistent volume claims will not be deleted if the installation is removed. You need to delete PVCs explicitly.
In case you wonder how we developed the YAML text, we started out with output from an experimental feature we are developing to dump the Kubernetes resource definition of any cluster created by Altinity.Cloud. We plan to make this available in future to all users.
apiVersion: "clickhouse.altinity.com/v1"
kind: "ClickHouseInstallation"
metadata:
  name: "first"
spec:
  configuration:
    # What does my cluster look like?
    clusters:
      - name: "first"
        layout:
          shardsCount: 2
          replicasCount: 2
        templates:
          podTemplate: clickhouse-stable
          volumeClaimTemplate: pd-ssd
    # Where is Zookeeper?
    zookeeper:
        nodes:
        - host: zookeeper.zoo1ns
          port: 2181
    # What are my users?
    users:
      # Password = topsecret
      demo/password_sha256_hex: 53336a676c64c1396553b2b7c92f38126768827c93b64d9142069c10eda7a721
      demo/profile: default
      demo/quota: default
      demo/networks/ip:
      - 0.0.0.0/0
      - ::/0
  templates:
    podTemplates:
    # What is the definition of my server?
    - name: clickhouse-stable
      spec:
        containers:
        - name: clickhouse
          image: altinity/clickhouse-server:21.8.10.1.altinitystable
      # Keep servers on separate nodes!
      podDistribution:
      - scope: ClickHouseInstallation
        type: ClickHouseAntiAffinity
    volumeClaimTemplates:
    # How much storage and which type on each node?
    - name: pd-ssd
      # Do not delete PVC if installation is dropped.
      reclaimPolicy: Retain
      spec:
        accessModes:
        - ReadWriteOnce
        resources:
          requests:
            storage: 100Gi
        # GKE storage class to allocate pd-ssd storage.
        storageClassName: premium-rwo
In case you are wondering, ‘premium-rwo’ really is the right StorageClass for pd-ssd. You can confirm by running ‘kubectl describe storageclass’ to see the details. In Altinity.Cloud we define our own storage classes with more obvious names to avoid confusion.
We’ll store the complete resource definition in a file called first.yaml. We can now bring up the cluster in the default namespace as follows.
kubectl apply -f first.yamlAfter a few minutes there should be four pods up and running. Let’s do some quick tests to show that our cluster works. First, let’s confirm we have four pods and that they are scheduled on different worker nodes as ordered. Here’s some kubectl magic to show that.
kubectl get pod -o=custom-columns=NAME:.metadata.name,\
STATUS:.status.phase,NODE:.spec.nodeName
NAME                    STATUS    NODE
chi-first-first-0-0-0   Running   gke-cluster-3-default-pool-0e592b5e-z79k
chi-first-first-0-1-0   Running   gke-cluster-3-default-pool-f0b76a3a-5xxz
chi-first-first-1-0-0   Running   gke-cluster-3-default-pool-0e592b5e-nwd4
chi-first-first-1-1-0   Running   gke-cluster-3-default-pool-f0b76a3a-bmwp
Next, let’s make sure we actually allocated storage. It’s possible to make a mistake and allocate the wrong type or not allocate it at all. If so, we want to know now. The following output looks satisfactory.
kubectl get pvc
NAME                           STATUS   VOLUME                                     CAPACITY   ACCESS MODES   STORAGECLASS   AGE
pd-ssd-chi-first-first-0-0-0   Bound    pvc-51f10c0e-1ae0-47cd-b62f-b44c3603dcbd   100Gi      RWO            premium-rwo    21m
pd-ssd-chi-first-first-0-1-0   Bound    pvc-1e18e8a5-4eed-4ef0-b3f4-d8312e7e6fb3   100Gi      RWO            premium-rwo    20m
pd-ssd-chi-first-first-1-0-0   Bound    pvc-7b0ea427-ae8f-4a2d-9738-c3534dd5e45c   100Gi      RWO            premium-rwo    19m
pd-ssd-chi-first-first-1-1-0   Bound    pvc-fd3eddd5-23f6-441b-8606-83e68affc108   100Gi      RWO            premium-rwo    15m
Finally, let’s ensure we can login and that there’s a functioning load balancer. We’ll get into one of the pods at the bash prompt, then connect clickhouse-client using our application login via the load balancer service.
kubectl exec -it chi-first-first-0-0-0 -- bash
root@chi-first-first-0-0-0:/# clickhouse-client --host=clickhouse-first --user=demo --password=topsecret
ClickHouse client version 21.8.10.1.altinitystable (altinity build).
Connecting to clickhouse-first:9000 as user demo.
Connected to ClickHouse server version 21.11.5 revision 54450.

chi-first-first-1-1-0.chi-first-first-1-1.default.svc.cluster.local :) select 1

SELECT 1

Query id: 7a517022-7184-4868-b7c6-8ae86524249a

┌─1─┐
│ 1 │
└───┘

1 rows in set. Elapsed: 0.003 sec.
That’s it! We have a live server with the same ClickHouse software version and topology as the original cluster in Altinity.Cloud. It has a user named demo for applications. It has high performance storage allocated. It sports best-practice data protections like spreading servers across nodes and adding the RETAIN flag so that we don’t remove storage claims if the ClickHouse installation is deleted by accident.
So what’s missing?
A lot, actually. This was a simplified demonstration, so we glossed over a number of points. Here are some of the most important issues that you will likely need to address for a production deployment.
- External access. If you have applications outside Kubernetes that connect to the data warehouse, you’ll need to configure a load balancer or ingress to give them access. Best practice is–of course–to implement TLS encryption on any external connection.
- Backup. It’s a best practice to configure clickhouse-backup and schedule daily backups. Or you can use mechanisms available in specialized storage providers like Portworx.
- Availability zones. It’s similarly a best practice to spread replicas across different availability zones. The Kubernetes operator can define replica pod templates tied to specific zones. See here for an example.
- Monitoring. You’ll want monitoring of ClickHouse with alerting on conditions like replication errors. We normally use Prometheus and Grafana for this. See the Altinity blog for an article that shows how to configure monitoring.
As long as you are willing to devote the administrative resources and management time, nothing prevents you from managing ClickHouse on Kubernetes yourself. Around 25% of Altinity support customers have made the choice to do so. The required infrastructure is available in open source. Kubernetes runs practically anywhere. It’s mostly a matter of whether you want to make the investment or focus on building better applications.
(Or you could just make things easy on yourself and get an account on Altinity.Cloud. Altinity will help you either way.)
Conclusion
Altinity.Cloud is designed to preserve the source licensing and portability that makes ClickHouse the great data warehouse it is today. We’ve learned from years of working with customers that these characteristics give users flexibility to achieve their goals for price/performance, security, data location, and many others.
We also believe users need the ability to shift easily between different operating environments, including Altinity.Cloud. In the coming year Altinity will be introducing new software to further increase your freedom to build cost-effective, secure, and reliable applications for real-time analytics wherever you want.
Stay tuned. There’s a lot of great technology on the way.
ClickHouse® is a registered trademark of ClickHouse, Inc.; Altinity is not affiliated with or associated with ClickHouse, Inc.