How to Set Up a ClickHouse® Cluster with Zookeeper

One of the most common questions I’ve seen when people start working with Altinity Stable for ClickHouse is “How do I set up my own ClickHouseTM cluster? I know how to install Zookeeper, and Altinity Stable for ClickHouse – but how do I put it all together?”
Sometimes the answer is easier like “Use Altinity.Cloud to create a cluster” or the instructional series on how to use the Altinity Kubernetes Operator to create your cluster with your own configuration with Docker images.
But if you’re like me, you also like to just “do it yourself”: see how the pieces go together rather than relying on someone else’s tool or jumping into a cloud service.
For you tinkerers and operators who want to build it yourself, this guide is for you. This guide will show in clear, simple steps how to create a ClickHouse cluster with a few nodes. No Kubernetes, no Docker – just working right with Zookeeper and Altinity Stable to get your clusters going.
To build our cluster, we’re going to follow these main steps:
- Install Zookeeper
- Install Altinity Stable build for ClickHouseTM
- Configure Altinity Stable for Zookeeper
- Create a sample replicated table
We’re using Altinity Stable for ClickHouseTM because it is a 100% compatible version of ClickHouse that has been tested for production environments. The build repository is secure, and compared to the community versions of Altinity, Altinity Stable for ClickHouse is supported for a full three years with security and other essential patches. So you know it’ll work now, and keep working years from now with your applications.
A copy of these instructions is also available on the Altinity Documentation site, so feel free to refer to those if you need more details. These instructions are geared for people setting up using Ubuntu Linux, but we also have Altinity Stable available for RPM-based Linux distributions and macOS through Homebrew.
The Layout
This cluster is going to be incredibly simple – one shard, three replicas of Altinity Stable version 21.8.13.1.altinitystable, all connected to one Zookeeper instance:
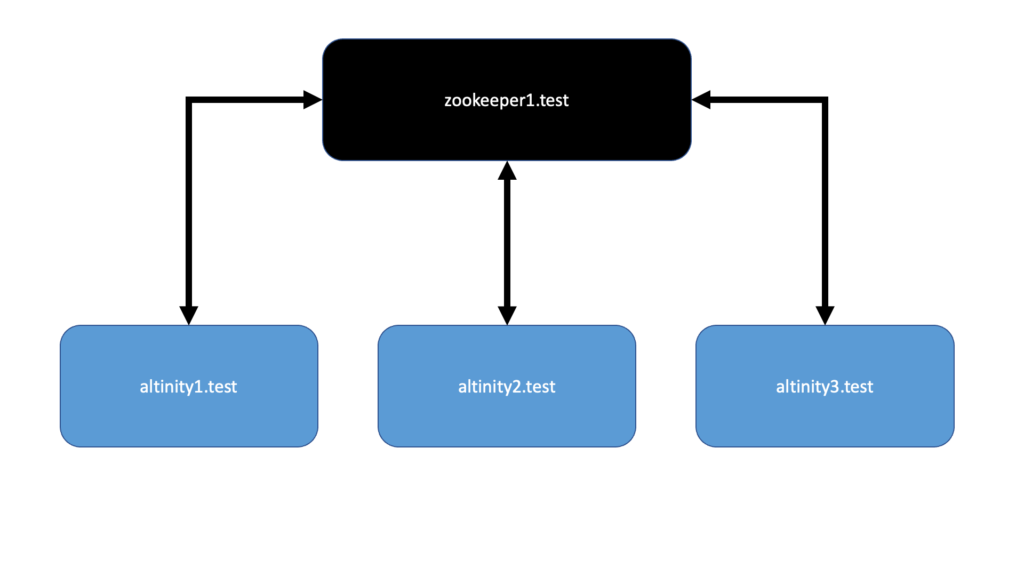
- Nodes: Our example will have 4 nodes. Each is an Ubuntu 20.04 container running on a ProxMox server. Feel free to use your preferred virtual machine manager or a bunch of machines in your server rack. Whatever works for you.
Here’s how I’m organizing my test environment:- One Zookeeper node I’ll call zookeeper1.test. In a production environment 3 would be best, but this is just for testing and examples.
- Three Altinity Stable nodes:
- altinity1.test
- altinity2.test
- altinity3.test
- Each node will have a static IP address inside of my network environment, and I’ll add them to a local DNS server so they can easily find each other.
- sudo level access to the machines you’re working on.
Install Zookeeper
For our Ubuntu environment, Zookeeper can be installed through apt-get with a user with sudo rights. As per our ZooKeeper Installation and Configuration guide, netcat is installed at the same time.
ZooKeeper version 3.4.5 and greater is required for ClickHouse clusters. In this case, we’ll be installing the most current version from the Ubuntu repository, which is Zookeeper 3.4.13, using the following command.
sudo apt-get install zookeeper netcat
Configure Zookeeper
We’ll configure Zookeeper to best serve our Altinity Stable nodes.
First we’ll set a zookeeper id. There’s only one zookeeper node, and no other clusters in the network, so we’ll set it as 1. Just update /etc/zookeeper/conf/myid and add a number to it, as seen in this example here:
Command:
sudo cat /etc/zookeeper/conf/myid
Expected Result:
1
Next up we want to update the Zookeeper configuration file at /etc/zookeeper/conf/zoo.cfg. There’s a couple settings we want. First is autopurge as follows:
Command:
cat /etc/zookeeper/conf/zoo.cfg | grep autopurge
Expected Result:
autopurge.purgeInterval=1
autopurge.snapRetainCount=5
Next we specify the Zookeeper ports. In this case, we only have the one so we’ll specify it and comment out the others:
Command:
cat /etc/zookeeper/conf/zoo.cfg | grep server
Expected Result:
# specify all zookeeper servers
server.1=zookeeper1.test:2888:3888
#server.2=zookeeper2:2888:3888
#server.3=zookeeper3:2888:3888
Start Zookeeper
Our configuration is ready, we can start up Zookeeper manually and verify the connections:
Command:
sudo -u zookeeper /usr/share/zookeeper/bin/zkServer.sh start
Expected Result:
ZooKeeper JMX enabled by default
Using config: /etc/zookeeper/conf/zoo.cfg
Starting zookeeper ... STARTED
Verify Installation and Connections
That might look like it’s running, but I’m more of a “trust but verify” person when it comes to software. We can verify Zookeeper is running on the local host with the following three commands. The output will be similar to what you see in the examples below.
First an ruok, which if successful will have Zookeeper return imok if Zookeeper is in good shape:
Command:
echo ruok | nc localhost 2181
Expected Result:
imok
Next up is mntr which will give an output of some statistics:
Command:
echo mntr | nc localhost 2181
Expected Result:
zk_version 3.4.13-5build1--1, built on Tue, 18 Feb 2020 10:26:56 +0100
zk_avg_latency 0
zk_max_latency 0
zk_min_latency 0
zk_packets_received 2
zk_packets_sent 1
zk_num_alive_connections 1
zk_outstanding_requests 0
zk_server_state standalone
zk_znode_count 4
zk_watch_count 0
zk_ephemerals_count 0
zk_approximate_data_size 27
zk_open_file_descriptor_count 29
zk_max_file_descriptor_count 524288
zk_fsync_threshold_exceed_count 0
And then stat for more connection information:
Command:
echo stat | nc localhost 2181
Expected Result:
Zookeeper version: 3.4.13-5build1--1, built on Tue, 18 Feb 2020 10:26:56 +0100
Clients:
 /0:0:0:0:0:0:0:1:55010[0](queued=0,recved=1,sent=0)
Latency min/avg/max: 0/0/0
Received: 3
Sent: 2
Connections: 1
Outstanding: 0
(...etc)
For more information for fine tuning zookeeper based on your environment, see the ZooKeeper Installation and Configuration guide.
Install Altinity Stable
Zookeeper is running, so now we can set up Altinity Stable. I’ll be repeating this process on each of our Altinity Stable nodes. It’s also the same process you can find on the Altinity Stable Builds Deb Install Guide.
Install Prerequisites
Before we install Altinity Stable, we’re going to get some of the necessary prerequisites. It’s also a good idea to make sure your operating system is up to date before you start.
We’ll use `apt-get` to install the necessary software:
sudo apt-get update

sudo apt-get install curl gnupg2 apt-transport-https ca-certificates
Install Altinity Stable from Secure Repo
Altinity Stable can be installed in several different ways, including building directly from the source code for those who are more adventuresome. We’ll use the Altinity Stable Builds repository to save us time.
First we add the build repository to our local deb sources:
sudo sh -c 'mkdir -p /usr/share/keyrings && curl -s https://builds.altinity.cloud/apt-repo/pubkey.gpg | gpg --dearmor > /usr/share/keyrings/altinity-dev-archive-keyring.gpg'

sudo sh -c 'echo "deb [signed-by=/usr/share/keyrings/altinity-dev-archive-keyring.gpg] https://builds.altinity.cloud/apt-repo stable main" > /etc/apt/sources.list.d/altinity-dev.list'
Then we update our apt library so it can pull from the Altinity Builds repository:
sudo apt-get update
Time to install Altinity Stable! We highly recommend that people specify the version of Altinity Stable to install in their environments to ensure maximum compatibility with all of their existing environments and software. So we’ll specify the version, then issue our apt-get install command for clickhouse-common-static, clickhouse-server, and clickhouse-client with the version listed.
version=21.8.13.1.altinitystable

sudo apt-get install clickhouse-common-static=$version clickhouse-client=$version clickhouse-server=$version
Since we’re doing this on a deb package, I was prompted to enter a password during the installation. For this example, we’re going to avoid passwords for the default user. There are ways of setting up a cluster with a shared password, but we’re going to keep this example simple. For more information on locking down the security of ClickHouse, see the ClickHouse Hardening Guide.
Just to make sure there’s no password for the default user, check for the file /etc/clickhouse-servers/users.d/default-password.xml and see if it has the following:
<yandex>
    <users>
        <default>
            <password remove='1' />
            <password_sha256_hex>SOMEHASH</password_sha256_hex>
        </default>
    </users>
</yandex>
If it does, just delete it:
sudo rm /etc/clickhouse-server/users.d/default-password.xml
Restart the clickhouse-server, then log in to verify Altinity Stable is stable.
sudo systemctl restart clickhouse-server

clickhouse-client
ClickHouse client version 21.8.13.1.altinitystable (altinity build).
Password for user (default):
Connecting to localhost:9000 as user default.
Connected to ClickHouse server version 21.8.13 revision 54449.
I’m going to repeat this process two more times for the hosts altinity2.test and altinity3.test.
Configure Altinity Stable for Zookeeper
Now we have our nodes running. zookeeper1.test is ready to zookeep, and altinity1.test, altinity2.test and altinity3.test are setup with basic configurations.
Let’s connect our Altinity Stable nodes to our Zookeeper node. As detailed in the Zookeeper Installation and Configuration page, the best recommendation is to create a new configuration file `/etc/clickhouse-server/config.d/zookeeper.xml` and add the relevant information there.
We only have one Zookeeper node – zookeeper1.test, so we’ll add that to our configuration file as follows. The following settings are the most important ones:
- <zookeeper><node>: There is one <node> entry for each Zookeeper node. We only have one, so that’s all we need here.
- <distributed_ddl><path>: This needs to be unique for each Altinity Stable cluster. We’re only creating one cluster with our three nodes, but if we wanted to we could have different Altinity Stable clusters all using the same Zookeeper.
- <root> and <identity>: For our simple cluster we aren’t specifying a Zookeeper root path or username/password, so we’ll just comment those out.
Note that we don’t have a password for our zookeeper node, so the <identity> section won’t matter. Save this file in each Altinity Stable node as /etc/clickhouse-server/config.d/zookeeper.xml.
<yandex>
    <zookeeper>
        <node>
            <host>zookeeper1.test</host>
            <port>2181</port>
        </node>
        <session_timeout_ms>30000</session_timeout_ms>
        <operation_timeout_ms>10000</operation_timeout_ms>
        <!-- Optional. Chroot suffix. Should exist. -->
        <!-- <root>/path/to/zookeeper/node</root> -->
        <!-- Optional. ZooKeeper digest ACL string. -->
        <!-- <identity>user:password</identity> -->
    </zookeeper>
    <!-- Allow to execute distributed DDL queries (CREATE, DROP, ALTER, RENAME) on cluster. -->
    <!-- Works only if ZooKeeper is enabled. Comment it out if such functionality isn't required. -->
    <distributed_ddl>
        <!-- Path in ZooKeeper to queue with DDL queries -->
        <path>/clickhouse/task_queue/ddl</path>

        <!-- Settings from this profile will be used to execute DDL queries -->
        <!-- <profile>default</profile> -->
    </distributed_ddl>
</yandex>
Macro Settings
We’ll define the <macros> configuration by creating the file for our macros in the file /etc/clickhouse-server/config.d/macros.xml. This sets how the shards and tables will set the paths of where they store the replicated tables. We have three values we care about:
- Cluster: the name of our cluster will be altinitydemo.
- Shard: We have just one shard, so we’ll make that number 1.
- Replica: This value is unique per node, and will be the host name of the node.
For example, altinity1.test becomes:
<yandex>
    <macros>
        <cluster>altinitydemo</cluster>
        <shard>1</shard>
        <replica>altinity1.test</replica>
    </macros>
</yandex>
altinity2.test is:
<yandex>
    <macros>
       <cluster>altinitydemo</cluster>
        <shard>1</shard>
        <replica>altinity2.test</replica>
    </macros>
</yandex>
And so on. Do this for each Altinity Stable node.
Define the Cluster
Part of the config.xml file defines the clusters being used. We’re going to define ours with the file /etc/clickhouse-server/config.d/clusters.xml file, and put a copy on every Altinity Stable node. This allows us to refer to our cluster and have each Altinity Stable node just what we’re talking about:
<yandex>
    <remote_servers>
        <altinitydemo>
            <shard>
                <replica>
                    <host>altinity1.test</host>
                    <port>9000</port>
                </replica>
                <replica>
                    <host>altinity2.test</host>
                    <port>9000</port>
                </replica>
                <replica>
                    <host>altinity3.test</host>
                    <port>9000</port>
                </replica>
            </shard>
        </altinitydemo>
    </remote_servers>
</yandex>
Connection Settings
Each of the clusters have to know how to talk to each other. If you attempt to connect from one host to another, you may get an error like this one:
clickhouse-client --host=altinity1.test
ClickHouse client version 21.8.13.1.altinitystable (altinity build).
Connecting to altinity1.test:9000 as user default.
Code: 210. DB::NetException: Connection refused (altinity1.test:9000)
This is a test environment, so we’ll keep it simple and open up the network communications through the <listen> element. Make one more file /etc/clickhouse-server/users.d/listen.xml and provide the following:
<yandex>
    <listen_host>::</listen_host>
</yandex>
Test the Cluster
If all of our nodes are ready with the configurations, restart them and let’s verify the connections. First restart the nodes:
systemctl restart clickhouse-server
For each cluster, issue the following command to retrieve the clusters that we configured back in the step Define the Cluster. This will list out the cluster altinitydemo and all of the nodes defined in it. Since we defined them by their host name, it will also give us the IP address – which lets us know that each node knows how to find its friends. Here’s my example:
$ clickhouse-client -q "SELECT * FROM system.clusters WHERE cluster='altinitydemo' FORMAT Vertical;"

Row 1:
───────€
cluster:                 altinitydemo
shard_num:               1
shard_weight:            1
replica_num:             1
host_name:               altinity1.test
host_address:            127.0.1.1
port:                    9000
is_local:                1
user:                    default
default_database:
errors_count:            0
slowdowns_count:         0
estimated_recovery_time: 0

Row 2:
───────€
cluster:                 altinitydemo
shard_num:               2
shard_weight:            1
replica_num:             1
host_name:               altinity2.test
host_address:            192.168.1.181
port:                    9000
is_local:                0
user:                    default
default_database:
errors_count:            0
slowdowns_count:         0
estimated_recovery_time: 0

Row 3:
───────€
cluster:                 altinitydemo
shard_num:               3
shard_weight:            1
replica_num:             1
host_name:               altinity3.test
host_address:            192.168.1.228
port:                    9000
is_local:                0
user:                    default
default_database:
errors_count:            0
slowdowns_count:         0
estimated_recovery_time: 0
Before we go on, let’s verify the connections from both the Altinity Stable nodes and Zookeeper. Login into each Altinity Stable node and query the system.zookeeper table:
clickhouse-client -q "select * from system.zookeeper where path='/clickhouse/task_queue/'"
If everything works right, you’ll see a response like this:
ddl 17183334544 17183334544 2019-02-21 21:18:16 2019-02-21 21:18:16 0 8 0 0 0 8 17183370142 /clickhouse/task_queue/
And if for some reason the connect to the Zookeeper node isn’t working, you’ll see something like this instead. If you do, check your connections and setup:
Received exception from server (version 21.8.13):
Code: 60. DB::Exception: Received from localhost:9000. DB::Exception: Table system.zookeeper doesn't exist.
Create a Sample Replicated Table
With our Zookeeper and Altinity Stable servers all talking to each other, let’s make a distributed table and test it out. We’re going to use each of our Altinity Stable nodes to prove that we can create a table from one node, insert data into that table from another, and then retrieve that data from a third.
Create the Table
Log into altinity1.test and create the following table in the default database. Notice the use of bracket fields like {cluster} – we defined those in our macros.xml file, and then defined our cluster in the clusters.xml file. This lets us use this SQL statement on other clusters with different replica configurations. Hooray for macros!
CREATE TABLE test ON CLUSTER '{cluster}'
(
    timestamp DateTime,
    contractid UInt32,
    userid UInt32
) ENGINE = ReplicatedMergeTree('/clickhouse/tables/{cluster}/{shard}/default/test', '{replica}')
PARTITION BY toYYYYMM(timestamp)
ORDER BY (contractid, toDate(timestamp), userid)
SAMPLE BY userid;
Once the table is created, we can see the Zookeeper getting involved when we do a query on from system.zookeeper. We specified the zookeeper path when we declared a ReplicatedMerge Tree. In that command, /clickhouse/tables/{cluster}/{shard}/default/test becomes /clickhouse/tables/altinitydemo/01/default/test:
Command:
select * from system.zookeeper WHERE path = '/clickhouse/tables/altinitydemo/1/default/test'
Expected Result:
alter_partition_version 24402 24402 2022-02-17 19:57:00 2022-02-17 19:57:00 0 0 00 0 0 24402 /clickhouse/tables/altinitydemo/1/default/test
{...more results follow}
Insert and Retrieve
Our table is created from altinity1.test. Let’s give it some data from another node and see that data replicated.
Log into altinity2.test. First we’ll verify that the table structure has been copied over:
altinity2.test :) select hostName(), database, name from clusterAllReplicas(altinitydemo, system.tables) where database='default' and name='test'

SELECT hostName(), database, name FROM clusterAllReplicas(altinitydemo, system.tables) WHERE (database = 'default') AND (name = 'test')

Query id: 424dd7ca-1c57-4dad-9769-18288ddaa0fc

┌─hostName()─┬─database─┬─name─┐
│ altinity2  │ default  │ test │
└───────────┴──────────┴───────┘

┌─hostName()─┬─database─┬─name─┐
│ altinity1  │ default  │ test │
└───────────┴──────────┴───────┘

┌─hostName()─┬─database─┬─name─┐
│ altinity3  │ default  │ test │
└───────────┴──────────┴───────┘
We can see the table has been copied over to all of the nodes in the altinitydemo cluster. Let’s insert some data.
Log into altinity2.test and make an insert:
INSERT INTO test (timestamp, contractid, userid) VALUES (NOW(), 1, 1);
And now let’s log into altinity3.test and retrieve it. If everything works right, then altinity1.test sent the table schema out to be replicated on the other nodes, and the insert from altinity2.test should was also replicated.
From altinity3.test issue our select command. If successful, we should see the insert we made from altinity2.test.
> select * from default.test
2022-02-17 19:57:56 1 1
Success!
Drop the Table
This is an optional step, but if you want to drop the table across the entire cluster, you have to specify the cluster in the DROP TABLE command:
DROP TABLE test ON CLUSTER '{cluster}';Closing
I hope you’ve enjoyed this very brief look into how to manually create an Altinity Stable cluster with Zookeeper. There are other ways to create these clusters, such as our Altinity.Cloud service that turns this whole process into a few clicks, or the Altinity Kubernetes Operator that helps you specify your own cluster for whatever environment you choose without all of the manual work.
Wherever or however you install Altinity Stable, Altinity is ready to help you manage that data in real time so you can succeed. If you have more questions, feel free to check out our Altinity Documentation site. If you have suggestions please submit them to our Knowledge Base so everyone in the Open Source community can benefit.
ClickHouse® is a registered trademark of ClickHouse, Inc.; Altinity is not affiliated with or associated with ClickHouse, Inc.
The create table sql is missing in the blog. Can you please update that?
Hello, great post, just one little issue. “Create the Table” section is missing the actual CREATE TABLE statement. Cheers
They’re in! They didn’t render but the Create Table is now there.
Hi firstly thank you soo much such a great article. Here is the mine too https://medium.com/p/12cfa21daa1a