Cut Compute Costs by Scaling ClickHouse® Servers to Zero on Kubernetes
If you love ClickHouse®, Altinity can simplify your experience with our fully managed service in your cloud (BYOC) or our cloud and 24/7 expert support. Learn more.
Hosts that run Kubernetes pods are expensive, especially for compute-heavy ClickHouse servers. Fortunately, the Altinity Kubernetes Operator for ClickHouse offers a simple way to turn off ClickHouse server pods when they are not in use. It’s a great way to save money on development and business-hours-only ClickHouse clusters that don’t need to run all the time.
In the blog that follows we’ll introduce the stop: yes property. It turns off pods but leaves storage intact, ready for use when you restart the pod. We will also dig into separation of storage and compute, which enables the cost-saving magic. Once you set this up, Kubernetes worker nodes will disappear when you stop the cluster and pop up again when you start it. That’s when you start to save actual money.
The examples for this article use AWS EKS 1.23 with Karpenter v0.22.1 and Altinity ClickHouse Operator version 0.21.2. Code samples are available here on GitHub. They work with any version of ClickHouse.
Stopping and starting ClickHouse servers on Kubernetes
Let’s start by creating a single node ClickHouse cluster. Here’s an example YAML file named chi-generic-00.yaml.
apiVersion: "clickhouse.altinity.com/v1"
kind: "ClickHouseInstallation"
metadata:
  name: "generic"
spec:
  configuration:
    clusters:
      - name: "ch"
        layout:
          replicasCount: 1
          shardsCount: 1
        templates:
          volumeClaimTemplate: storage
          podTemplate: replica
  templates:
    podTemplates:
      - name: replica
        spec:
          containers:
          - name: clickhouse
            image: altinity/clickhouse-server:23.3.8.22.altinitystable
    volumeClaimTemplates:
      - name: storage
        reclaimPolicy: Retain
        spec:
          accessModes:
            - ReadWriteOnce
          resources:
            requests:
              storage: 10Gi
Apply the file on any Kubernetes cluster with a working ClickHouse operator as follows:
kubectl apply -f chi-generic-00.yaml
After a few seconds you’ll see a singleClickHouse server node with resources like the following.
OK, let’s stop the node. We can do that by adding the stop property to the YAML file as shown below.
apiVersion: "clickhouse.altinity.com/v1"
kind: "ClickHouseInstallation"
metadata:
name: "generic"
spec:
stop: "yes"
configuration:
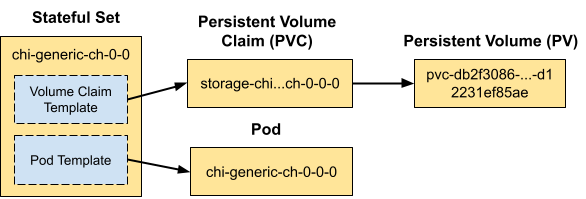
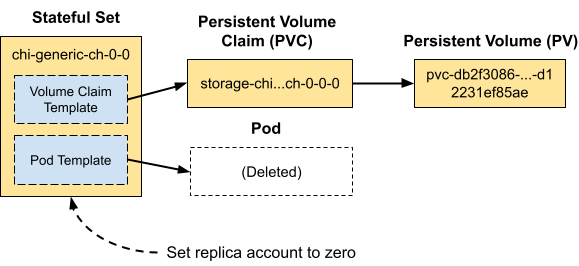
clusters:Apply the new definition using kubectl -f and wait a few seconds. If you look for the server pod chi-ch-generic-0-0-0 it’s now gone! The Altinity operator does this by setting the replicas for stateful set chi-ch-generic-0-0 to 0. Here is a picture to illustrate what happens.
We can confirm this by extracting the replica count from the stateful set using kubectl combined with the jq command, which selects json values.
$ kubectl get statefulset/chi-generic-ch-0-0 -o json |jq .spec.replicas
0
Let’s now get our pod back. All we do is change the stop property to “no,” as shown in the snippet, and the pod will promptly reappear. You can also remove the property from the file entirely, which will cause the value to default back to “no”.
apiVersion: "clickhouse.altinity.com/v1"
kind: "ClickHouseInstallation"
metadata:
  name: "generic"
spec:
  stop: "no"
  configuration:
    clusters:
Apply this change and the pod will reappear. You can run the kubectl | jq command again yourself. It will show that the number of replicas is set to 1.
Separating Compute and Storage for ClickHouse
The commands shown above work on any Kubernetes instance. However, there is a little more work to free billed resources like VMs. Pods run on worker nodes, but stopping a pod does not guarantee Kubernetes will stop the worker node itself and free the VM. For that we need to be more scientific about allocating pods to specific cloud VM types, which we can do by implementing separation of compute and storage.
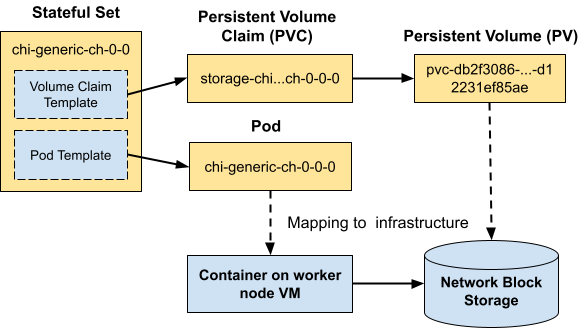
Our examples run on Amazon EKS, which is a managed Kubernetes service. We’ll put the database storage on EBS, which is block storage that attaches to the VM over its own network. EBS volumes can persist independently when the VM is gone, and you can move them from one VM to another. Every cloud vendor has a similar feature–on Google Cloud this would be called Persistent Disk.
Here’s a picture showing how Kubernetes maps resources to compute and storage.
To implement full separation of compute and storage on EKS we’ll need two things in place.
The first is a configured CSI driver that can allocate EBS storage. This is necessary to use EBS for any purpose, not just for separation of storage and compute. If you do not have the driver set up, follow this link to EBS CSI driver installation instructions. Make sure that EBS is the default storage type.
The second is a way to provision new Kubernetes worker nodes automatically on specific VM types and release them when they are no longer needed. For that we’ll use Karpenter. Let’s briefly digress to explore how it works.
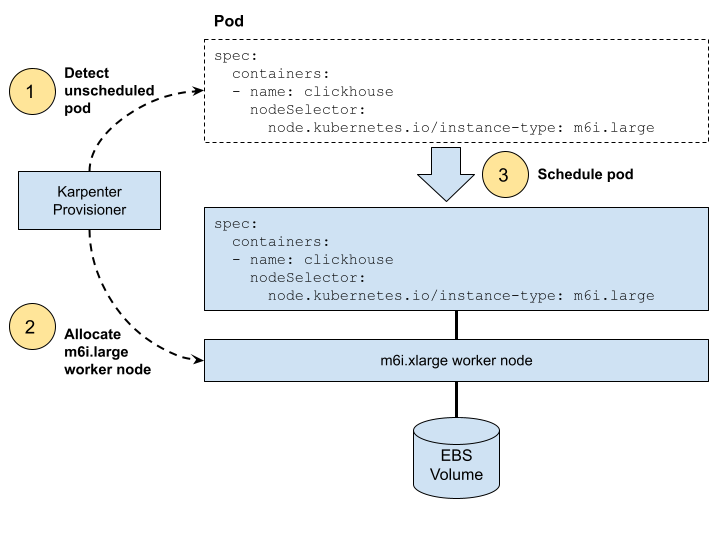
Karpenter watches for pods that Kubernetes cannot schedule due to missing resources. It automatically adds Kubernetes worker nodes that meet the pod requirements. It also drops worker nodes when pods no longer need them. Karpenter is fast and easy to use. Here’s a picture that shows the steps to allocate a worker node for a pod. Karpenter takes care of the first two steps, then Kubernetes schedules the pod on it in step 3.
You can install Karpenter on EKS using the installation procedure. Add Karpenter to your Kubernetes cluster now, if it is not already there.
Allocating and Deallocating Worker Nodes with the stop property
With Karpenter in place, we can now create a new example that allocates AWS VMs automatically for our ClickHouse cluster. Here’s the YAML file from example file chi-aws-00.yaml. We have added two extra clauses. The nodeSelector clause uses a Kubernetes well-known label to specify the VM type our cluster needs. The podDistribution clause is an Altinity ClickHouse operator feature that prevents more than one ClickHouse from scheduling on each worker.
apiVersion: "clickhouse.altinity.com/v1"
kind: "ClickHouseInstallation"
metadata:
  name: "aws"
spec:
  configuration:
    clusters:
      - name: "ch"
        layout:
          replicasCount: 1
          shardsCount: 1
        templates:
          volumeClaimTemplate: storage
          podTemplate: replica
  templates:
    podTemplates:
      - name: replica
        podDistribution:
          - type: ClickHouseAntiAffinity
            scope: ClickHouseInstallation
        spec:
          containers:
          - name: clickhouse
            image: altinity/clickhouse-server:23.3.8.22.altinitystable
          nodeSelector:
            node.kubernetes.io/instance-type: m6i.large
    volumeClaimTemplates:
      - name: storage
        reclaimPolicy: Retain
        spec:
          accessModes:
            - ReadWriteOnce
          resources:
            requests:
              storage: 10Gi
Let’s apply the new definition using kubectl apply -f. If everything is set up properly, you’ll see the new cluster pop up with its pod after Kubernetes allocates a worker on a m6i.large VM. Moreover, if you look at the cluster nodes you’ll see that there is a new m6i.large node. Here’s a slightly horrendous kubectl command to check your node VM types.
(Completely off topic: wouldn’t it be great if kubectl could accept SQL queries?)
$ kubectl get nodes -o=custom-columns=NodeName:.metadata.name,AZ:.metadata.labels.'topology\.kubernetes\.io\/zone',InstanceType:.metadata.labels.'node\.kubernetes\.io\/instance-type',vCPU:.metadata.labels.'karpenter\.k8s\.aws\/instance-cpu',RAM:.metadata.labels.'karpenter\.k8s\.aws\/instance-memory'
NodeName       AZ           InstanceType   vCPU     RAM
<hostname>     us-west-2b   m5.large       2        8192
<hostname>     us-west-2a   m5.2xlarge     8        32768
<hostname>     us-west-2d   m6i.large      2        8192
. . .
Let’s repeat the process of adding the stop: “yes” property to our example and apply the changes.
apiVersion: "clickhouse.altinity.com/v1"
kind: "ClickHouseInstallation"
metadata:
  name: "aws"
spec:
  stop: "yes"
  configuration:
Apply the change with kubectl and your pod will disappear as in the previous example. If you wait a minute and then check the worker nodes, you’ll see the m6i.instance has disappeared as well.
$ kubectl get nodes -o=custom-columns=NodeName:.metadata.name,AZ:.metadata.labels.'topology\.kubernetes\.io\/zone',InstanceType:.metadata.labels.'node\.kubernetes\.io\/instance-type',vCPU:.metadata.labels.'karpenter\.k8s\.aws\/instance-cpu',RAM:.metadata.labels.'karpenter\.k8s\.aws\/instance-memory'
NodeName       AZ           InstanceType   vCPU     RAM
<hostname>     us-west-2b   m5.large       2        8192
<hostname>     us-west-2a   m5.2xlarge     8        32768
We’ll leave bringing the pod back as an exercise for the reader. Assuming it works you have successfully implemented separation of storage and commute. You are now in a fair way to save real money.
Conclusion
We’ve just shown how to stop ClickHouse pods using the stop: "yes" property. This turns off cluster compute by setting the stateful set rep replicas to 0. Setting stop: "no" brings the pod back again. With proper setup, Kubernetes will allocate and deallocate worker nodes as you change the stop setting. This means that VMs go away when you turn off the cluster, saving you money.
The magic that makes this work is separation of storage and compute. By using cloud block storage with a provisioner like Karpenter, we can create the equivalent of Snowflake Virtual Data Warehouses, only using ClickHouse.
The Altinity Kubernetes Operator for ClickHouse supports many other great tricks that let you save money while maintaining great performance for analytics. We’ll continue to share them in future articles.
Finally, if you like the sound of what you read here but would like someone else to run it for you, try Altinity.Cloud. The feature we described in this article is called an Uptime Schedule. Uptime schedules turn off ClickHouse clusters on a schedule or after they are idle for a while. It’s one of my favorite features, because I always forget to turn off my development clusters. Start a trial today to see it in action!
About The Author
Robert Hodges has worked on database systems since 1983. During that time, he has worked on 20 different DBMS types. His technical interests include data, distributed systems, virtualization technology, and security. He is currently CEO of Altinity.
ClickHouse® is a registered trademark of ClickHouse, Inc.; Altinity is not affiliated with or associated with ClickHouse, Inc.