Using Altinity.Cloud to Log Sensor Data with ClickHouse® Endpoints
Believe that a further shore is reachable from here…
But keep your eye on the temperature and pressure.
-Seamus Heaney, The Cure at Troy
In an earlier blog post, we demonstrated how ClickHouse Endpoints can simplify your applications. The examples there exposed ClickHouse queries as REST endpoints, letting authenticated users run those queries and get the results without any knowledge of the queries themselves.
Those examples only used the GET verb. In this blog post, we’ll take a look at invoking a ClickHouse endpoint with a POST request. ClickHouse will take the data from the POST request and use it in an INSERT statement. Our scenario is that we have a BME680 temperature sensor attached to a single-board computer (SBC). There could be many of these devices in, for example, a warehouse. Each device can read its sensor and put together a POST request with the data from the sensor.
We tested the code on three devices: a Raspberry Pi Model 4B with 8GB RAM, a Raspberry Pi Zero 2 W, and a Raspberry Pi Pico W. The Raspberry Pis are SBCs that run Linux, while the Raspberry Pi Pico W is a microcontroller that runs MicroPython.
See the appendix for a list of the hardware we used.
Photos of These Machines at Work
To whet your appetite, we’ll look at pictures of these machines reading the sensor and sending data to ClickHouse. For the Raspberry Pis, your author configured ssh when burning the system image onto the Micro SD card so no keyboard, mouse, or monitor would be needed to work with the machine. The only thing plugged into the boards is the power supply.
Here’s the setup on a Raspberry Pi 4 Model B:
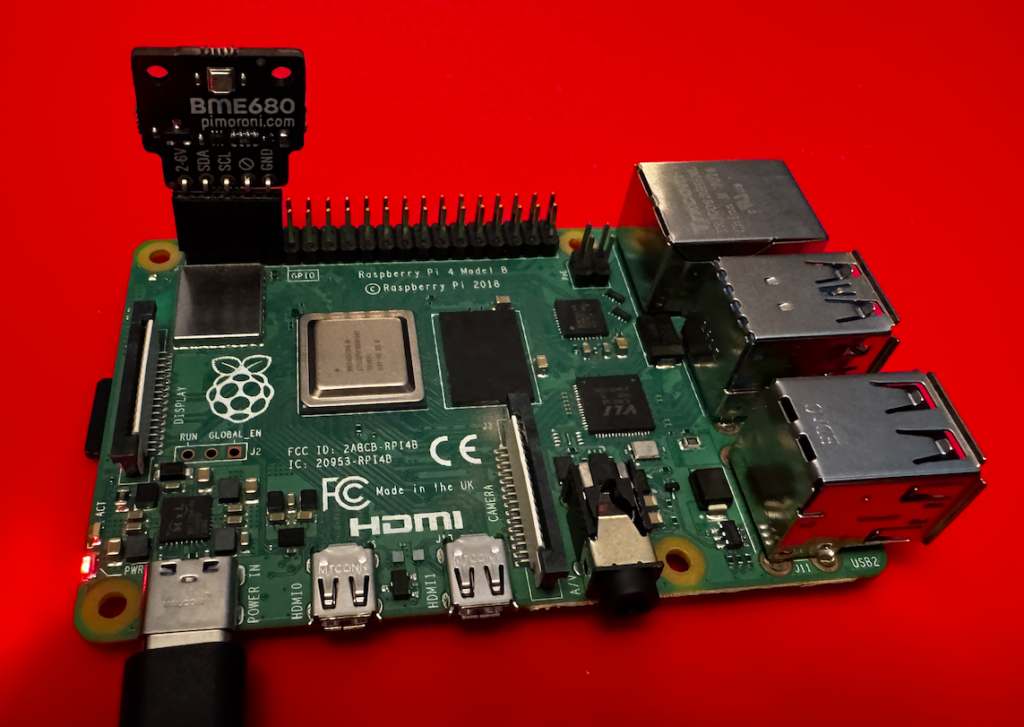
Figure 1. A Raspberry Pi 4B with a BME680 sensor attached
This features the Pimoroni BME680 breakout board with right-angle female headers. The Pimoroni board matches the pinouts for the Raspberry Pi, making it easy to connect.
The Pi Zero 2 W is similar, just smaller:
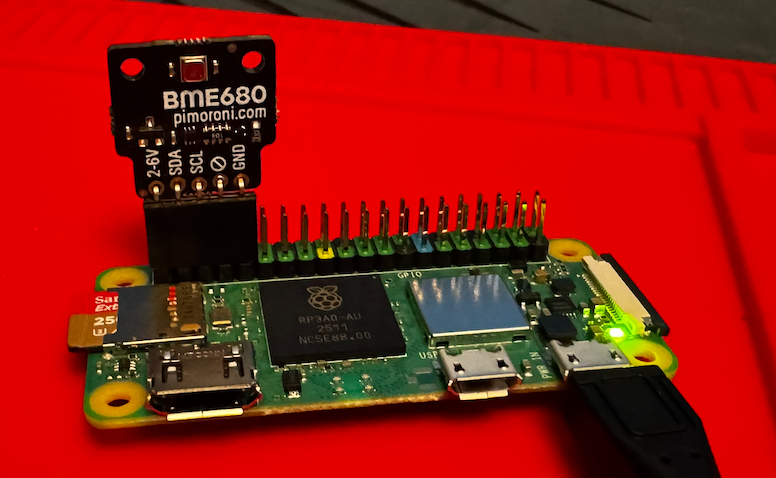
Figure 2. A Raspberry Pi Zero 2 W with a BME680 sensor attached
These two machines run the same code. As a final example, here’s a Raspberry Pi Pico W microcontroller inserting data into ClickHouse:
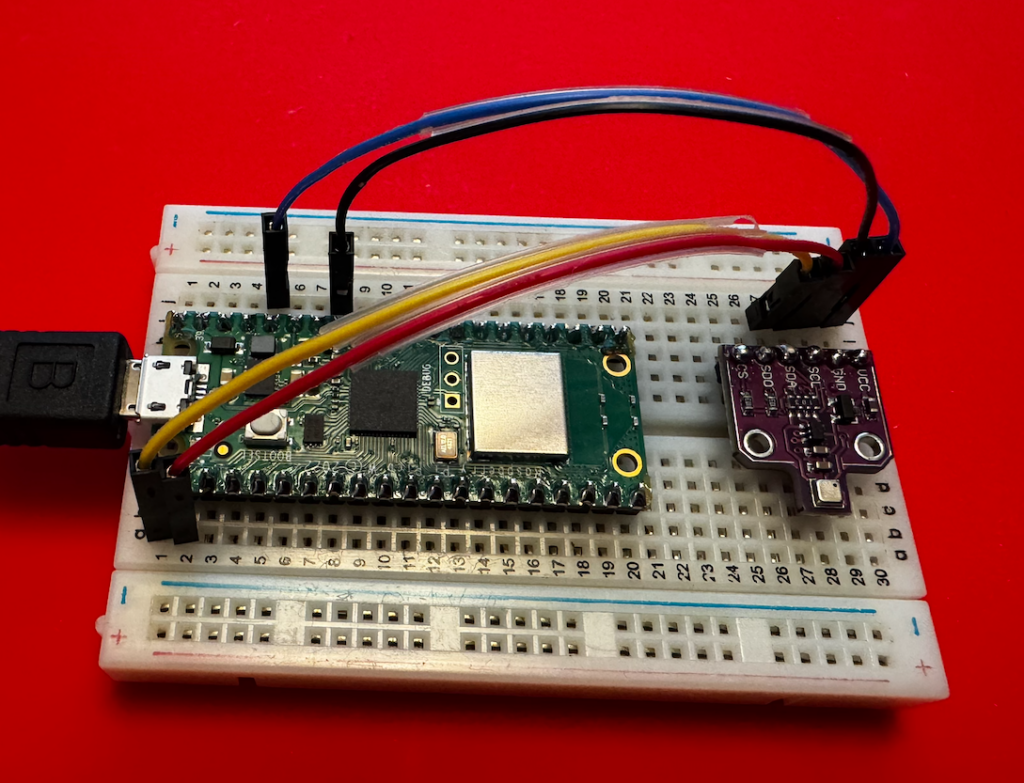
Figure 3. A Raspberry Pi Pico W wired to a BME680 sensor on a breadboard
The Pico doesn’t have an SD card, and it doesn’t run Linux; it runs MicroPython in its 264KB of RAM and 2MB of flash storage. (Yes, those numbers are kilobytes and megabytes.) When you power it on, it looks for main.py and runs it. And here we’re using a different breakout board for the BME680, with jumper wires connecting the correct pins from the Pico to the sensor.
But First…
We’ll look at how to set up the machines and run the code on them, but first we need a ClickHouse cluster and database and endpoint to store the data. So:
- If you don’t have an Altinity.Cloud account already, sign up for a free trial.
- Once you have an account, create a new ClickHouse cluster.
Creating Our Sample Database
Before we can create an API endpoint to our ClickHouse cluster, we need to create the database. Run this command to create it:
CREATE DATABASE IF NOT EXISTS maddie ON CLUSTER '{cluster}';
Now create the table:
CREATE TABLE maddie.sensor_data ON CLUSTER '{cluster}'
(
    time_stamp DateTime64(3),
    temp Float32,
    humidity Float32,
    pressure Float32,
    sensor String
)
ENGINE = ReplicatedMergeTree('/clickhouse/{cluster}/tables/maddie/sensor_data', '{replica}')
ORDER BY tuple()
SETTINGS index_granularity = 8192;
With the database in place, we’ll define a ClickHouse endpoint for our code to insert data.
Creating an Endpoint in the ACM
The API Endpoints tab is in the ACM’s Cluster Explorer. We’ll look at the UI of the endpoint editor to show you how easy it is to work with endpoints. When you open the tab for the first time, you’ll see this:

Figure 4. No ClickHouse endpoints defined
Clicking the + ENDPOINT button takes you to the endpoints editor:
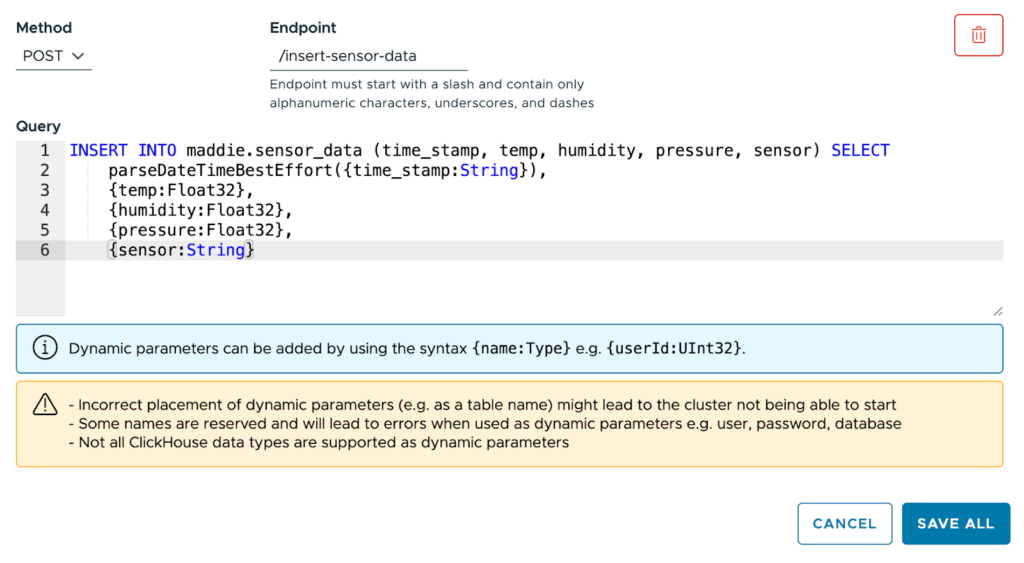
Figure 5. Defining a new ClickHouse endpoint
Select the POST method, name the endpoint /insert-sensor-data, and paste this statement into the text box:INSERT INTO maddie.sensor_data (time_stamp, temp, humidity, pressure, sensor) SELECT
parseDateTimeBestEffort({time_stamp:String}),
{temp:Float32},
{humidity:Float32},
{pressure:Float32},
{sensor:String}
Our INSERT statement has five parameters: time_stamp, temp, humidity, pressure, and sensor. The temp, humidity, and pressure parameters are all Float32; those values come directly from the sensor. The sensor parameter, a String, is the name we give to the sensor to distinguish it from other sensors.
Click SAVE ALL and you’ll have an endpoint:
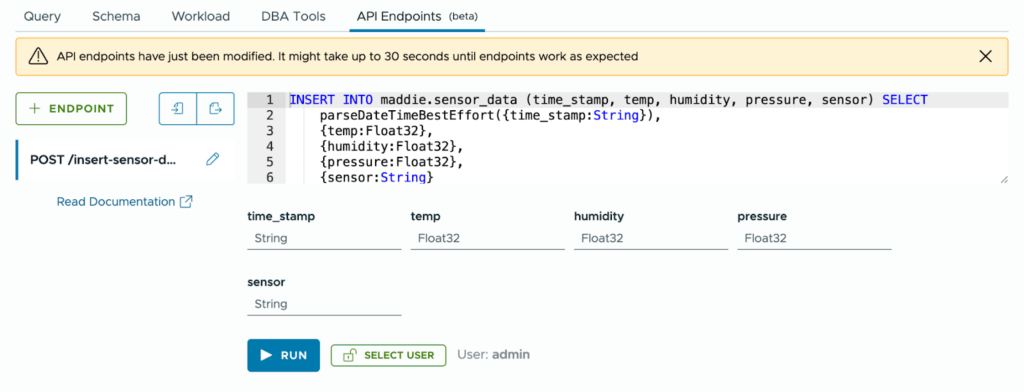
Figure 6. The new endpoint is defined
You’ll see a message that lets you know that the API endpoint isn’t fully configured inside ClickHouse:
Figure 7. The endpoint isn’t ready
When the message disappears, you’re ready to go. The editor gives you entry fields for all of the parameters in the query. Here we can fill in five values and test the endpoint to make sure it works :
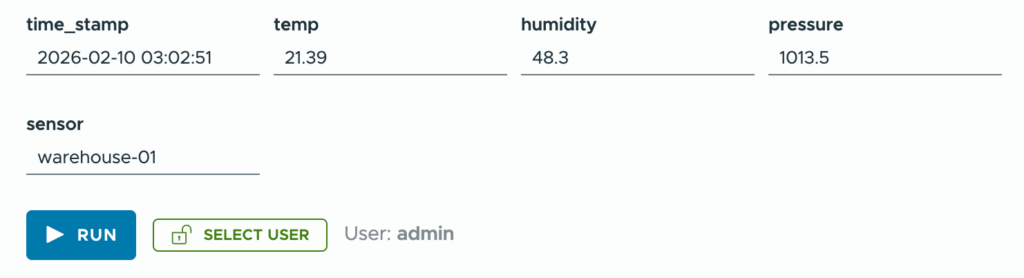
Figure 8. Testing the endpoint
Enter some test values and click the RUN button. If the post works, you’ll get nothing:
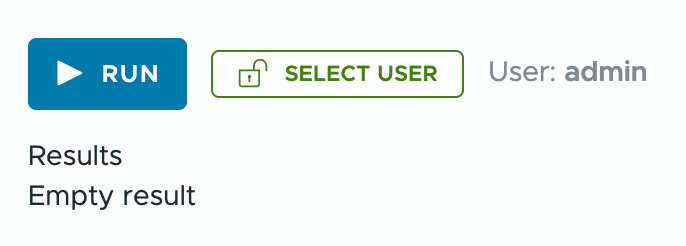
Figure 9. Empty result = success
It’s a POST, after all, so you shouldn’t get any results unless something goes wrong. And here we’re running the query as user admin; you can also run the query as another user. That’ll be useful when we talk about access control later.
You can go to the Query tab of the Cluster Explorer to make sure the new data is in the database:
SELECT * FROM maddie.sensor_data;
   ┌──────time_stamp─────────┬──temp─┬─humidity─┬─pressure─┬───sensor─────┐
1. │ 2026-02-10 03:02:51.000 │ 21.39 │     48.3 │   1013.5 │ warehouse-01 │
   └─────────────────────────┴───────┴──────────┴──────────┴──────────────┘
We’ve tested the endpoint from within the ACM; let’s also test it with curl. First of all, we need the URL of our ClickHouse cluster. There’s a Connection Details link in the ACM:
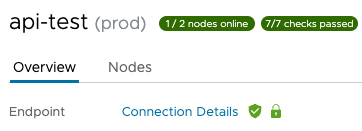
Figure 10. The Connection Details link
Clicking the link brings up this dialog:
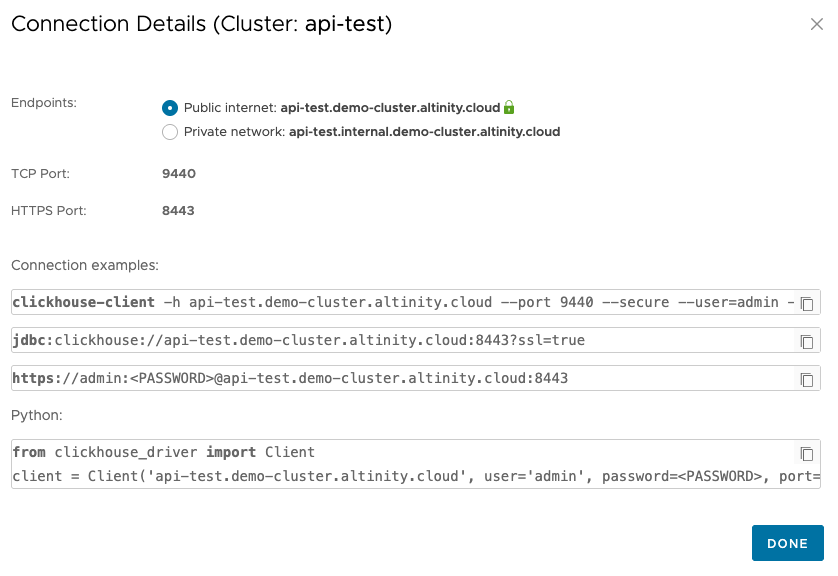
Figure 11. The URL for our ClickHouse cluster
Based on this example, the URL is https://api-test.demo-cluster.altinity.cloud:8443/insert-sensor-data. (See the Cluster Connection Details documentation if you need more information.) To test your endpoints, substitute your cluster’s URL and your username and password to run this command:
curl -X POST \
"https://api-test.demo-cluster.altinity.cloud:8443/insert-sensor-data?time_stamp=2026-02-19%2012:30:45&temp=22.53&humidity=45.29&pressure=1013.25&sensor=curl-test" \
  -u "demouser:demopassword" \
  -H "Content-Length: 0"
If this works, you won’t get any response at all. As above, you can make sure it worked on the Query tab:
SELECT * FROM maddie.sensor_data WHERE sensor = 'curl-test'
   ┌─────────────time_stamp──┬──temp─┬─humidity─┬─pressure─┬─sensor────┐
1. │ 2026-02-19 12:30:45.000 │ 22.53 │    45.29 │  1013.25 │ curl-test │
   └─────────────────────────┴───────┴──────────┴──────────┴───────────┘
Moving on to the Hardware
Now we’ve set up our database, created our API endpoint, and we’ve made sure everything works. Let the fun begin! We’ll set up the Raspberry Pi next; skip ahead to the Raspberry Pi Pico section if that’s your hardware platform.
Setting Up the Raspberry Pi
You’ll need a power supply and a micro SD card, of course. Burn the card image in the Raspberry Pi imager:
- Select your device type, then use the recommended OS: Raspberry Pi OS (64-bit), which is a port of Debian Trixie.
- Create the user
demouserwith a password ofdemopassword. (Creating a user with that username and password on the ClickHouse cluster makes things simpler.) - Enter your SSID and password so the Pi connects to wifi automatically whenever it boots.
- Enable SSH with password authentication. This makes things easier, because we can use the Raspberry Pi without a keyboard, mouse, or monitor.
- There’s no need to enable Raspberry Pi Connect.
- With those options set, burn the image to the SD card.
Once your micro SD card is ready, insert it into your Raspberry Pi and power it up. When your RaspberryPi is up and running, SSH into it and update the system:sudo apt update
sudo apt upgrade -y
Next, configure the I2C interface:sudo raspi-config
Navigate through the menus:
- Select option 3: Interface Options → Enter
- Select option I5: I2C → Enter
- Would you like the ARM I2C interface to be enabled? → Select Yes → Enter
- Press Enter at the confirmation message
- Tab to Finish → Enter
Now restart the system:sudo reboot
When the system is back, install the Python tools and other things we’ll need to work with the I2C interface (they may be installed already, but this will make sure they are):sudo apt install -y python3-pip python3-venv git i2c-tools
Now we need to connect the sensor to the Raspberry Pi
Wiring Up the BME680
Wire the BME680 to the Raspberry Pi like this:
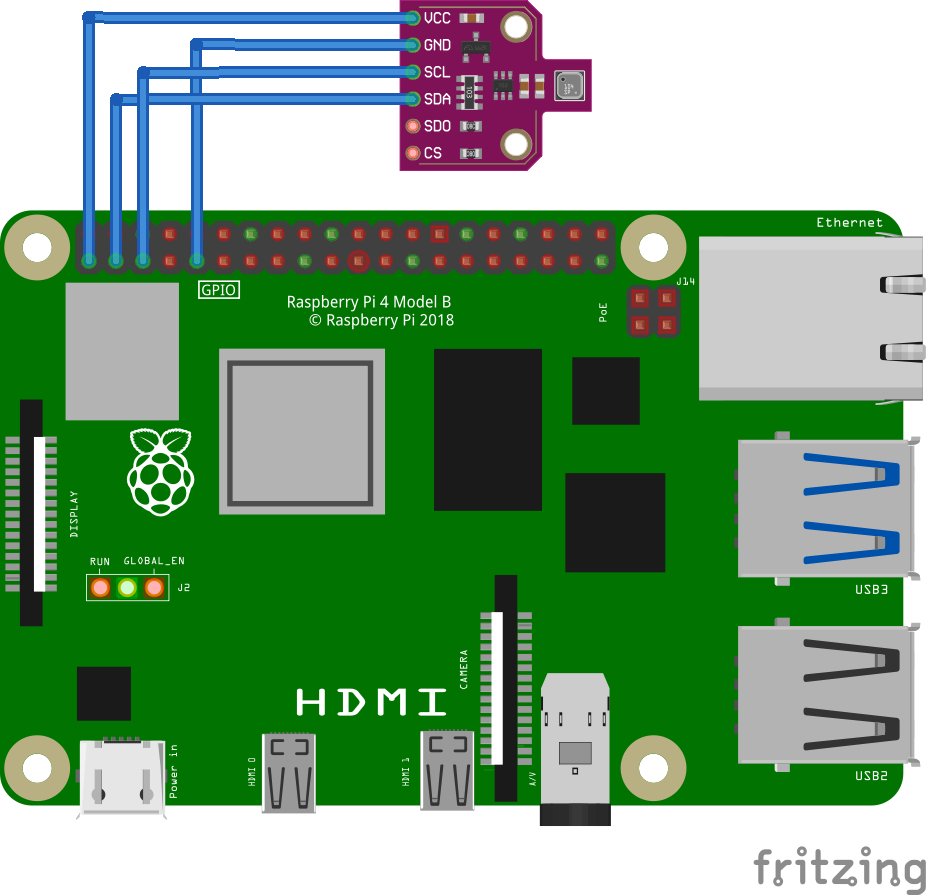
Figure 12. Pinouts for the Raspberry Pi and the BME680
The pinouts are (they’re the same for all Raspberry Pi models since at least 2014):
| BME680 pin | Raspberry Pi pin |
|---|---|
Power in (3.3V, NOT 5V) – labeled VCC on the generic board shown in Figure 12, labeled 2-6V on the Pimoroni breakout board, and labeled VIN on the Adafruit breakout board | 1 |
SDA or SDI | 3 |
SCL or SCK | 5 |
| Ground (you can use any of the Raspberry Pi’s eight ground pins, but pin 9 is the most convenient) | 9 |
NOTE: The Adafruit breakout board uses SPI terminology (SDI and SCK) instead of I2C. It also has pins labeled SDO and CS; leave those disconnected.
With the BME680 wired up, run i2cdetect -y 1 to make sure it’s detected by the system:i2cdetect -y 1
0 1 2 3 4 5 6 7 8 9 a b c d e f
00: -- -- -- -- -- -- -- –
10: -- -- -- -- -- -- -- -- -- -- -- -- -- -- -- –
20: -- -- -- -- -- -- -- -- -- -- -- -- -- -- -- –
30: -- -- -- -- -- -- -- -- -- -- -- -- -- -- -- –
40: -- -- -- -- -- -- -- -- -- -- -- -- -- -- -- –
50: -- -- -- -- -- -- -- -- -- -- -- -- -- -- -- –
60: -- -- -- -- -- -- -- -- -- -- -- -- -- -- -- –
70: -- -- -- -- -- -- 76 –
The BME680 should appear on slot 76 or 77. If all you see are double dashes (--), unwire the BME680 immediately. Especially if the BME680 is so hot you can barely touch it. (A moment of silence, please, for the sensor your author managed to wire up incorrectly. May it rest in peace.)
Installing the Code
To start, clone the example repo:git clone https://github.com/altinity/examples
Switch to the examples/bme680_clickhouse_demo/raspberry_pi directory. Set up the Python virtual environment and activate it: python -m venv venv
source venv/bin/activate
Once the environment is active, the command-line prompt should start with (venv):(venv) demouser@pizero-2w:~/examples/bme680_clickhouse_demo/raspberry_pi $
BTW, you can make sure you don’t have to call the source command again with this command:echo 'source ~/examples/bme680_clickhouse_demo/venv/bin/activate' >> ~/.bashrc
Next, make sure pip is up-to-date:pip install --upgrade pip
The requirements.txt file tells pip exactly what we need, so use it to set up our dependencies:pip install -r requirements.txt
Before we run the script that posts data to ClickHouse, run python test_bme680.py to make sure it’s actually working. Running python test_bme680.py writes the sensor data to the console every 3 seconds:Polling sensor (Ctrl+C to exit)
Temp: 27.57°C
Pressure: 1003.43 hPa
Humidity: 17.43%
------------------------------
Temp: 27.56°C
Pressure: 1003.42 hPa
Humidity: 17.43%
------------------------------
Temp: 27.55°C
Pressure: 1003.43 hPa
Humidity: 17.44%
------------------------------
^C
Exiting…
Type Ctrl+C to exit the script.
Configuring and Running the Code
At this point, the Raspberry Pi and the BME680 are working together. The script that reads the sensor and POSTs it to our ClickHouse endpoint is sensor_to_clickhouse.py. We need to configure it with our username, password, and the URL of our endpoint. First, copy .env.example to .env and set your username and password:# ClickHouse Credentials
# Copy this file to .env and fill in your actual credentials
CLICKHOUSE_USERNAME=your_username_here
CLICKHOUSE_PASSWORD=your_password_here
(Worry not, the repo contains a .gitignore file that makes sure you won’t accidentally commit the .env or config.json files.)
Now copy config.json.example to config.json and edit it to include your endpoint’s URL:{
"endpoint_url": "https://api-test.demo-cluster.altinity.cloud:8443/insert-sensor-data",
"sample_interval": 60,
"sensor_name": "warehouse-01",
"log_to_console": true,
"temp_adjustment": 0.0
}
Make sure endpoint_url ends with /insert-sensor-data, the name of the endpoint we defined in the ACM.
There are other parameters:
sample_interval– how many seconds between readingssensor_name– whatever you’d like to call this sensorlog_to_console– set to false if you don’t want to see console messages every time the script sends data to the endpointstemp_adjustment– lets you adjust the temperature reading by some number of degrees Celsius. Depending on how you have the sensor wired to the Raspberry Pi and what model of Raspberry Pi you’re using, heat from the Raspberry Pi may skew the temperature readings.
Everything is ready, so let’s run python sensor_to_clickhouse.py to start writing data to ClickHouse:
Sensor Logger initialized successfully!
Endpoint: https://api-test.demo-cluster.altinity.cloud:8443/insert-sensor-data
Sample interval: 60 seconds
Sensor: warehouse-01
Temperature offset: 0.0
Starting sensor data collection...
Press Ctrl+C to stop

✓ Data sent successfully at 2026-02-20 15:10:11
  Temp: 25.19°C (raw: 25.19°C), Humidity: 30.01%, Pressure: 990.13 hPa
✓ Data sent successfully at 2026-02-20 15:11:17
  Temp: 25.21°C (raw: 25.21°C), Humidity: 30.0%, Pressure: 990.13 hPa
^C

Stopping sensor logger...
Goodbye!
Hurrah! We’ve successfully configured the hardware and software we need to write data to ClickHouse through our API endpoint. There are some things we should do to keep everything secure, however. You can skip past the Raspberry Pi Pico section for the details.
Setting Up the Raspberry Pi Pico
You’ll need a micro USB cable to connect the Pico to your PC. To start, we need to flash the MicroPython runtime to the Pico. Insert the micro USB cable into the Pico, hold down the Pico’s BOOTSEL button, then plug the other end of the cable into your machine. The Pico will show up on your desktop as a new USB flash drive:
Figure 13. The Pico shows up as a flash drive
Go to the MicroPython Pico W site and download the latest version of the .uf2 file for the Pico W. Copy that file to the flash drive that represents the Pico. When that file is copied, the Pico will install MicroPython and reboot. The Pico is now initialized, so we’re ready to wire up the sensor.
Wiring Up the BME680
Put the Pico and the sensor breakout board on a breadboard and wire them up like this:

Figure 14. Pinouts for the Raspberry Pi Pico and the BME680
NOTE: The pinouts on the Raspberry Pi Pico are numbered differently from Linux-based Raspberry Pis. Here’s how the pins are numbered:
| Raspberry Pi Pico | Raspberry Pi |
|---|---|
1 40etc. | 1 2etc. |
With that in mind, wire up the BME680 as shown in Figure 13 above:
| BME680 pin | Raspberry Pi Pico pin |
|---|---|
SDA or SDI | 1 |
SCL or SCK | 2 |
| Ground | 33 |
Power in (3.3V, NOT 5V) – labeled VCC on the generic board shown in Figure 13, 2-6V on the Pimoroni breakout board, and VIN on the Adafruit breakout board | 36 |
NOTE: The Adafruit breakout board uses SPI terminology (SDI and SCK) instead of I2C. It also has pins labeled SDO and CS; leave those disconnected.
Now it’s time to get the code running on the Pico.
Installing the Code
To start, clone the example repo:git clone https://github.com/altinity/examples
Switch to the examples/bme680_clickhouse_demo/raspberry_pi_pico directory.
There are a couple of ways to install the code on the Pico; here we’ll focus on Thonny, an IDE that works with microcontrollers. (There are other ways to copy files; see the raspberry_pi_pico/SETUP.md file for the details.) When you install it, you’ll see something like this:
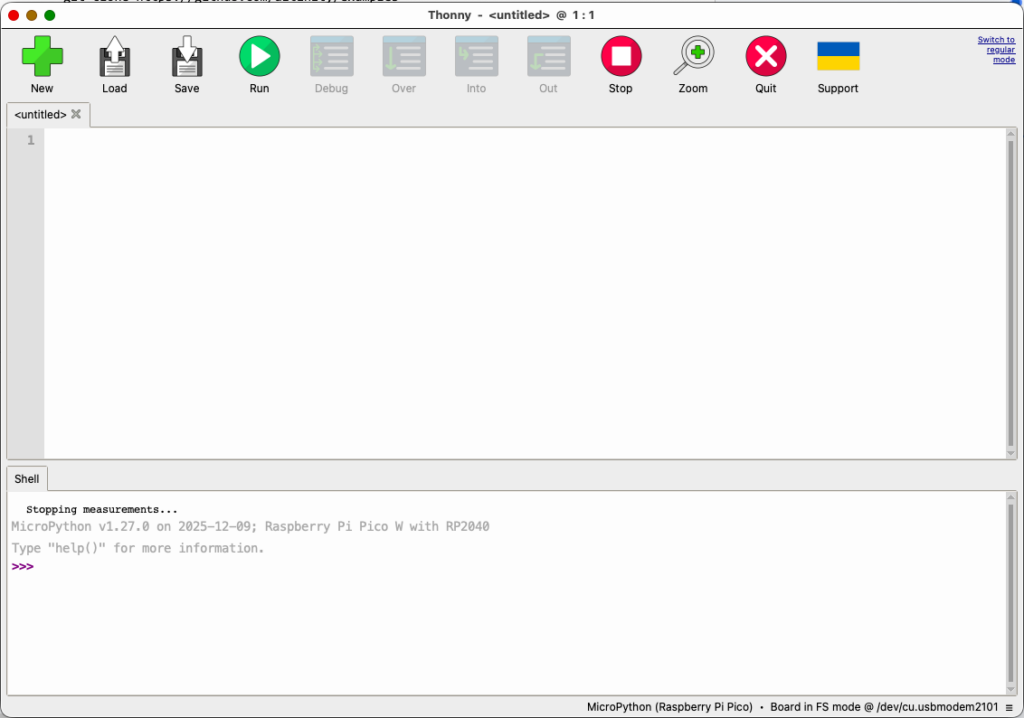
Figure 15. The Thonny IDE
Click the list of devices in the lower right corner of the window and select the Pico:
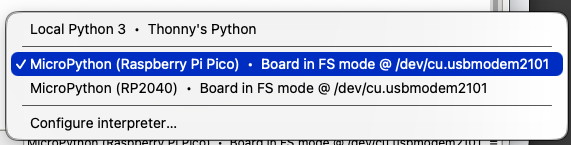
Figure 16. Connecting to the Pico
Click the View → Files menu item to open the Files tab. Navigate to the examples/bme680_clickhouse_demo/raspberry_pi_pico directory. Right-click on the file main.py, then choose Upload to /:
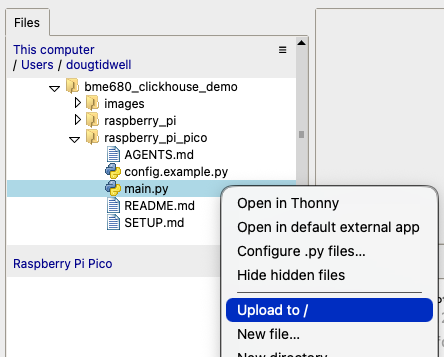
Figure 17. Uploading the code to the Pico
The Python script uses the bme680.py module. Download the latest version of bme680.py from the BME680-Micropython repo onto your machine, then use the same process to copy it to the Pico. The script and the BME680 library should be on the Pico:
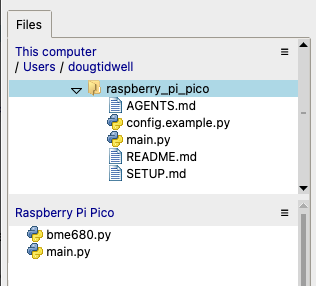
Figure 18. The main script and the sensor library are on the Pico
Configuring and Running the Code
The main script tries to load your configuration details from a file named config.py. (The project’s .gitignore file ensures that your config.py file will never be committed.) Double-click on the config.example.py file in the Raspberry Pi Pico section of the Files tab. That will open the sample configuration file in the IDE:
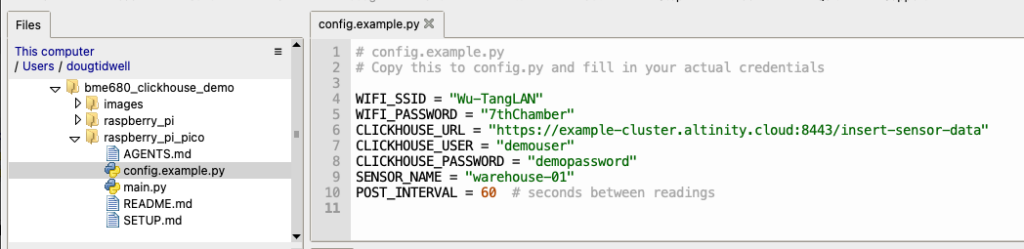
Figure 19. The sample configuration file
We need to save a copy of this file as config.py. Click the File → Save As… menu. You’ll be asked where you want to save the file:
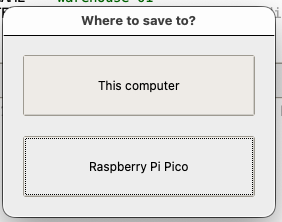
Figure 20. Thonny asks where you want to save the file
Click Raspberry Pi Pico, then save the file as config.py:
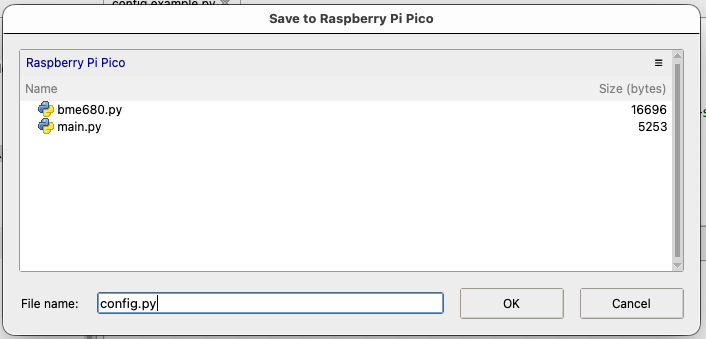
Figure 21. Saving the sample configuration file on the Pico
Edit config.py and enter the correct parameters for your environment:
# ============ CONFIGURATION ============
WIFI_SSID = "Wu-TangLAN"
WIFI_PASSWORD = "7thChamber"
CLICKHOUSE_URL = "https://example-cluster.altinity.cloud:8443/insert-sensor-data"
CLICKHOUSE_USER = "demouser"
CLICKHOUSE_PASSWORD = "demopassword"
SENSOR_NAME = "warehouse-01"
POST_INTERVAL = 60  # seconds between readings
When you’ve configured them correctly, click the Save button. Now double-click main.py in the Raspberry Pi Pico section of the files tab. Click Run. You can watch the action in the Shell tab:
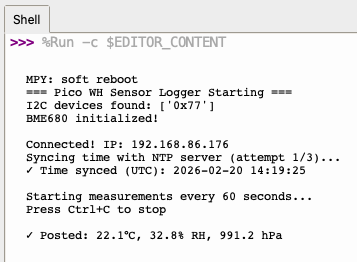
Figure 22. The Pico successfully initializing and writing data to ClickHouse
Figure 22 is nothing but good news! The script found the BME680, connected to wifi, set the system time, then posted a reading to ClickHouse. (Without setting the system time, the Pico defaults to January 1, 2021.) Thonny makes it easy to get the code on the Pico, and you have a console that lets you diagnose any problems. Once the code is working, you can disconnect the Pico from your machine. There’s no need to connect the Pico to your machine again; anytime it’s powered up, the Pico finds main.py and runs it. Figure 23 shows the Pico running on battery power, with no other computer in sight:
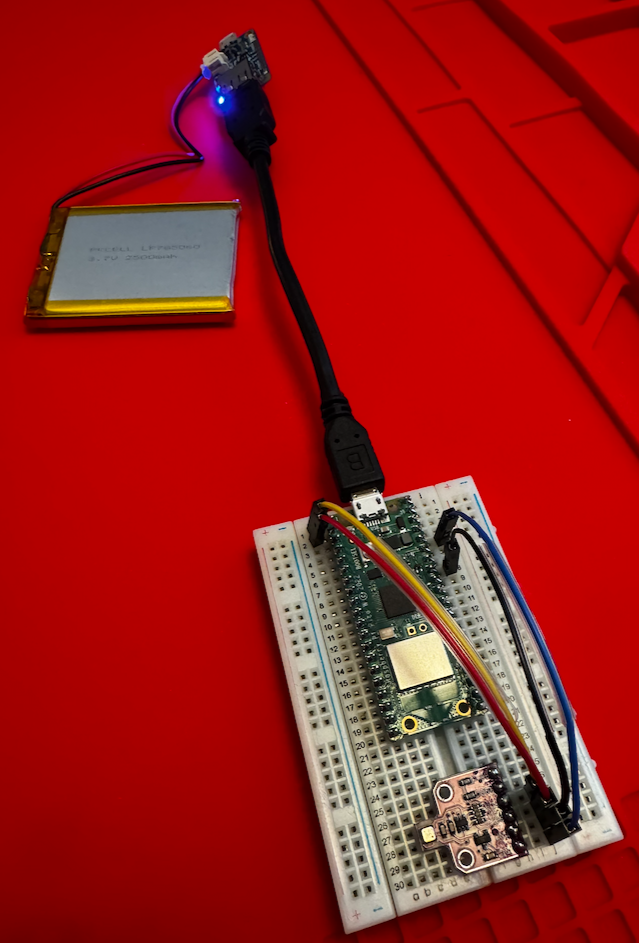
Figure 23. The Pico running on battery power
Access Control for Your Endpoint
It’s great that everything is working, but you definitely want tight control on who can insert data into your database. There are a couple of things you should do to keep your data safe.
Define Allowed IP Addresses
The ACM lets you define a list of allowed IP addresses for your cluster. With those addresses defined, any request that comes from any other IP address will be ignored. Put the IP addresses of your authorized users on the list, and your endpoint is much more secure.
Create User Accounts with Limited Access
You can only access the endpoints with valid credentials. You should create user accounts with limited access. The ACM makes it easy to manage your user accounts, and you can restrict the access of those accounts to only the databases you specify. And as we mentioned earlier, you can test the endpoints in the endpoint editor by running a query as a particular user.
As Usual, Thanks to Claude!
See the raspberry_pi/AGENTS.md and raspberry_pi_pico/AGENTS.md files for complete details on your author’s interactions with Claude as they worked out the details of the code, hardware configuration, and other details. (Things got a little spicy at times.)
Summary
ClickHouse’s API endpoints simplify the code that goes into the applications that work with ClickHouse data, hiding the structure of your database in the process. The Altinity Cloud Manager makes it easy to create, test, and manage endpoints, as well as manage users and control what they can access. In this post, we’ve seen how to use API endpoints to allow very small, lightweight devices to create records in a ClickHouse database. It’s a powerful, elegant way to collect data that can be analyzed in real time.
If you have questions, please contact us at Altinity or join the discussion on our Slack channel. And please sign up for a free trial Altinity.Cloud account and try it out for yourself!
Appendix A: Parts List
We ran the code on these machines:
There are several breakout boards for the BME680:
- Pimoroni BME680, in a package that includes a right-angle female header as shown in Figures 1 and 2 above
- Adafruit BME680
- hiBCTR Environmental Sensor Module, one of many generic boards
All of these sensors use the Bosch BME680 chip, and there are many form factors and vendors to choose from. We really like the combination of the Pimoroni and the right-angled female header. The pinouts match the RaspberryPi perfectly, letting you attach the sensor without jumper wires.
For the battery-powered Pico setup, we added:
Starting with a fully charged battery, the Pico ran for roughly 38 hours.
NOTE: All of these items can be purchased from multiple sources around the web. Look for the combination of price, availability, and shipping costs that work for you. No one at Altinity (including your author) has any commission plan or partnership with any of these vendors; we’re just passing along what we used in building this sample.
Appendix B: Urge Overkill
Nvidia’s Jetson Nano is a Linux-based SBC with a 128-core NVIDIA Maxwell GPU. That’s overkill for running a small Python script that reads a sensor, but it works. (Your author was obsessed with getting this code to work on every SBC around the house.) The pinouts we need for the Nano are the same as those for the Raspberry Pis; wire the BME680 as we discussed in the Raspberry Pi section above. If you’ve got the Pimoroni breakout board, it simply plugs in:
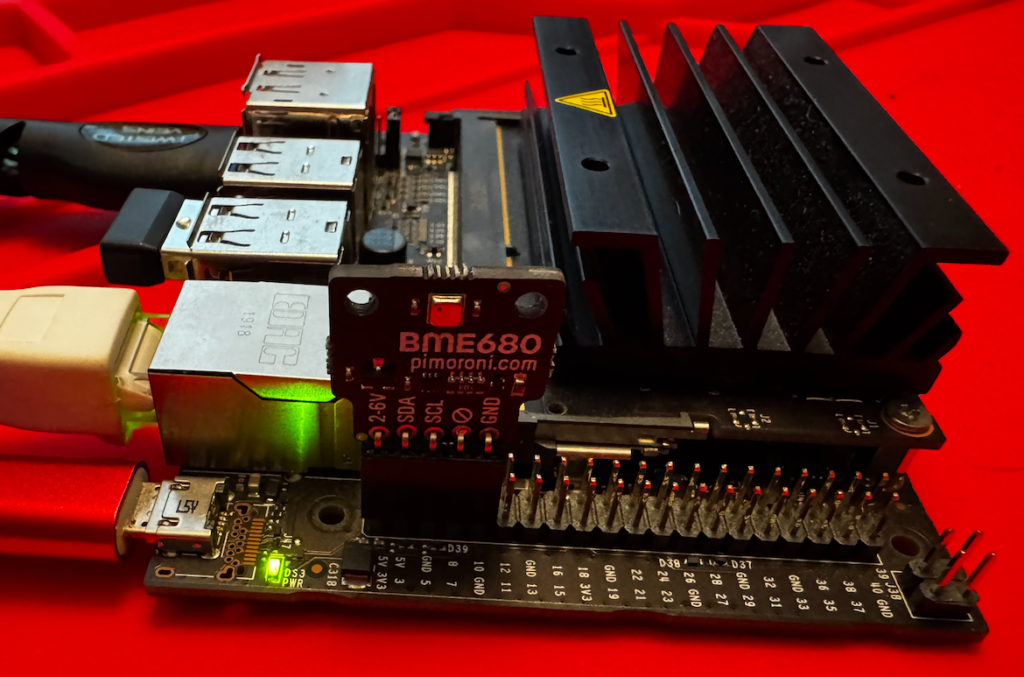
Figure 24. A Jetson Nano with a BME680 sensor attached
With a couple of minor exceptions, the instructions for getting the example running on the Jetson Nano are the same as for the Raspberry Pi. However, the machine runs on Ubuntu 18.04 (yes, an eight-year-old OS), so the more recent versions of the packages used by the Raspberry Pi aren’t available. To compensate, the raspberry_pi/jetson-requirements.txt file specifies older versions of the packages. Use it instead of the requirements.txt file:
pip install -r jetson-requirements.txt
You may need to use the python3 command instead of python as you follow the Raspberry Pi steps above, and you’ll need to run i2cdetect -y -r -a 1 to check the connection to the BME680. Beyond that, the Jetson Nano should work just fine. It should also work with the Jetson Orin Nano. Buying another SBC and testing it is left as an exercise for the reader. If you try it, let us know how it goes!
ClickHouse® is a registered trademark of ClickHouse, Inc.; Altinity is not affiliated with or associated with ClickHouse, Inc.