Squeezing JuiceFS with ClickHouse® (Part 2): Bringing The Two Together

If you love ClickHouse®, Altinity can simplify your experience with our fully managed service in your cloud (BYOC) or our cloud and 24/7 expert support. Learn more.
JuiceFS is a POSIX-compatible filesystem over S3 storage that allows applications to store and share data without directly using S3 API. Since directly managing servers running ClickHouse and JuiceFS is complex, we use Kubernetes as our test environment. In Part 1, we successfully installed JuiceFS in our self-managed Kubernetes environment using the JuiceFS CSI driver. We also created a JuiceFS storage class to define persistent volume claim (PVC), which we tested using a simple application pod.
In this second part, we’ll combine JuiceFS with ClickHouse using Altinity’s clickhouse-operator. We’ll look into configuring and using a JuiceFS disk for MergeTree tables and compare simple write and read performance to non-cached and cached ClickHouse standard S3 disks, as well as look at the potential problems.
Creating ClickHouse cluster
Before creating a ClickHouse cluster in our Kubernetes environment, we need to install the clickhouse-operator. Installing the clickhouse-operator is as simple as running the command below. I’ll be using version 0.23.5.
kubectl --kubeconfig kubeconfig apply -f https://raw.githubusercontent.com/Altinity/clickhouse-operator/release-0.23.5/deploy/operator/clickhouse-operator-install-bundle.yaml
The ClickHouse cluster itself I’ll define using the clickhouse_cluster.yaml below. It defines the storage.xml configuration file with all our disks and volumes. See External Disks for Storing Data in ClickHouse documentation for more details.
Given that we mount JuiceFS as a standard folder, we define the JuiceFS disk as a local disk and put data into the juicefs-data folder.
 <clickhouse>
    <storage_configuration>
      <disks>
        <juicefs>
          <type>local</type>
          <path>/juicefs-disk/juicefs-data/</path>
        </juicefs>
      </disks>
    </storage_configuration>
</clickhouse>
This disk corresponds to the /juicefs-disk/ path defined by the following volume mount.
volumeMounts:
  - name: juicefs-storage-vc-template
    mountPath: /juicefs-disk
The juicefs-storage-vc-template corresponds to the following volume claim template that uses the juicefs storage class that we’ve created for the JuiceFS.
volumeClaimTemplates:
  - name: juicefs-storage-vc-template
    spec:
      accessModes:
        - ReadWriteOnce
      volumeMode: Filesystem
      storageClassName: juicefs
      resources:
        requests:
          storage: 10P
Here is the complete clickhouse_cluster.yaml definition.
apiVersion: "clickhouse.altinity.com/v1"
kind: "ClickHouseInstallation"
metadata:
  name: "ch-juicefs"
spec:
  configuration:
    files:
      storage.xml: |
        <clickhouse>
           <storage_configuration>
               <disks>
                   <s3>
                       <type>s3</type>
                       <endpoint>https://BUCKET.s3.REGION.wasabisys.com/s3-data/{replica}/</endpoint>
                       <access_key_id>ACCESS_KEY</access_key_id>
                       <secret_access_key>SECRET_KEY</secret_access_key>
                   </s3>
                   <s3_cache>
                       <type>cache</type>
                       <disk>s3</disk>
                       <path>/s3_cache/</path>
                       <max_size>10Gi</max_size>
                   </s3_cache>
                   <juicefs>
                       <type>local</type>
                       <path>/juicefs-disk/juicefs-data/</path>
                   </juicefs>
               </disks>
               <policies>
                   <s3>
                       <volumes>
                           <main>
                               <disk>s3</disk>
                           </main>
                       </volumes>
                   </s3>
                   <s3_cache>
                       <volumes>
                           <main>
                               <disk>s3_cache</disk>
                           </main>
                       </volumes>
                   </s3_cache>
                   <juicefs>
                       <volumes>
                           <main>
                               <disk>juicefs</disk>
                           </main>
                       </volumes>
                   </juicefs>
               </policies>
           </storage_configuration>
        </clickhouse>
    clusters:
      - name: "ch-juicefs"
        templates:
          podTemplate: pod-template-with-volumes
        layout:
          shardsCount: 1
          replicasCount: 1

  templates:
    podTemplates:
      - name: pod-template-with-volumes
        spec:
          containers:
            - name: clickhouse
              image: altinity/clickhouse-server:23.8.11.29.altinitystable
              volumeMounts:
                - name: data-storage-vc-template
                  mountPath: /var/lib/clickhouse
                - name: log-storage-vc-template
                  mountPath: /var/log/clickhouse-server
                - name: juicefs-storage-vc-template
                  mountPath: /juicefs-disk
    volumeClaimTemplates:
      - name: juicefs-storage-vc-template
        spec:
          accessModes:
            - ReadWriteOnce
          volumeMode: Filesystem
          storageClassName: juicefs
          resources:
            requests:
              storage: 10P
      - name: data-storage-vc-template
        spec:
          accessModes:
            - ReadWriteOnce
          resources:
            requests:
              storage: 100Gi
      - name: log-storage-vc-template
        spec:
          accessModes:
            - ReadWriteOnce
          resources:
            requests:
              storage: 10Gi
For simplicity, I’ve chosen a cluster with only one shard and replica. Now, let’s apply the clickhouse_cluster.yaml to create the cluster.
kubectl --kubeconfig kubeconfig apply -f clickhouse_cluster.yaml
clickhouseinstallation.clickhouse.altinity.com/ch-juicefs created
Having created the cluster, we can enter the ClickHouse server pod and launch clickhouse-client to check the available disks.
kubectl --kubeconfig kubeconfig exec -it -n default chi-ch-juicefs-ch-juicefs-0-0-0 -- /bin/bash
Then I can launch the clickhouse-client.
clickhouse-client
In the clickhouse-client, I can check the available disk using the following query.
SELECT * FROM system.disks

┌─name─────┬─path──────────────────────────┬───────────free_space─┬──────────total_space─┬─────unreserved_space─┬─keep_free_space─┬─type──┬─is_encrypted─┬─is_read_only─┬─is_write_once─┬─is_remote─┬─is_broken─┬─cache_path─┐
│ default  │ /var/lib/clickhouse/          │          64848461824 │         105089261568 │          64848461824 │               0 │ local │            0 │            0 │             0 │         0 │         0 │            │
│ juicefs  │ /juicefs-disk/juicefs-data/   │     1125830005723136 │     1125830005731328 │     1125830005723136 │               0 │ local │            0 │            0 │             0 │         0 │         0 │            │
│ s3       │ /var/lib/clickhouse/disks/s3/ │ 18446744073709551615 │ 18446744073709551615 │ 18446744073709551615 │               0 │ s3    │            0 │            0 │             0 │         1 │         0 │            │
│ s3_cache │ /var/lib/clickhouse/disks/s3/ │ 18446744073709551615 │ 18446744073709551615 │ 18446744073709551615 │               0 │ s3    │            0 │            0 │             0 │         1 │         0 │ /s3_cache/ │
└──────────┴───────────────────────────────┴──────────────────────┴──────────────────────┴──────────────────────┴─────────────────┴───────┴──────────────┴──────────────┴───────────────┴───────────┴───────────┴────────────┘
With the default, juicefs, s3, and s3_cache disks now available, we could create different MergeTree tables to check the performance of each disk type.
Loading test dataset
For basic performance tests, I’ll be using our favorite 1.3B rows NYC taxi rides dataset that is available through our public S3 bucket https://s3.us-east-1.amazonaws.com/altinity-clickhouse-data/nyc_taxi_rides/data/tripdata/data-*.csv.gz.
I will first copy the whole dataset into the /var/lib/clickhouse/user_files folder in the chi-ch-juicefs-ch-juicefs-0-0-0 pod so that later I can use the file() table function to load it into tables which use different disks.
cd /var/lib/clickhouse/user_files
mkdir -p datasets/tripdata
cd datasets/tripdata
aws --no-sign-request s3 cp --recursive s3://altinity-clickhouse-data/nyc_taxi_rides/data/tripdata .
With the dataset loaded, we are ready to create MergeTree tables.
Creating MergeTree tables
I’ll create three different tables, one for each disk named tripdata_juicefs, tripdata_s3, tripdata_s3_cache. The template for the CREATE TABLE query is below, where the <NAME> is either juicefs, s3, or s3_cache.
CREATE TABLE IF NOT EXISTS tripdata_<NAME> (
  pickup_date Date DEFAULT toDate(pickup_datetime) CODEC(Delta, LZ4),
  id UInt64,
  vendor_id String,
  pickup_datetime DateTime CODEC(Delta, LZ4),
  dropoff_datetime DateTime,
  passenger_count UInt8,
  trip_distance Float32,
  pickup_longitude Float32,
  pickup_latitude Float32,
  rate_code_id String,
  store_and_fwd_flag String,
  dropoff_longitude Float32,
  dropoff_latitude Float32,
  payment_type LowCardinality(String),
  fare_amount Float32,
  extra String,
  mta_tax Float32,
  tip_amount Float32,
  tolls_amount Float32,
  improvement_surcharge Float32,
  total_amount Float32,
  pickup_location_id UInt16,
  dropoff_location_id UInt16,
  junk1 String,
  junk2 String)
ENGINE = MergeTree
PARTITION BY toYYYYMM(pickup_date)
ORDER BY (vendor_id, pickup_location_id, pickup_datetime)
SETTINGS storage_policy='<NAME>';
Here are short examples of table definitions.
CREATE TABLE IF NOT EXISTS tripdata_juicefs (
  ...
SETTINGS storage_policy='juicefs';
CREATE TABLE IF NOT EXISTS tripdata_s3 (
  ...
SETTINGS storage_policy='s3';
CREATE TABLE IF NOT EXISTS tripdata_s3_cache (
  ...
SETTINGS storage_policy='s3_cache';
Check that tables were created successfully.
SHOW TABLES

┌─name──────────────┐
│ tripdata_juicefs  │
| tripdata_s3       |
│ tripdata_s3_cache │
└───────────────────┘
Write performance
With the dataset loaded and tables created, we are ready to start checking how the table that uses JuiceFS compares to tables that use standard non-cached and cached S3 disks.
Let’s start with inserting our dataset into the tripdata_juicefs table.
INSERT INTO tripdata_juicefs
SELECT * FROM file('datasets/tripdata/data-*.csv.gz',
'CSVWithNames',
'pickup_date Date, id UInt64, vendor_id String, tpep_pickup_datetime DateTime, tpep_dropoff_datetime DateTime, passenger_count UInt8, trip_distance Float32, pickup_longitude Float32, pickup_latitude Float32, rate_code_id String, store_and_fwd_flag String, dropoff_longitude Float32, dropoff_latitude Float32, payment_type LowCardinality(String), fare_amount Float32, extra String, mta_tax Float32, tip_amount Float32, tolls_amount Float32, improvement_surcharge Float32, total_amount Float32, pickup_location_id UInt16, dropoff_location_id UInt16, junk1 String, junk2 String',
'gzip')
settings max_threads=8, max_insert_threads=8, input_format_parallel_parsing=0;
0 rows in set. Elapsed: 1159.444 sec. Processed 1.31 billion rows, 39.98 GB (1.13 million rows/s., 34.48 MB/s.)
Now, let’s do the same for the tripdata_s3 table.
INSERT INTO tripdata_s3
SELECT * FROM file('datasets/tripdata/data-*.csv.gz',
'CSVWithNames',
'pickup_date Date, id UInt64, vendor_id String, tpep_pickup_datetime DateTime, tpep_dropoff_datetime DateTime, passenger_count UInt8, trip_distance Float32, pickup_longitude Float32, pickup_latitude Float32, rate_code_id String, store_and_fwd_flag String, dropoff_longitude Float32, dropoff_latitude Float32, payment_type LowCardinality(String), fare_amount Float32, extra String, mta_tax Float32, tip_amount Float32, tolls_amount Float32, improvement_surcharge Float32, total_amount Float32, pickup_location_id UInt16, dropoff_location_id UInt16, junk1 String, junk2 String',
'gzip')
settings max_threads=8, max_insert_threads=8, input_format_parallel_parsing=0;
0 rows in set. Elapsed: 1098.654 sec. Processed 1.31 billion rows, 39.98 GB (1.19 million rows/s., 36.39 MB/s.)
Finally, let’s finish with the tripdata_s3_cache table.
INSERT INTO tripdata_s3_cache
SELECT * FROM file('datasets/tripdata/data-*.csv.gz',
'CSVWithNames',
'pickup_date Date, id UInt64, vendor_id String, tpep_pickup_datetime DateTime, tpep_dropoff_datetime DateTime, passenger_count UInt8, trip_distance Float32, pickup_longitude Float32, pickup_latitude Float32, rate_code_id String, store_and_fwd_flag String, dropoff_longitude Float32, dropoff_latitude Float32, payment_type LowCardinality(String), fare_amount Float32, extra String, mta_tax Float32, tip_amount Float32, tolls_amount Float32, improvement_surcharge Float32, total_amount Float32, pickup_location_id UInt16, dropoff_location_id UInt16, junk1 String, junk2 String',
'gzip')
settings max_threads=8, max_insert_threads=8, input_format_parallel_parsing=0;
0 rows in set. Elapsed: 1090.200 sec. Processed 1.31 billion rows, 39.98 GB (1.20 million rows/s., 36.67 MB/s.)
Let’s graph the data for the write performance.
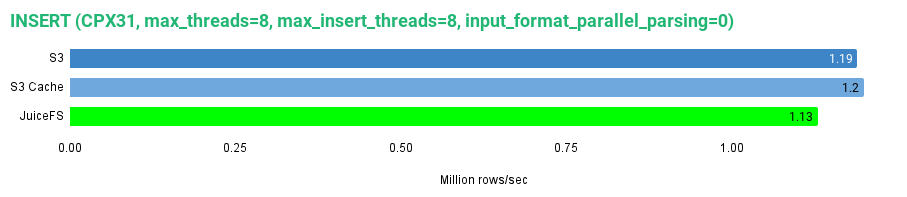
As the graph shows, writing to the JuiceFS disk in our specific test environment is slightly slower than writing to S3 or S3-cached disks. However, the difference is not that significant. We got 1.13 Million rows/sec. Let’s look at the read performance.
Read performance
We can check read performance by selecting all the rows in our test tables to read the whole dataset. Given that we expect some disks to use caching we’ll execute the query back-to-back five times against each disk
Let’s start with JuiceFS and read all data from the tripdata_juicefs table.
SELECT * FROM tripdata_juicefs FORMAT Null SETTINGS max_threads = 8, max_insert_threads = 8, input_format_parallel_parsing = 0;
I got the following results:
0 rows in set. Elapsed: 172.750 sec. Processed 1.31 billion rows, 114.15 GB (7.59 million rows/s., 660.76 MB/s.)
Peak memory usage: 103.08 MiB.
0 rows in set. Elapsed: 94.315 sec. Processed 1.31 billion rows, 114.15 GB (13.90 million rows/s., 1.21 GB/s.)
Peak memory usage: 153.77 MiB.
0 rows in set. Elapsed: 76.713 sec. Processed 1.31 billion rows, 114.15 GB (17.09 million rows/s., 1.49 GB/s.)
Peak memory usage: 151.27 MiB.
0 rows in set. Elapsed: 73.887 sec. Processed 1.31 billion rows, 114.15 GB (17.74 million rows/s., 1.54 GB/s.)
Peak memory usage: 149.49 MiB.
0 rows in set. Elapsed: 74.713 sec. Processed 1.31 billion rows, 114.15 GB (17.55 million rows/s., 1.53 GB/s.)
Peak memory usage: 151.51 MiB.
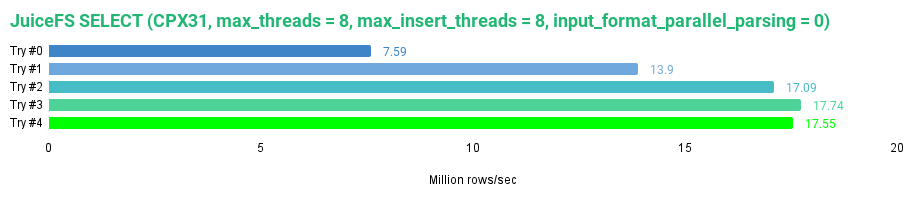
From the data for the JuiceFS above, we see that JuiceFS is definitely able to cache data to provide faster access on the successive reads, reaching a maximum read speed of 1.53 GB/s or 17.55 million rows/s for our dataset. By default, the JuiceFS sets the cache size to 100 GB and uses 2-random strategy for data block eviction.
Now, let’s do the same for the tripdata_s3 table.
SELECT * FROM tripdata_s3 FORMAT Null SETTINGS max_threads = 8, max_insert_threads = 8, input_format_parallel_parsing = 0;
Here are my results.
0 rows in set. Elapsed: 256.445 sec. Processed 1.31 billion rows, 114.15 GB (5.11 million rows/s., 445.11 MB/s.)
Peak memory usage: 220.41 MiB.
0 rows in set. Elapsed: 176.409 sec. Processed 1.31 billion rows, 114.15 GB (7.43 million rows/s., 647.05 MB/s.)
Peak memory usage: 280.11 MiB.
0 rows in set. Elapsed: 195.219 sec. Processed 1.31 billion rows, 114.15 GB (6.72 million rows/s., 584.71 MB/s.)
Peak memory usage: 282.05 MiB.
0 rows in set. Elapsed: 252.489 sec. Processed 1.31 billion rows, 114.15 GB (5.19 million rows/s., 452.08 MB/s.)
Peak memory usage: 281.88 MiB.
0 rows in set. Elapsed: 238.748 sec. Processed 1.31 billion rows, 114.15 GB (5.49 million rows/s., 478.10 MB/s.)
Peak memory usage: 279.51 MiB.
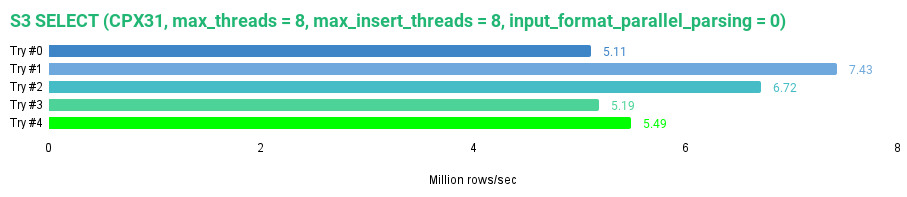
The s3 disk does not use any cache, so each query always uses S3 API calls to read the whole dataset. We can see this from the inconsistent read speeds, ranging from 445 to 647 MB/s or 5.11 to 7.43 million rows/s. Since JuiceFS uses cache by default, it is faster than the non-cached S3 disk.
Finally, let’s read all data from the tripdata_s3_cache.
SELECT * FROM tripdata_s3_cache FORMAT Null SETTINGS max_threads = 8, max_insert_threads = 8, input_format_parallel_parsing = 0;
This is what I got.
0 rows in set. Elapsed: 252.166 sec. Processed 1.31 billion rows, 114.15 GB (5.20 million rows/s., 452.66 MB/s.)
Peak memory usage: 4.12 GiB.
0 rows in set. Elapsed: 155.952 sec. Processed 1.31 billion rows, 114.15 GB (8.41 million rows/s., 731.93 MB/s.)
Peak memory usage: 7.94 GiB.
0 rows in set. Elapsed: 144.535 sec. Processed 1.31 billion rows, 114.15 GB (9.07 million rows/s., 789.75 MB/s.)
Peak memory usage: 8.40 GiB.
0 rows in set. Elapsed: 141.699 sec. Processed 1.31 billion rows, 114.15 GB (9.25 million rows/s., 805.55 MB/s.)
Peak memory usage: 8.58 GiB.
0 rows in set. Elapsed: 142.764 sec. Processed 1.31 billion rows, 114.15 GB (9.18 million rows/s., 799.54 MB/s.)
Peak memory usage: 8.53 GiB.
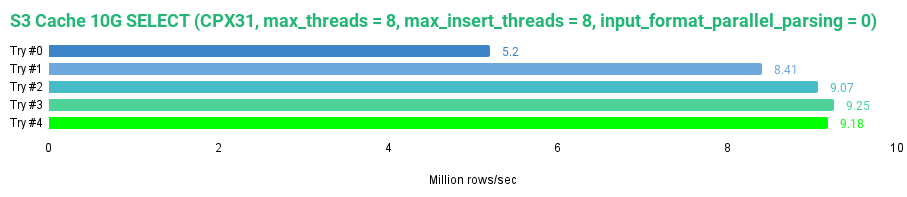
The s3_cache disk improves performance compared to the non-cached S3 disk. We hit 805 MB/s speed, giving us up to 9.25 million rows/s. However, it is still slower than the JuiceFS with its default settings.
Let’s retry using the cached S3 disk, but now we’ll set the cache size to 50 GB instead of the initial 10 GB.
We can do it by modifying the s3_cache disk definition.
 <s3_cache>
     <type>cache</type>
     <disk>s3</disk>
     <path>/s3_cache/</path>
     <max_size>50Gi</max_size>
 </s3_cache>
After modifying clickhouse_cluster.yaml and reapplying it, which will restart the pod and, therefore, the server, we can execute the SELECT query.
SELECT * FROM tripdata_s3_cache FORMAT Null SETTINGS max_threads = 8, max_insert_threads = 8, input_format_parallel_parsing = 0;
With the 50GB cache size, my results were the following:
0 rows in set. Elapsed: 643.662 sec. Processed 1.31 billion rows, 114.15 GB (2.04 million rows/s., 177.34 MB/s.)
Peak memory usage: 4.23 GiB.
0 rows in set. Elapsed: 51.423 sec. Processed 1.31 billion rows, 114.15 GB (25.49 million rows/s., 2.22 GB/s.)
Peak memory usage: 417.64 MiB.
0 rows in set. Elapsed: 51.678 sec. Processed 1.31 billion rows, 114.15 GB (25.37 million rows/s., 2.21 GB/s.)
Peak memory usage: 416.17 MiB.
0 rows in set. Elapsed: 50.358 sec. Processed 1.31 billion rows, 114.15 GB (26.03 million rows/s., 2.27 GB/s.)
Peak memory usage: 418.08 MiB.
0 rows in set. Elapsed: 51.055 sec. Processed 1.31 billion rows, 114.15 GB (25.68 million rows/s., 2.24 GB/s.)
Peak memory usage: 410.55 MiB.
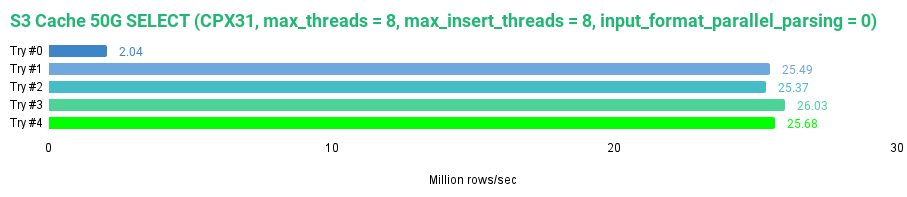
Comparing results between cached S3 disks, we see that with a 50 GB cache size, which allows us to cache the whole dataset, we got almost 1 GB/s faster read than with the 10 GB cache size once the data was available in the cache. A larger cache for S3 disks is the way to go. With the 50 GB cache in our test environment, we achieved faster read performance than the JuiceFS using its default settings.
We can now compare the overall average read performance between all the disks that we’ve tested.
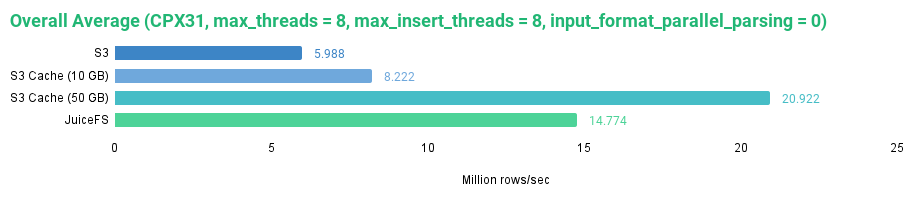
The graph shows that JuiceFS is performing pretty well with the default settings. It is faster than a non-cached S3 disk and a 10 GB cached S3 disk but slower than an S3 cached disk with a 50 GB cache size, which allows the whole dataset to be cached on the local disk.
Potential problems
While we got JuiceFS working with ClickHouse, it would be challenging to use it in production. Here are a few problems that come to mind:
- Managing the JuiceFS metadata store adds complexity.
- Macros are not being expanded in the path for local disks. Therefore, each replica must have a custom storage configuration file if you want to keep data for each replica on a separate path for easy orphaned data cleanup when replicas are removed.
- ClickHouse does not support zero-copy replication for local disks, which means each replica will create a duplicate copy.
- ClickHouse no longer supports caching for disks with local type starting from versions >= 23.5, so you’ll have to rely only on JuiceFS caching.
- The overall reliability of using JuiceFS and ClickHouse needs to be tested.
Three of the five points above are related to ClickHouse and point out opportunities in which ClickHouse could be improved. Such as macro expansion in paths for the local disks, generalized support for zero-copy replication for disks that already implement replication or some alternative, and bringing back support for caching over what ClickHouse considers local disks, but are in fact disks that are mounted over a distributed file system.
Conclusion
Our adventure with combining JuiceFS with ClickHouse is over for now. Setting up JuiceFS in Kubernetes was easy, but the fact that we had to deploy a separate metadata store complicated the process. However, once we got things ready, the CSI driver was straightforward to use with our clickhouse-operator. ClickHouse configuration was also trivial, given that JuiceFS disk can be treated as local. The overall performance of the disk was pretty good, as we’ve made no attempt to optimize performance and have used the default settings.
The idea that S3 storage can be presented to applications as a POSIX-compatible filesystem is appealing as it allows the seamless integration of any application with S3 storage. However, the data on S3 can’t be accessed without the metadata store, making it a critical part of the infrastructure. If we lose the metadata store, then we lose all the data. Nonetheless, this is similar to how ClickHouse implemented S3 disks, which also uses local metadata to map objects in S3. The overall reliability of using JuiceFS with ClickHouse would have to be tested further and workarounds would have to be found for the potential problems that we’ve identified. However, we’ve shown that integration can be done, so JuiceFS is definitely worth investigating further. As always, remember to reach out to us for anything related to ClickHouse.
ClickHouse® is a registered trademark of ClickHouse, Inc.; Altinity is not affiliated with or associated with ClickHouse, Inc.