
Managing Users and Access with OAuth and Antalya
TL;DR: Altinity’s Antalya build of ClickHouse® provides support for OAuth token-based authentication in a fully open-source environment. Define users in an identity provider, then use Antalya’s OAuth support to manage user accounts and their access with the full power of ClickHouse’s RBAC toolset.
As of version 26.3, Altinity’s Antalya build features GA-level support for token-based authentication via OAuth and OIDC (OpenID Connect). Previously, open-source ClickHouse® had two ways of managing users: manually (with config files or SQL) or via an LDAP server. In practice, administrators relied on shared service account credentials. That leads to several problems: it’s difficult to rotate passwords, access control is coarse-grained, and it’s hard to figure out who did what when something goes wrong.
Token-based systems, on the other hand, work with short-lived tokens. A password that falls into the wrong hands might be valid for days, weeks, or more; a token expires in a relatively short period of time. (You determine how quickly a token expires, of course.) You can configure Antalya to give very fine-grained access to your data based on the information in a token. And you have an audit trail of every token that was generated, making it much easier to know who did what.
An OAuth Identity Provider (IdP) is designed to manage users across an organization. You can define users and groups, then assign permissions to users based on the groups they belong to. You get the full expressive power of ClickHouse’s RBAC syntax without having to create individual users
With support for token-based authentication, Antalya can integrate with your existing identity provider to control access to your ClickHouse data via short-lived tokens. (Keycloak is the identity provider we’ll look at here, but Okta, Entra, and other OIDC-compliant systems work the same way.)
We’ll look at a sample application that shows token-based authentication at work…
…but first, a metaphor
Think about staying in a hotel as a token-based scenario. When you check in, you give your credentials to the front desk, typically a government-issued photo ID and a credit card. Once the front desk is convinced that you are who you say you are, you get a key card. The key card says something like “this card expires at noon on July 17th, and the holder of this card is allowed to open the doors to room 438 and the gym and the lounge on the 9th floor and can access the 4th and 9th floors via the elevator.”
The important part of the metaphor: When you hold the key card to the card reader on the door lock, the card reader simply looks at the data on the key card. If the card reader is on the door of room 438 and it’s 8:30 am on July 17th, the door unlocks and lets you in. The card reader doesn’t care who you are; it only looks at the key card’s expiration date and what the key card says you’re allowed to do. That’s how our sample application uses access tokens.
What we’re working with
In our discussion here, we’ll look at a token-based system with three components:
- An Identity Provider (IdP), which generates, refreshes, and revokes tokens.
- A client application, which interacts with the IdP to obtain and manage tokens and send them to resources. In the world of identity management, this is called a relying party, meaning that it relies on the IdP to validate someone’s identity.
- An Antalya server that accepts an access token from the client application along with the client application’s request to access ClickHouse data. It validates the token, then decides whether the client application’s request should be executed or not. In the world of OAuth, this is called a resource server.
We’ll use three different types of tokens:
- An ID token, which tells us who someone is
- An access token, which has an expiration time and tells us what the holder of the token is allowed to do (assuming it’s valid, of course)
- A refresh token, which also has an expiration time, although its lifetime is typically much longer than an access token. A client application can send a refresh token to the IdP to get a new access token. The IdP sends a refresh token to the client application; the client application never sends the refresh token to anyone other than the IdP.
Those tokens are based on three standards:
- OAuth 2.0, a standard for issuing scoped, expiring access tokens and refresh tokens. We’ll use OAuth for authorization. A resource server uses an access token to decide what the holder of that token is allowed to do, and a client application can use a refresh token to get a new access token when one expires.
- OIDC, which defines a standard set of fields (
email,preferred_username,given_name,family_name, etc.) that go into an ID token to tell an application who the token holder is. We’ll use OIDC for authentication. - JSON Web Tokens (JWTs) – a JSON format that holds the data we need. A JWT contains a header, a payload, and a signature. The fields in the payload are called claims;
"email": "mateo@example.com"is a claim. OIDC ID tokens must be JWTs; OAuth access and refresh tokens are often JWTs, but can also be… - …opaque tokens, which aren’t a standard at all. They’re basically lookup strings that only mean something to the IdP. (
KfHMt8N8MuWy6gzXcGX, for example.) The only way to validate an opaque token is to send it to the IdP. OAuth access and refresh tokens can be opaque tokens.
Looking back at the hotel metaphor, the OIDC ID token is your photo ID, and the OAuth access token is your room’s key card.
Our sample application
We’ll look at a system that uses Grafana as the client application, Altinity’s Antalya build of ClickHouse as the resource server, and Keycloak as the IdP. Here’s how tokens and data flow through the system:
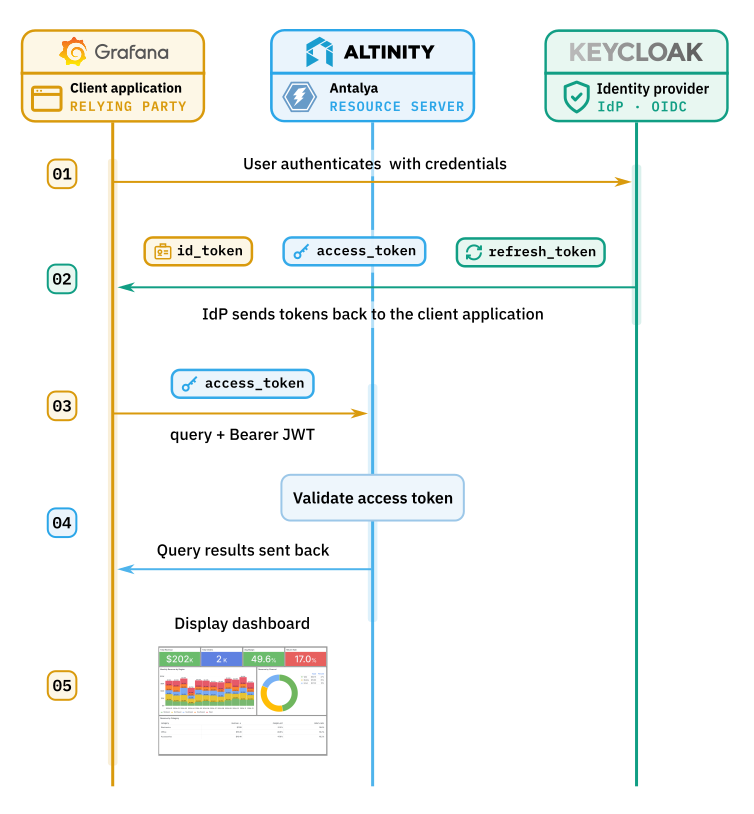
Figure 1. The application’s architecture
The user’s journey from logging in to seeing a dashboard full of data from ClickHouse goes like this:
- The user logs in to Grafana. Grafana sends the user to Keycloak, then the user enters their credentials on the Keycloak login screen.
- If the user’s credentials are valid, Keycloak sends the ID, access, and refresh tokens to Grafana.
- The user wants to see a dashboard full of ClickHouse data, so Grafana needs to run a query against the Antalya server. It sends the query and the access token to Antalya.
- Antalya validates the access token. If it’s valid, Antalya sends the query results back to Grafana. (Validating tokens is a subject for another post.)
- Grafana displays the dashboard to the user.
A crucial part of the stack here is Altinity’s Grafana plugin for ClickHouse. It uses Grafana’s OAuth support, so we configure it to pass the access token to ClickHouse instead of a username/password or some other kind of credential.
The user experience
A major advantage of token-based applications is that the details of authentication and authorization are hidden from the user. Once a user logs in to the IdP, they can access different resources without having to reauthenticate, and typically their access is effortless until the refresh token expires. Let’s look at what a user sees as they work with our application.
First of all, the user goes to the Grafana login screen:
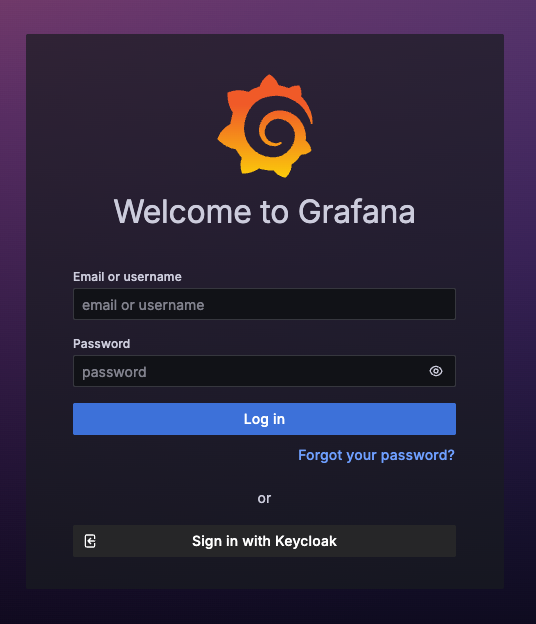
Figure 2. The Grafana login screen, with a link to Keycloak
The user clicks “Sign in with Keycloak” to go to the Keycloak login screen:
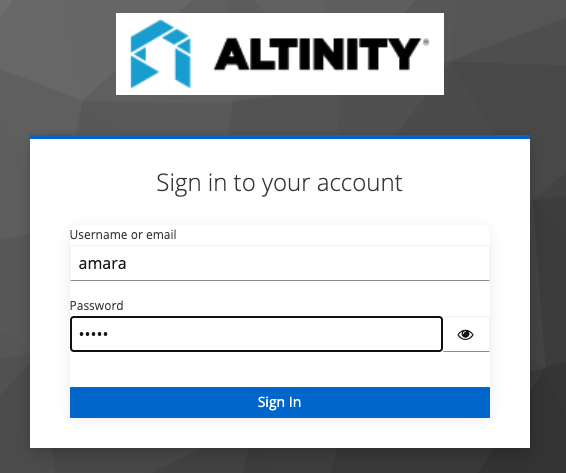
Figure 3. The Keycloak login screen
Once the user logs in with Keycloak, they’re redirected to Grafana. The next thing they see is the default dashboard:
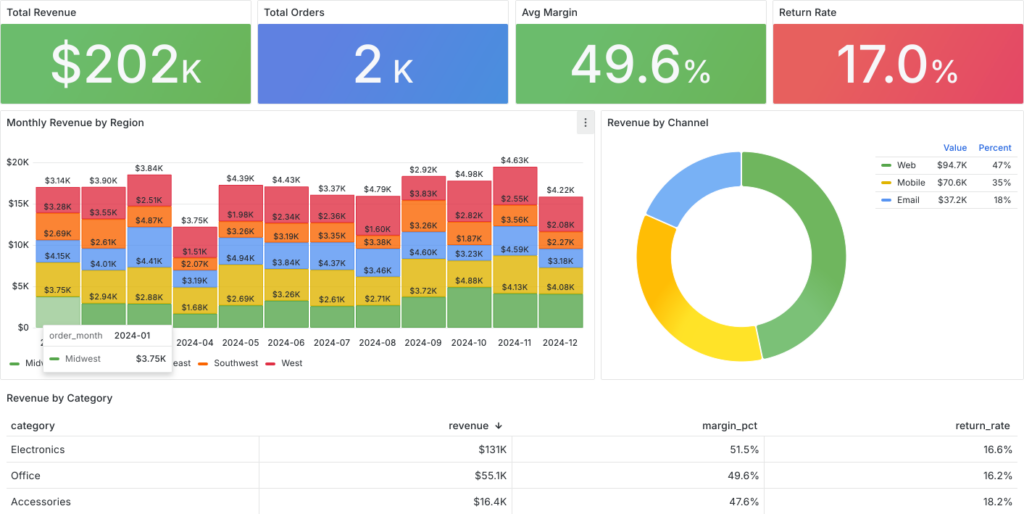
Figure 4. The Executive Overview dashboard
The sales data displayed here comes from ClickHouse. Looking back at our sequence diagram above, the user doesn’t see anything from steps 2, 3, or 4. They log in and go directly to their dashboard.
How we’re using tokens
The sample application uses tokens to do three things:
- Validate the user. Grafana validates the ID token by checking its signature against the IdP’s public key.
- Determine which Grafana dashboards the user can see. Grafana has three roles –
Admin,Editor, andViewer. The information in the ID token defines what role a user has. For the sample, we’ve defined three dashboards. Admins can see all three, editors can see two of the three, and viewers can only see the overview dashboard shown above. - Determine which ClickHouse databases the user can access – There are ClickHouse queries behind the Grafana dashboards. When Grafana sends that query to Antalya, the information in the access token also defines what role a user has in ClickHouse. Unlike Grafana, ClickHouse lets us define as many roles as we need, and each role can have extremely fine-detailed grants. For the demo, we’ve defined the roles
clickhouse_admins,clickhouse_analysts, andclickhouse_readers.
How it all works together
Our sample application has Keycloak, Grafana, and ClickHouse working together, using tokens to authenticate token holders and authorize access to data. Here are the things we need to define and configure across those components:
Keycloak
In our Keycloak config, we created six groups:
grafana-admins,grafana-editors, andgrafana-viewersfor Grafanaclickhouse-admins,clickhouse-analysts, andclickhouse-readersfor ClickHouse.
We also defined three users:
amara: passwordamara, belongs to the groupsgrafana-adminsand clickhouse-adminshelen: passwordhelen, belongs to the groupsgrafana-editorsandclickhouse-analystsmateo: passwordmateo, belongs to the groupsgrafana-viewersandclickhouse-readers.
And we defined an interface between Keycloak and Grafana. Part of that involves setting the URL of our Grafana server as a valid requestor for Keycloak. We also configured the Keycloak server to put the groups claim into the access token:
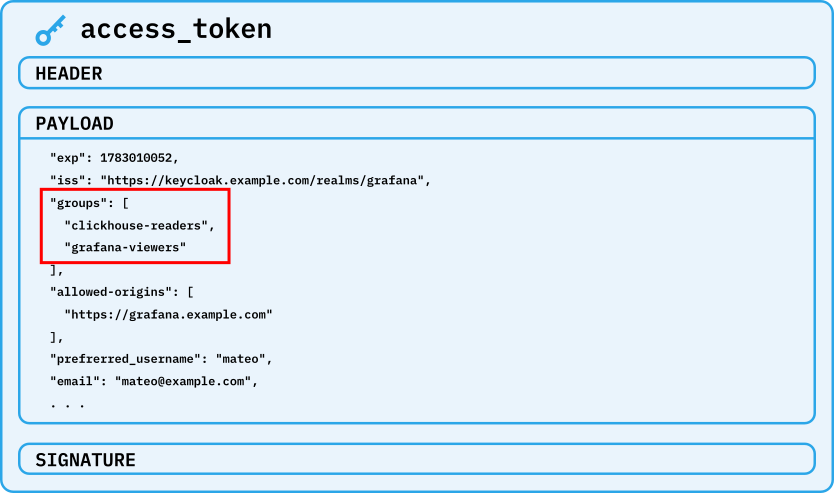
Figure 5. An access token with groups defined
(There’s a lot more information in the access token, but it’s not relevant to our discussion here.) Grafana uses the groups to determine what dashboards the holder of this token is allowed to see. When it loads a dashboard, it sends the access token to ClickHouse as it runs queries to populate the widgets in the dashboard. ClickHouse similarly uses the groups to determine what databases and tables the holder of this token is allowed to access.
Grafana
In our sample application Grafana uses tokens in two ways: it uses the ID token to determine what dashboards a user is allowed to see, and it manages the access token, passing it to ClickHouse whenever it needs to run a query to build a dashboard. In its interactions with ClickHouse, Grafana doesn’t do anything to the access token; it simply passes it to ClickHouse.
First of all, Grafana has to use the ID token to determine what access a user should have. As we mentioned earlier, Grafana has three groups: Admin, Editor, and Viewer. We map the group names we defined in Keycloak to the Grafana groups. The mapping is what you’d guess:
grafana-admins→Admingrafana-editors→Editorgrafana-viewers→Viewer
We define a ClickHouse data source with the Altinity ClickHouse plugin for Grafana. Crucially, we tell Grafana to forward its OAuth tokens to ClickHouse in the configuration of the plugin.
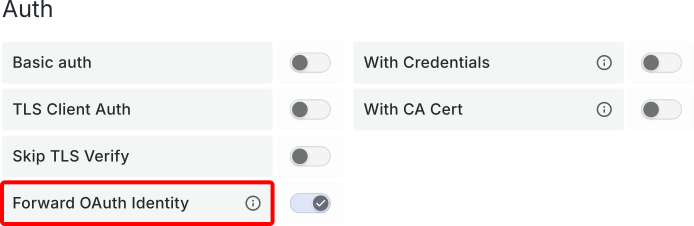
Figure 6. Configuring the Altinity Grafana Plugin to forward OAuth tokens to ClickHouse
Grafana gets the tokens from the identity provider; here we’re telling it to pass the identity and access tokens to ClickHouse with every query. ClickHouse, as we’ll discuss in a minute, then uses the contents of the token to determine what the holder of that token can do.
We also have three dashboards:
- The Admin Dashboard – visible to
Admins only, contains detailed customer information (PII) - The Analytics Dashboard – visible to
Editors andAdmins only, summarizes revenues, returns, and margins - The Executive Overview – visible to all users, a high-level summary of sales trends
When a user signs in, the Dashboards list contains only the dashboards that they’re allowed to view. This is Amara’s view; Helen and Mateo don’t even know that the Admin dashboard exists. Similarly, Mateo doesn’t know the Analytics dashboard exists.
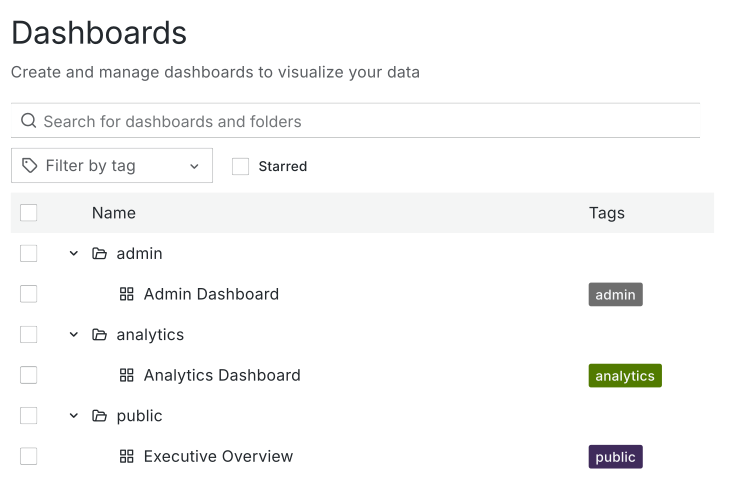
Figure 7. The list of dashboards available to Admin users
Antalya
Which brings us to the Antalya configuration. We’ve defined the roles clickhouse_readers, clickhouse_analysts, and clickhouse_admins. We then grant them access as follows:
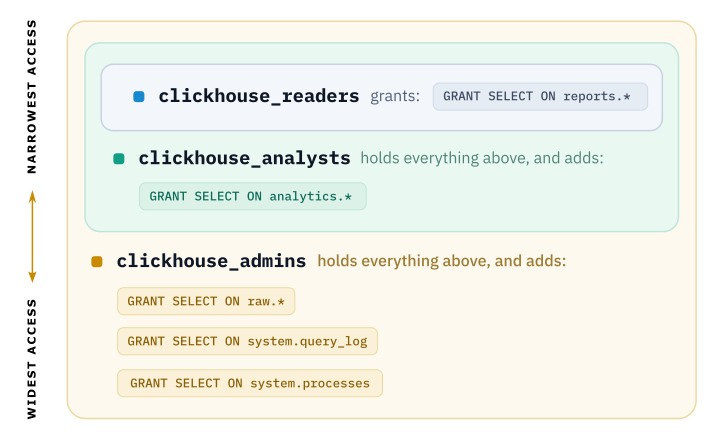
Figure 8. The hierarchy of roles and grants in our ClickHouse configuration.
clickhouse_readers gives the user read-only access to the reports database. All other roles are granted clickhouse_reader access, either directly or transitively. Next, the clickhouse_analysts role is granted access to the analytics database. To wrap everything up, the clickhouse_admins role is granted the clickhouse_analysts role, then it is granted access to query the raw database and the system.query_log and system.processes tables.
Finally, we have some XML configuration work to tell Antalya how to find the Keycloak server and validate tokens. See the Antalya OAuth documentation for all the details.
Our complete configuration
Looking at the configuration of all these components, we’ve set up Keycloak to generate the groups claims we need. Each token has one of the three Grafana roles (either grafana-viewers, grafana-editors, or grafana-admins) and one of the three ClickHouse roles (either clickhouse_readers, clickhouse_analysts, or clickhouse_admins). When Grafana sees the groups claim, it determines which dashboards the user is allowed to access. And when those dashboards need to get data from Antalya, Grafana passes along the access token, then Antalya uses the groups claim to determine what ClickHouse ROLEs and GRANTs apply.
Let’s go through the dashboards to see how Grafana and ClickHouse authorize (or not) a user identified with a token. We looked at the Executive Overview dashboard earlier. That dashboard is visible to all Grafana users, and all of the data it displays comes from the reports database, so the view we saw above works for everyone. The “Revenue by Channel” widget queries data from the reports.channel_summary table; all others come from reports.monthly_revenue.
Now for the Analytics dashboard:
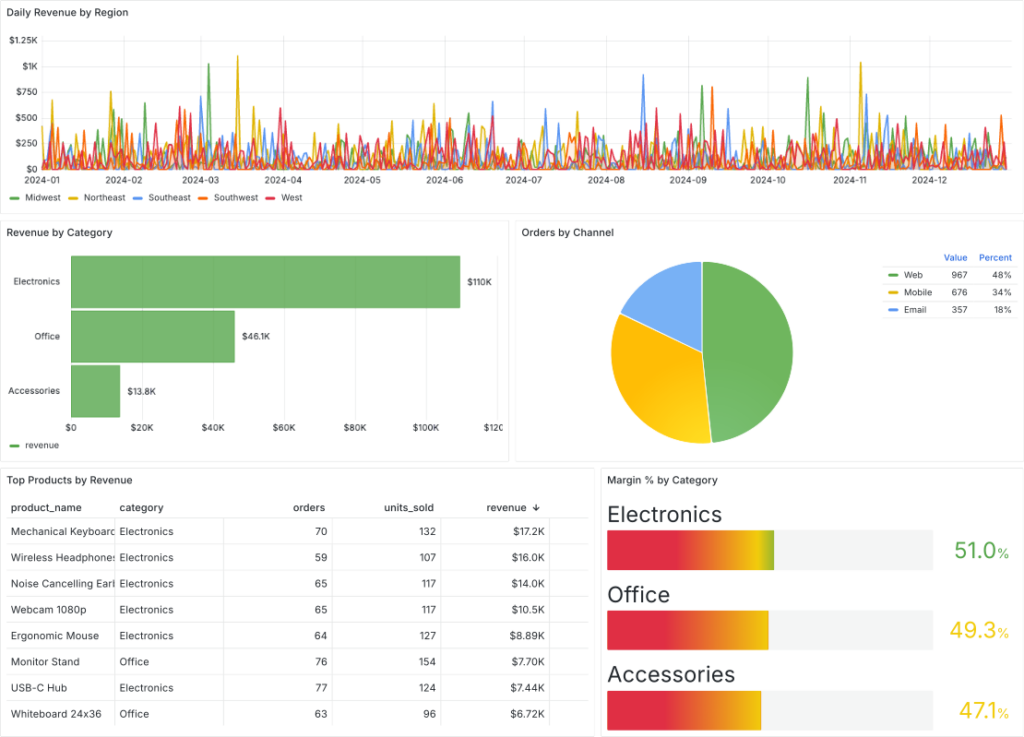
Figure 9. The analytics dashboard
Grafana gives access to the dashboard to Amara and Helen (and anyone else with the appropriate roles). The “Top Products by Revenue” widget comes from reports.product_performance, and everything else comes from analytics.orders.
As an aside, using different groups for Grafana and ClickHouse isolates mistakes in granting access to users. For example, say we put Mateo in the groups grafana-editors and clickhouse-readers. We only want to give Mateo access to data in the reports database, but putting him in the group grafana-editors gives him access to the Analytics dashboard. That doesn’t matter: ClickHouse will reject any query against the analytics database because he’s in clickhouse-readers. Every widget except “Top Products by Revenue” in Figure 9 above won’t contain any data. For example, “Revenue by Category” requires access to analytics.orders, so it’ll be empty:
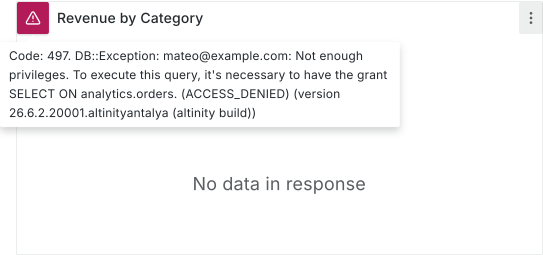
Figure 10. A Grafana widget whose query was rejected by ClickHouse
Finally, the Admin dashboard:
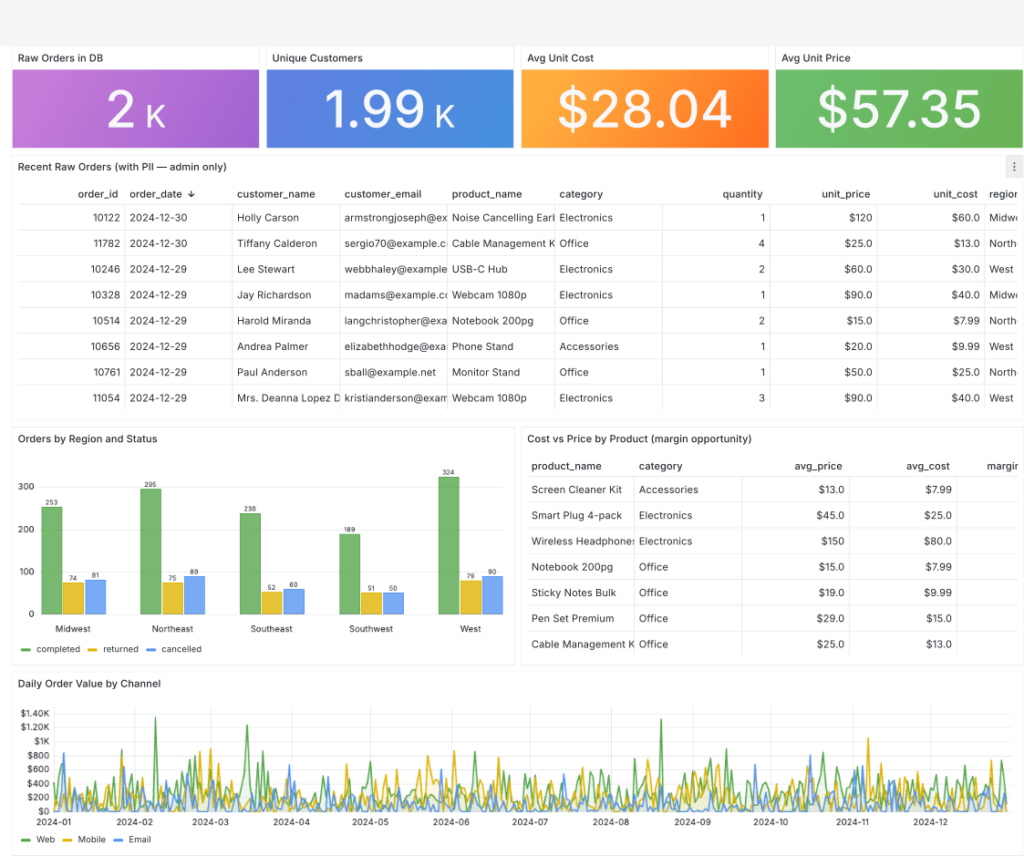
Figure 11. The Admin dashboard
Grafana gives access to the Admin dashboard to Amara only. All of the widgets visualize data from the raw.orders table.
In each case, Grafana and ClickHouse restrict access to dashboards and data correctly.
Users in OAuth, Grafana, and ClickHouse
Let’s wrap things up by looking at the users that exist in Grafana and ClickHouse. As we mentioned before, we manage users through the identity provider. The only users we created were done in Keycloak: Amara, Helen, and Mateo. We haven’t explicitly defined them in Grafana and ClickHouse. First, let’s look at the Grafana admin console to see the list of users:
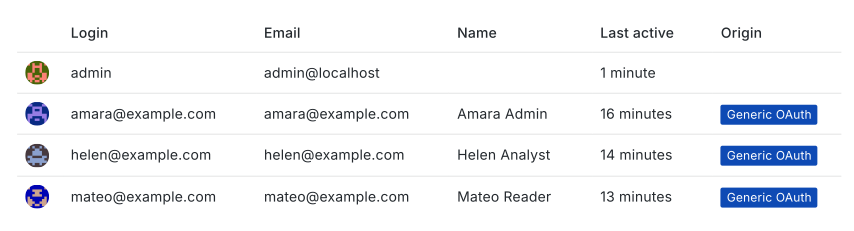
Figure 12. List of users in the Grafana admin console
(Notice the Generic OAuth label next to the users we defined in Keycloak.) Similarly, let’s use clickhouse-client to see who’s defined to ClickHouse:
SELECT name, auth_type FROM system.users

   ┌─name──────────────┬─auth_type──────────────┐
1. │ default           │ ['plaintext_password'] │
2. │ helen@example.com │ ['jwt']                │
3. │ amara@example.com │ ['jwt']                │
4. │ mateo@example.com │ ['jwt']                │
   └───────────────────┴────────────────────────┘
(The auth_type for the users we defined in Keycloak is jwt.) Both Grafana and ClickHouse created users based on tokens generated by the identity provider. Note that Amara, Helen, and Mateo appear in the list above because they’ve logged on before. If we had checked the lists of users before anyone logged in to Grafana, the only users would be admin on Grafana and default on ClickHouse.
Let’s take it one step further: we’ll define user maddie on Keycloak and put her in the grafana-admins and clickhouse_admins groups.
Neither the Grafana server nor the ClickHouse server has seen maddie before, and they don’t even know she exists until she logs in. But once she has, she appears in the list of users in Grafana and ClickHouse:
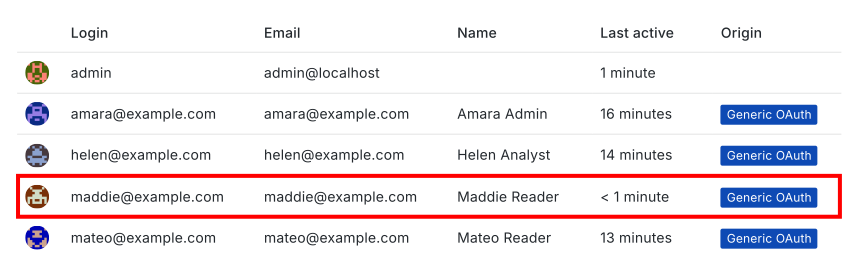
Figure 13. Updated list of users in the Grafana console
There’s a new item in ClickHouse’s system.users table as well:
SELECT name, auth_type FROM system.users

   ┌─name───────────────┬─auth_type──────────────┐
1. │ default            │ ['plaintext_password'] │
2. │ maddie@example.com │ ['jwt']                │
3. │ helen@example.com  │ ['jwt']                │
4. │ amara@example.com  │ ['jwt']                │
5. │ mateo@example.com  │ ['jwt']                │
   └────────────────────┴────────────────────────┘
We defined the new user in one place: the identity provider. Grafana and ClickHouse took it from there.
Summary
Using OAuth and OIDC tokens makes it much easier for us to manage users and their access to resources across our environment. As we’ve seen here, we defined groups in our identity provider (Keycloak), then we mapped them to groups in Grafana and roles in Antalya, then we used those groups and roles to control access to dashboards, databases, and other resources. We don’t have to define users in every component of the system, and the tokens we generate have a limited lifespan and are traceable. If needed, we can revoke a user’s access to everything simply by blocking them at the identity provider. Best of all, we still have access to all of the robust access controls built into ClickHouse. Antalya’s OAuth support makes it possible to manage access to resources based on centrally managed identities and roles.
ClickHouse® is a registered trademark of ClickHouse, Inc.; Altinity is not affiliated with or associated with ClickHouse, Inc.