Managing ClickHouse® on Intel NUC Using Altinity.Cloud Anywhere

If you love ClickHouse®, Altinity can simplify your experience with our fully managed service in your cloud (BYOC) or our cloud and 24/7 expert support. Learn more.
Public cloud data services have revolutionized database management. Developers spin up a database from a cloud service vendor and start building apps in minutes. Altinity.Cloud offered this model for ClickHouse starting in 2020. The uptake has been rapid, and we have lots of happy users.
Still, it was clear that we could do more. Our users love cloud management, but they also value direct control of data, security compliance, and resource costs. In short: the good parts of installed software. We found a way to combine cloud and installed experiences using Kubernetes, a portable runtime for container-based applications.
Altinity.Cloud already uses Kubernetes to provide environments for ClickHouse installations in AWS and GCP. We extended it to create Altinity.Cloud Anywhere. Users can now utilize Kubernetes cluster running virtually anywhere as local environments for managed ClickHouse clusters.
Is Kubernetes really that portable? How far can this model go? The answers are “yes” and “a long way.” This article demonstrates how to use Altinity.Cloud to manage Kubernetes running on an Intel NUC on a home network. It’s just one of countless places we can now manage ClickHouse from the cloud.
The Scene of the Crime
The examples that follow are based on my Intel NUC, which is named pika. It runs on my desktop and connects to the Internet through my home router. Here are the specifications.
- CPU: Intel® Coreâ„¢ I5-4250U @ 1.30GHz (2 cores x 2 threads)
- RAM: 16GB (2 x 8GB SODIMM DDR 1600 MHz)
- Storage: 1TB Samsung SSD 840
- OS: Ubuntu 22.04.1 LTS
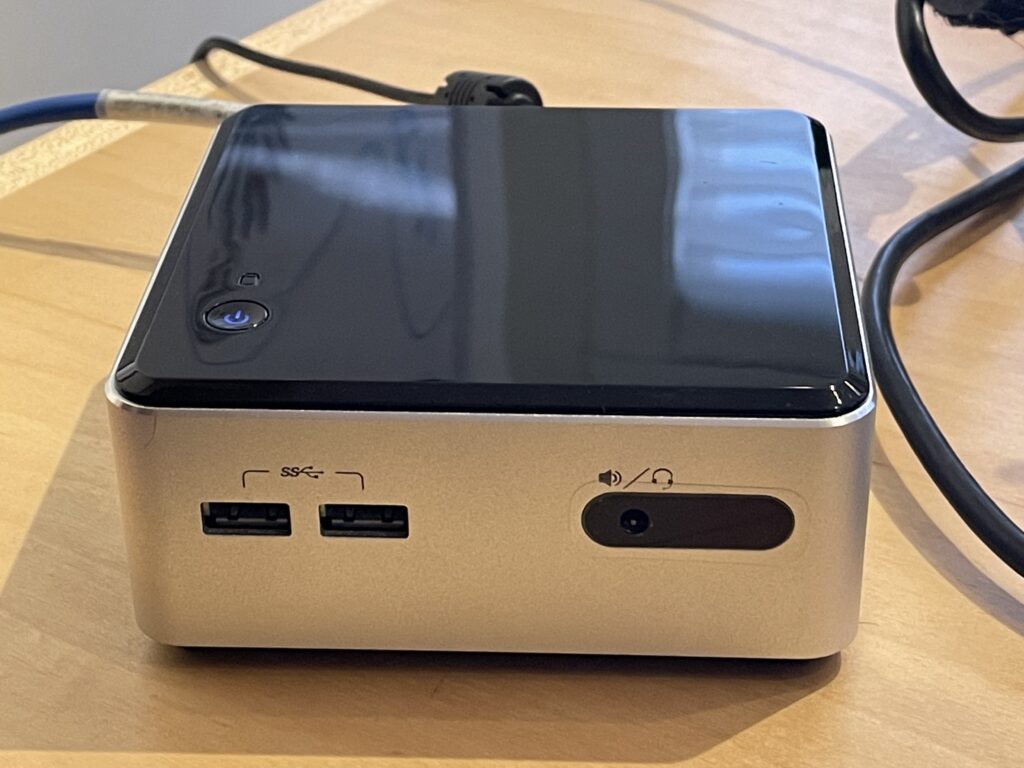
Pika’s CPU came out in 2013, so it’s old and pretty underpowered. Here’s a picture to prove pika is really on my desk.
Install Kubernetes
For this exercise we’ll use minikube, a developer version of Kubernetes that runs on Linux hosts. Other Kubernetes work as well. Here are the commands to set up on Ubuntu 22.04.
Download and install kubectl, the standard command line tool for managing Kubernetes clusters.
curl -LO "https://dl.k8s.io/release/$(curl -L -s https://dl.k8s.io/release/stable.txt)/bin/linux/amd64/kubectl"Next, install Docker. Here are the commands to add the repo and install packages.
sudo mkdir -p /etc/apt/keyrings
curl -fsSL https://download.docker.com/linux/ubuntu/gpg |\
 sudo gpg --dearmor -o /etc/apt/keyrings/docker.gpg
echo \
 "deb [arch=$(dpkg --print-architecture) signed-by=/etc/apt/keyrings/docker.gpg] https://download.docker.com/linux/ubuntu $(lsb_release -cs) stable" | \
 sudo tee /etc/apt/sources.list.d/docker.list > /dev/null
sudo apt-get update
sudo apt-get install docker-ce docker-ce-cli containerd.io \
 docker-buildx-plugin docker-compose-plugin
Finally, install minikube.
curl -LO \ https://storage.googleapis.com/minikube/releases/latest/minikube_latest_amd64.deb
sudo dpkg -i minikube_latest_amd64.deb
minikube start
Once the last command finishes, you can talk to Kubernetes using kubectl. Let’s see which namespaces are installed.
$ kubectl get ns
NAME                                STATUS   AGE
default                             Active   19d
kube-node-lease                     Active   19d
kube-public                         Active   19d
kube-system                         Active   19d
Additional Prep for Minikube to Work With Altinity.Cloud
Minikube is up and running. However, we need to do a bit of extra preparation so that Altinity.Cloud Anywhere can use it. Before doing so it helps to understand how Kubernetes schedules pods (i.e., containers that represent processes) on nodes (hosts or VMs).
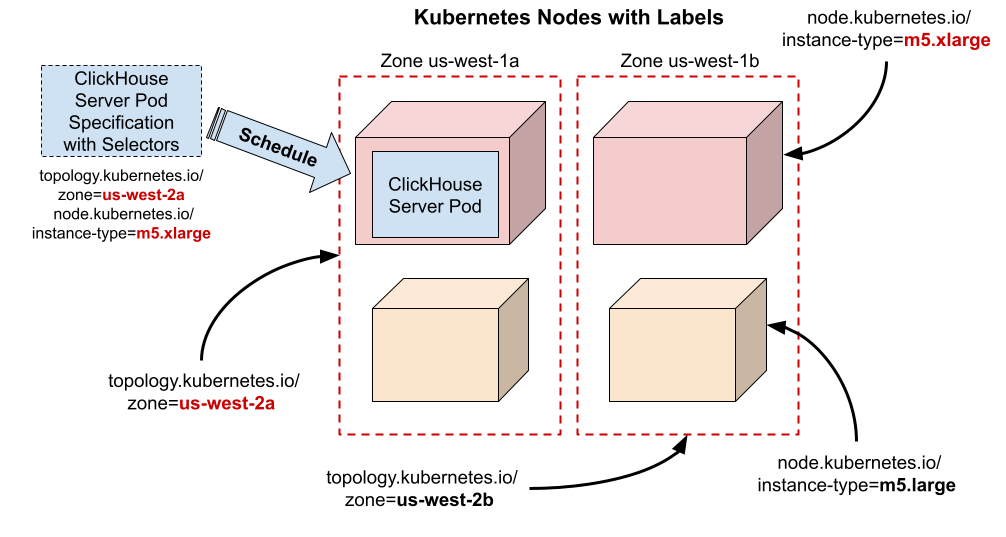
Altinity.Cloud Anywhere expects that each node has a zone label and an instance-type label. In environments like AWS the zone corresponds to the availability zone in which the node lives, and the instance type is the node VM type. AWS EKS creates these labels automatically, so you don’t have to do anything special.
Minikube does nothing of the sort, since it’s just running locally on a desktop and offers a single node. To enable Altinity.Cloud to work, we’ll need to add a fake instance type and zone. Let’s do that now.
kubectl --context=minikube label nodes minikube \
  node.kubernetes.io/instance-type=minikube-node \
  topology.kubernetes.io/zone=minikube-zone-a
We’re now truly done with the Kubernetes setup and can turn to connecting it with Altinity.Cloud.
Connecting the NUC to Altinity.Cloud
As before, it is helpful to understand what’s going on behind the scenes. Here’s how Altinity.Cloud Anywhere works with Kubernetes.
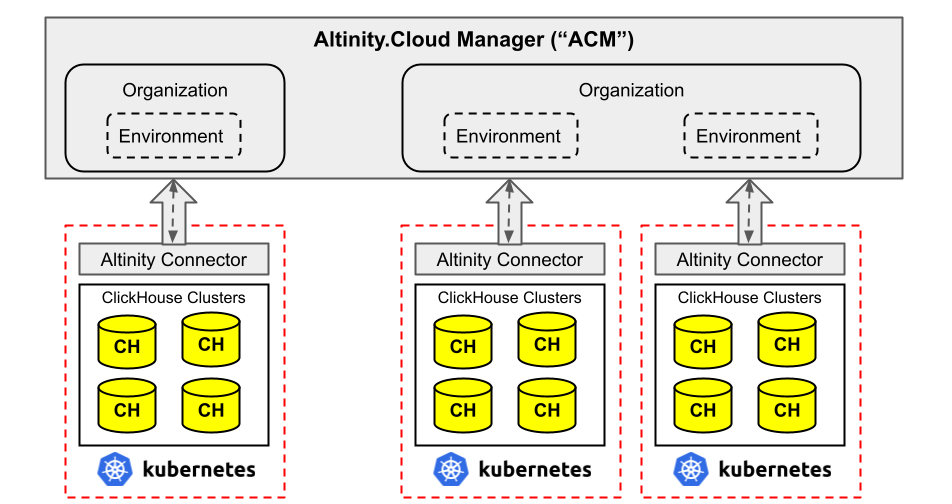
Altinity.Cloud Anywhere runs ClickHouse servers in “environments,” which correspond to user Kubernetes clusters. The Altinity Connector sets up a secure connection from the Kubernetes cluster to Altinity.Cloud, which allows it to manage ClickHouse clusters. As this picture shows, users (which we call “organizations”) can have multiple environments.
Get an Altinity.Cloud account with an Anywhere environment
If you are already an Altinity.Cloud user, just send an email to support at altinity dot com requesting an Anywhere environment. We’ll start it for you and ensure your account has privileges to access it.
If you are not already an Altinity.Cloud user, you can request an Anywhere trial here. Full documentation is here. You will need to validate your email to complete registration. The trial is free for two weeks, and there is no need to enter a credit card.
Register your minikube cluster with Altinity.Cloud
Sign on to Altinity.Cloud and locate your environment using the left side Environments tab. You’ll see a screen like the following.
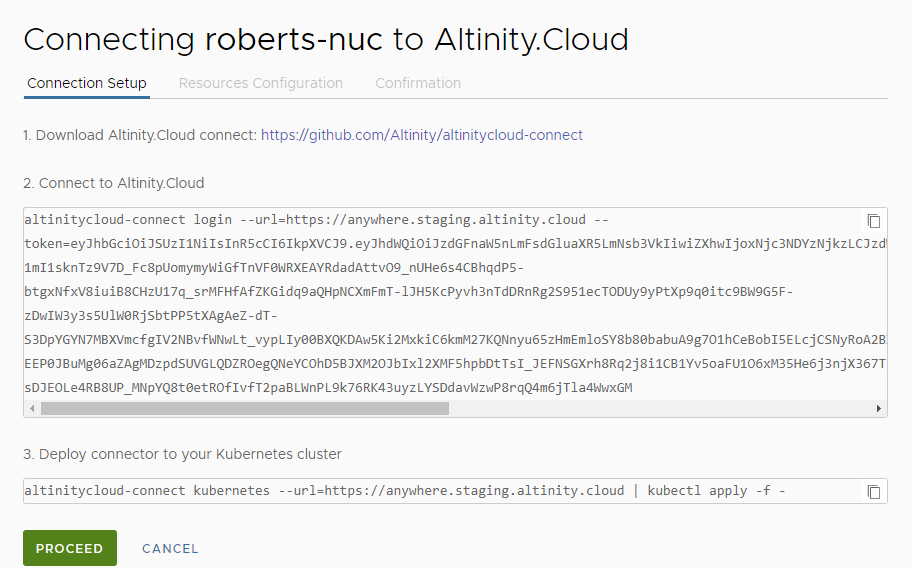
Let’s follow the procedure. First, download the Altinity Connector.
curl -sSL https://github.com/altinity/altinitycloud-connect/releases/download/v0.9.3/altinitycloud-connect-0.9.3-linux-amd64 \
 -o altinitycloud-connect \
 && chmod a+x altinitycloud-connect \
 && sudo mv altinitycloud-connect /usr/local/bin/
Next, we need to register with Altinity.Cloud. Note that the –url argument is different from what you’ll see in a production instance because I’m targeting a staging environment for testing. You can leave this off in a real installatino or just copy the command you see. Either way everything should work.
altinitycloud-connect login --token=<token from Altinity.Cloud>Finally, deploy Altinity Connector into Kubernetes. Altinity Connector generates a script for this purpose that we pipe into kubectl. If you want to know exactly what’s in the script, run the first command and dump the output to a file for inspection.
altinitycloud-connect kubernetes | kubectl apply -f -If you now check the namespaces in Kubernetes, you’ll see two new altinity-cloud namespaces have been added.
$ kubectl get ns
NAME                                STATUS   AGE
altinity-cloud-managed-clickhouse   Active   2m46s
altinity-cloud-system               Active   2m46s
default                             Active   18d
kube-node-lease                     Active   18d
kube-public                         Active   18d
kube-system                         Active   18d
Complete configuration in Altinity.Cloud
We can now switch back to Altinity.Cloud to complete setup. Back in the Altinity.Cloud Manager, press the PROCEED button on the Connection Setup tab. You’ll see the following screen.
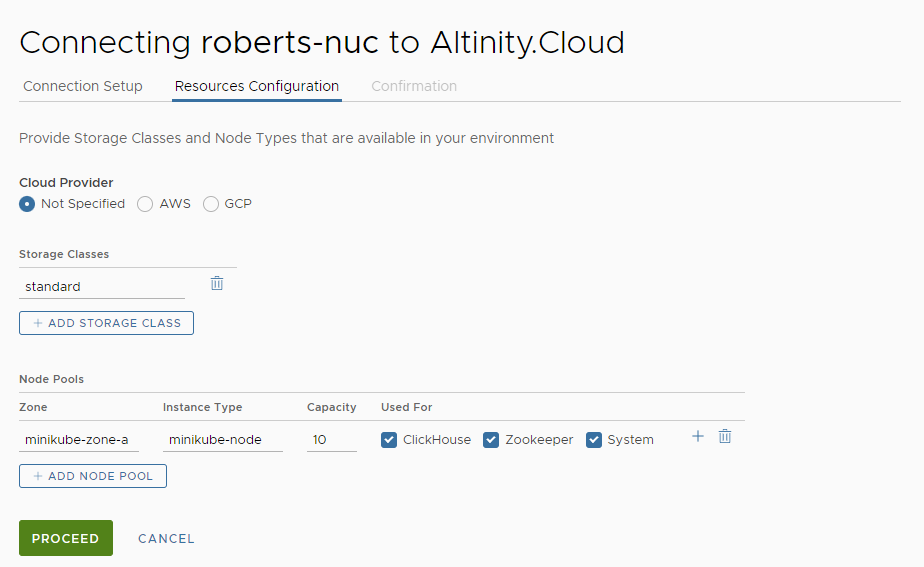
Fill out the screen exactly as shown in the above example and press PROCEED. A final screen will appear.
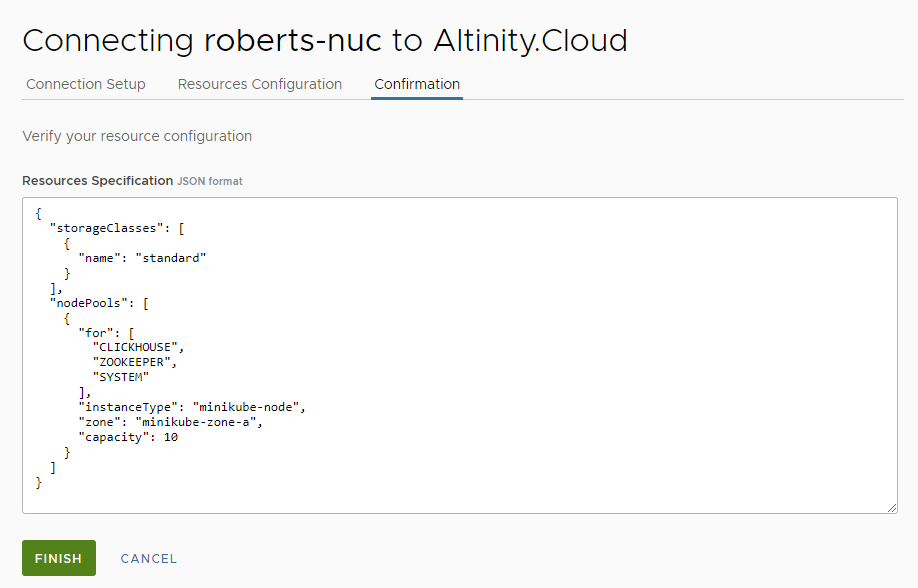
Press FINISH and wait. You’ll see a “Connection is being established. Please wait…” message. Don’t worry if it times out. It’s downloading containers into the altinity-cloud-system and altinity-cloud-managed-clickhouse namespace and configuring the environment for use. This can take 15 minutes or more to complete.
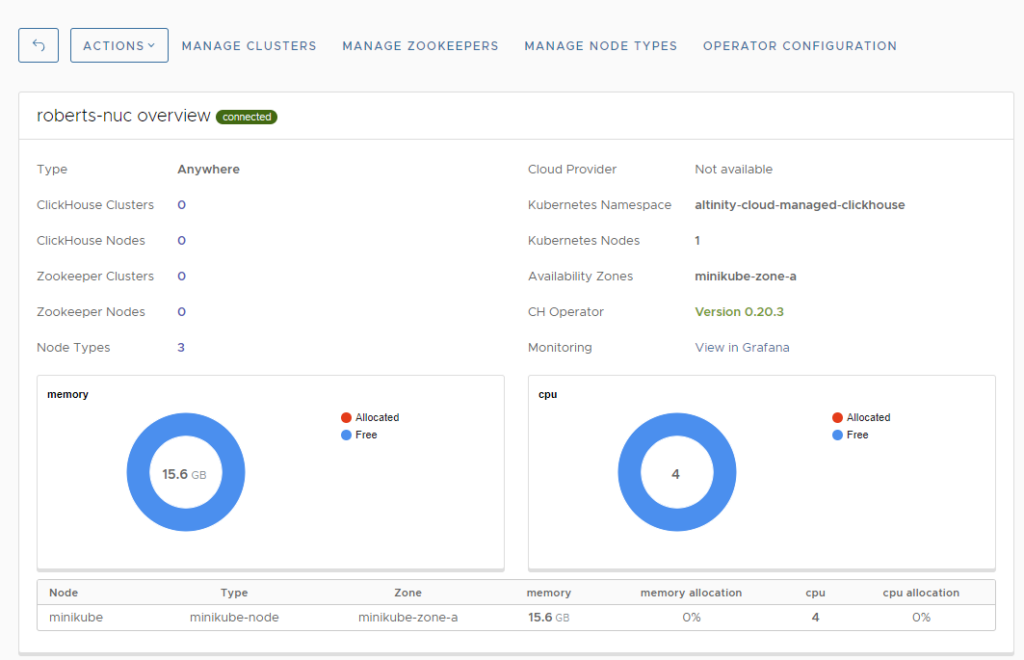
Once environment configuration finishes, you’ll see a screen like the following.
If you look in the altinity-cloud-system and altinity-cloud-managed-clickhouse namespaces, you’ll see that they are populated with a variety of services required to manage ClickHouse on Kubernetes. For instance, the altinity-cloud-managed-clickhouse namespace contains the Altinity Kubernetes Operator for ClickHouse.
$ kubectl -n altinity-cloud-managed-clickhouse get pods
NAME                                 READY   STATUS    RESTARTS   AGE
clickhouse-operator-996785fc-vvgn6   2/2     Running   0          10m
Final adjustments for minikube
In the Environment view, press MANAGE NODE TYPES. A list of node types will appear – they will be missing CPU and memory because minikube does not know about instance types or the associated resources.
Use the ADD NODE TYPE and Edit functions (available if you press the triple dots on the left of each row) to fill out the node definitions as shown below.

These settings set resource requests for ClickHouse and ZooKeeper so that you can run a ClickHouse server with 2 replicas and 3 ZooKeeper nodes on a 4 vCPU host like pika.
Create a Cluster
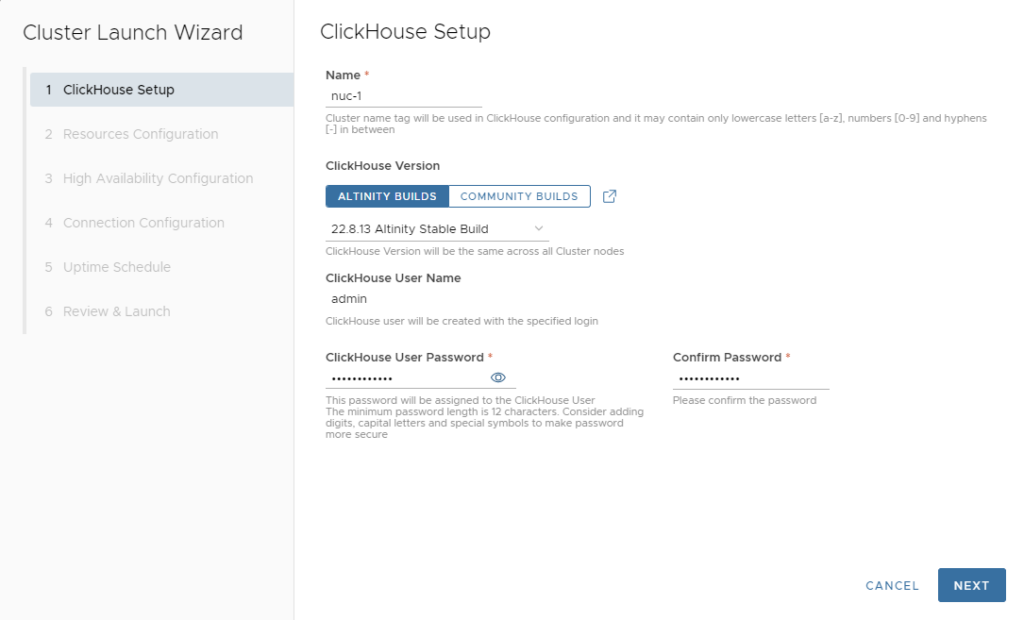
We’re now ready to start a ClickHouse cluster. Press the MANAGE CLUSTERS button in the environment dashboard, followed by LAUNCH CLUSTER in the Clusters panel. This will start the Cluster Launch Wizard.
Fill out the ClickHouse Setup tab as shown below and press NEXT. You’ll need to provide a password of at least 12 letters. Note the password as you can use it later to connect applications.
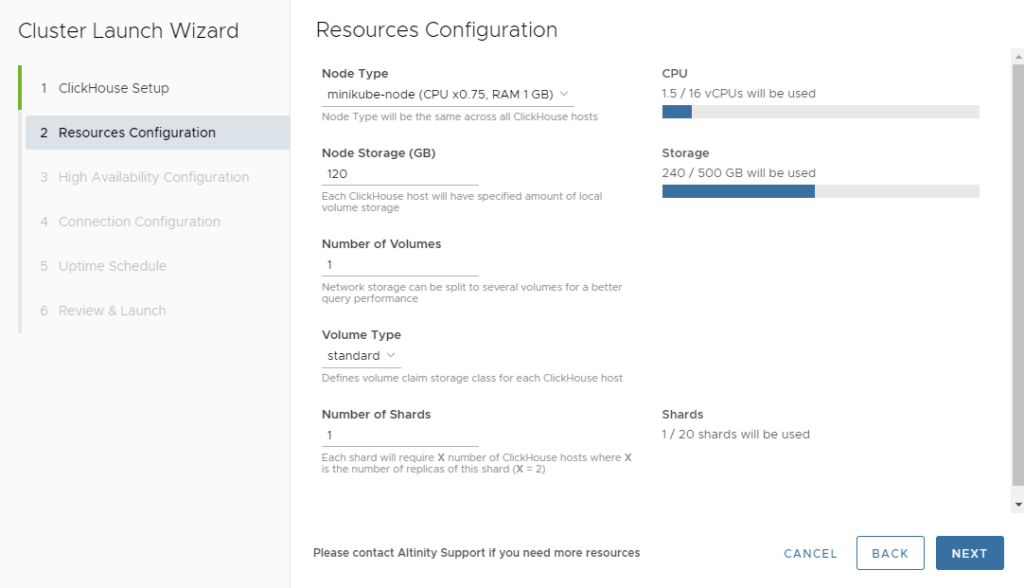
Fill out the Resources Configuration screen as shown below and press NEXT.
You can press NEXT on the following three screens:
- High Availability Configuration – Selects 2 replicas.
- Connection Configuration – Selects TLS connections without any IP whitelist.
- Uptime Schedule – Keeps cluster operating at all times.
You’ll see a review screen at the end. For trials, you can ignore the estimated cluster cost. Press LAUNCH to spin up the cluster. You’ll return the Clusters panel.
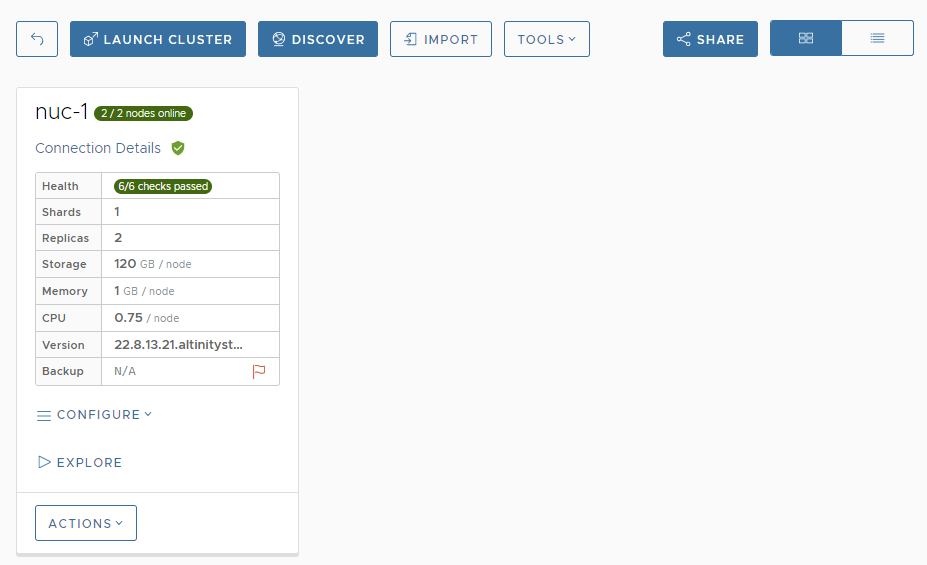
It takes a few minutes for the cluster to spin up fully. (It’s faster if you allocate less storage per node.) Once it is complete the cluster panel will show “2/2 nodes online” and “6/6 checks passed” in green. When you see this, your cluster is ready.
Start Exploring Your New ClickHouse Cluster
Congratulations! You now have a fully managed ClickHouse cluster running on the NUC. Press the nuc-1 card to bring up the cluster dashboard and start looking around.
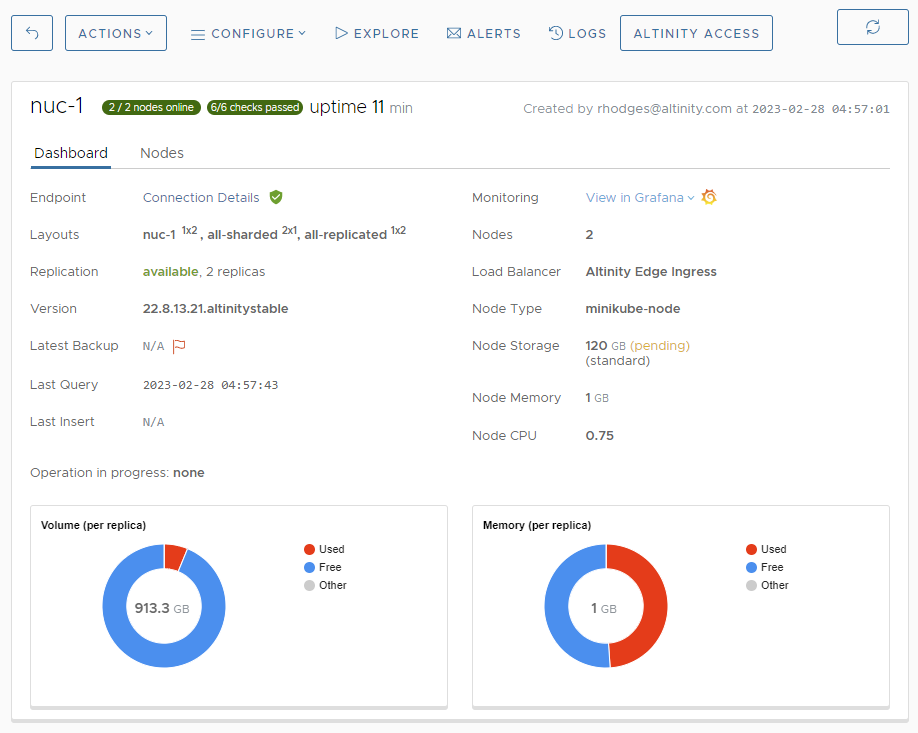
Here are just a few of the many things you can do in Altinity.Cloud.
The ACTIONS menu lets you upgrade, pause, resume, rescale, and destroy your cluster. For example, try upgrading to the newest available ClickHouse version.
In the CONFIGURE menu, you’ll find operations to change configuration variables, create new users, and set uptime schedules that turn your cluster off automatically when it is not in use.
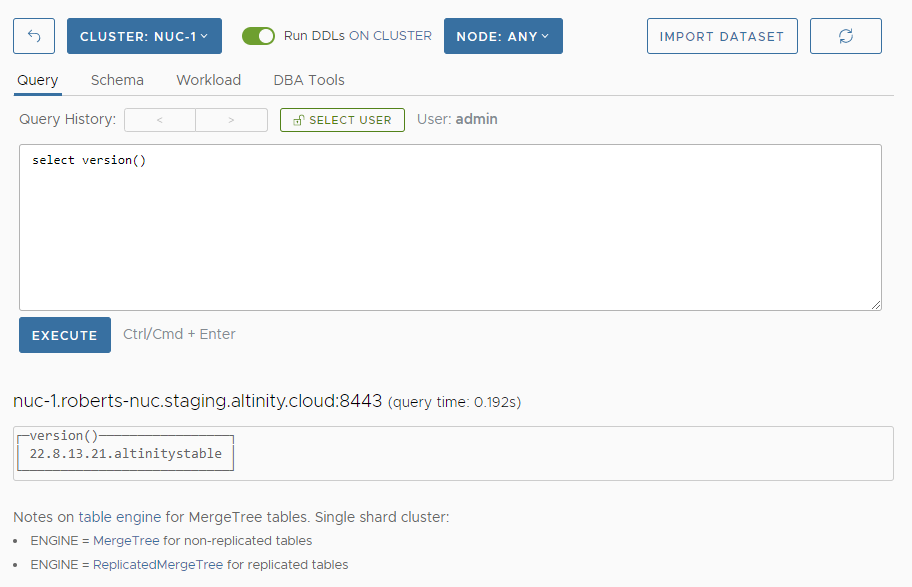
The EXPLORE menu accesses multiple developer tools, including a simple query browser. Open it up and see what version of ClickHouse you’re running, like the following example.
What about loading a test dataset? Press the IMPORT DATASET and select the airline dataset to load. Since we have a couple of replicas, you’ll need to change the table type from MergeTree to ReplicatedMergeTree in the import wizard .Or you can drop one of the replicas before importing. Altinity.Cloud Anywhere makes these operations simple, so have fun!
Note: import downloads a lot of data, so it may take a while to complete unless you have a very fast internet connection.
Whither next?
For more ideas, check out the Altinity.Cloud user documentation as well as our videos. Here’s a recent contribution that introduces Altinity.Cloud Anywhere.
Among other things, you’ll get some insight into what’s going on behind the scenes. Feel free to explore the Kubernetes services, especially those installed in the altinity-cloud-managed-clickhouse namespace. Feeling adventurous? Connect some applications!
Conclusion
Kubernetes opens up the door for a new way to manage data. The management plane is located in the cloud and offers the benefits of cloud management. Meanwhile, data and software live locally in user environments, giving you the control of installed software. The target environment can be as small as minikube running on an Intel NUC.
Many Altinity.Cloud Anywhere users are running ClickHouse in their own cloud accounts using managed Kubernetes services like EKS and GKE. We’re delighted to see their success but also excited by the possibility to support a far wider range of use cases. As this example shows, Kubernetes allows Altinity.Cloud to manage ClickHouse anywhere. Got an edge environment that needs to collect analytics? Building a custom cloud for high performance analytics? Altinity.Cloud Anywhere can manage them both.
We invite you to try Altinity.Cloud Anywhere. The possibilities are truly endless. Drop by the Altinity website and start a trial today.
ClickHouse® is a registered trademark of ClickHouse, Inc.; Altinity is not affiliated with or associated with ClickHouse, Inc.