Using Kubernetes Secrets and Environment Variables in Altinity.Cloud

Another installment of our Running ClickHouse® on Kubernetes series
Doug Tidwell, Director of Content, Altinity
Configuring ClickHouse often involves authentication tokens, credentials, and other sensitive information. Altinity.Cloud has great integration with Kubernetes Secrets and environment variables. In this post we’ll show how easy it is to use the Altinity Cloud Manager (ACM) to integrate the Kubernetes Secrets in your VPC with your ClickHouse configuration. This technique lets users use credentials without ever knowing their values, helping you support your users while keeping your system secure. Best of all, Altinity.Cloud and the ACM don’t access those values either. Your credentials never leave your environment. Read on for the details…
If you love ClickHouse®, Altinity can simplify your experience with our fully managed service in your cloud (BYOC) or our cloud and 24/7 expert support. Learn more.
Bring Your Own Kubernetes
The architecture we’ll be using here is what we call Bring Your Own Kubernetes. In this architecture, you create and manage the Kubernetes cluster. With the Kubernetes cluster created, you use the altinitycloud-connect tool to authorize Altinity to create ClickHouse clusters inside your Kubernetes cluster. Then you can use the ACM to manage ClickHouse clusters inside your Kubernetes cluster.
Here’s a simplified view of the architecture:
The ACM runs in Altinity’s VPC, while the Kubernetes cluster and any ClickHouse clusters it runs are in your VPC. You have complete control over your Kubernetes environment.
Our scenario
A common scenario for configuring ClickHouse is setting up an S3 bucket as a data store. In many cases access to that bucket is tightly controlled. With AWS, you’ll probably need an access key and a secret key to read or write sensitive data in the bucket. What we’d like to do, of course, is let ClickHouse users and application developers access the bucket without ever knowing the actual values of the access key and secret key.
The technique
As you probably guessed from the title, we’ll be using Kubernetes Secrets and environment variables to solve the problem. The steps are:
- Define a Kubernetes Secret that contains the access key and the secret key.
- Define environment variables that pull the access key and the secret key out of the Kubernetes Secret.
- Use those environment variables in our ClickHouse configuration.
This approach has several advantages:
- Many Kubernetes deployments use Secrets already, and those deployments have locked down access to the Secrets. You’re just using your existing infrastructure.
- The environment variables are set every time a pod is launched. Kubernetes sets their values to the appropriate keys within the appropriate Secrets.
- The only thing a ClickHouse user can access is the name of the environment variable, not its value. That means we can use the credential by putting the variable name in our ClickHouse configuration. The actual value never appears in the ClickHouse configuration files.
So that’s the technique. It’s elegant, relatively simple, and it works with any ClickHouse on Kubernetes deployment, whether you’re an Altinity customer or not.
Our example: Configuring an S3 bucket as a data store
As an illustration we’ll look at setting up an S3 bucket as a data store for ClickHouse. That means we need to create an <s3> element in our ClickHouse configuration. We’ll do that with a file we’ve named s3.xml that we’ll eventually need to put in the config.d directory. That file should look like this:
<clickhouse>
  <s3>
    <endpoint-name>
      <endpoint>https://acm-example-bucket.s3.us-east-1.amazonaws.com/ch-data/</endpoint>
      <access_key_id>
        KAA...PDH
      </access_key_id>
      <secret_access_key>
        1qy...tpg
      </secret_access_key>
    </endpoint-name>
  </s3>
</clickhouse>
The three key pieces of information here are the URL of the S3 bucket, the access_key, and the secret_key. (BTW, we’ve abbreviated the values of the Secrets throughout to thwart bots that scan for things that look like credentials.)
A couple of restrictions on the URL of the S3 bucket: first of all, it has to end with a directory name; you can’t just refer to the root directory of the bucket. Second, you need to use the bucket URL that includes a zone name (...s3.us-east-1.amazonaws... instead of ...s3.amazonaws...).
In this example we’ve hardcoded the values for access_key and secret_key in the ClickHouse configuration file; that’s exactly what we don’t want to do. Let’s fix that.
Step 1. Creating the Kubernetes Secret
A Kubernetes Secret is the default way of managing credentials in a Kubernetes cluster. Creating one is straightforward with kubectl:
> kubectl create secret generic s3-credentials \
--namespace altinity-cloud-managed-clickhouse \
--from-literal=access_key=KAA...PDH \
--from-literal=secret_key=1qy...tpg
This creates a new Kubernetes Secret named s3-credentials. It contains two secrets, access_key and secret_key, and it’s in the altinity-cloud-managed-clickhouse namespace.
Let us take this opportunity to introduce the eminently useful kubens tool. Runningkubens altinity-cloud-managed-clickhouse sets kubectl’s default namespace so you don’t have to type the namespace again. You’re welcome. (And yes, kubectl config ... can do the same thing, but kubens is way easier to type.)
We can use kubectl get secret to take a look at the data, which includes the base64-encoded version of the credentials:
> kubectl get secret s3-credentials \
--namespace altinity-cloud-managed-clickhouse -o json
{
  "apiVersion": "v1",
  "data": {
      "access_key": "S0F...Eg=",
      "secret_key": "MXF...w=="
  },
  "kind": "Secret",
  "metadata": {
      "creationTimestamp": "2024-02-06T00:05:28Z",
      "name": "s3-credentials",
      "namespace": "altinity-cloud-managed-clickhouse",
      "resourceVersion": "979309",
      "uid": "63f33a8b-84d9-bd9d-4dbb-dcb47cf80941"
  },
  "type": "Opaque"
}
Creating the Secret makes it available inside the Kubernetes cluster, so anyone with kubectl access to the Kubernetes cluster can use it. As administrators, when we say “anyone” we of course mean “as few people as possible.” And that chosen few may not include any ClickHouse users or developers. But as we’ll see, that’s okay.
Step 2. Creating environment variables
For the rest of our example, we’ll use the UI of the Altinity Cloud Manager (ACM). The ACM makes it easy to set up the environment variables and the ClickHouse configuration we need. For details on using environment variables and Kubernetes Secrets without the ACM, see Robert Hodges’ blog post ClickHouse Confidential: Using Kubernetes Secrets with the Altinity Operator.
As a starting point, we used the Launch Cluster Wizard in the ACM to create a ClickHouse cluster named credentials inside our Kubernetes cluster:
The cluster view in the ACM gives us a quick overview of the ClickHouse cluster’s properties, and of course it lets us drill down into the cluster’s properties, nodes, connections, and other details. For our purposes here, all we care about is configuring the settings, which we can do from the Configure menu:
This takes us to the Settings panel:
Going to the Environment Variables tab, then clicking the ADD VARIABLE button makes it easy to create the variables we need. Here’s the dialog:
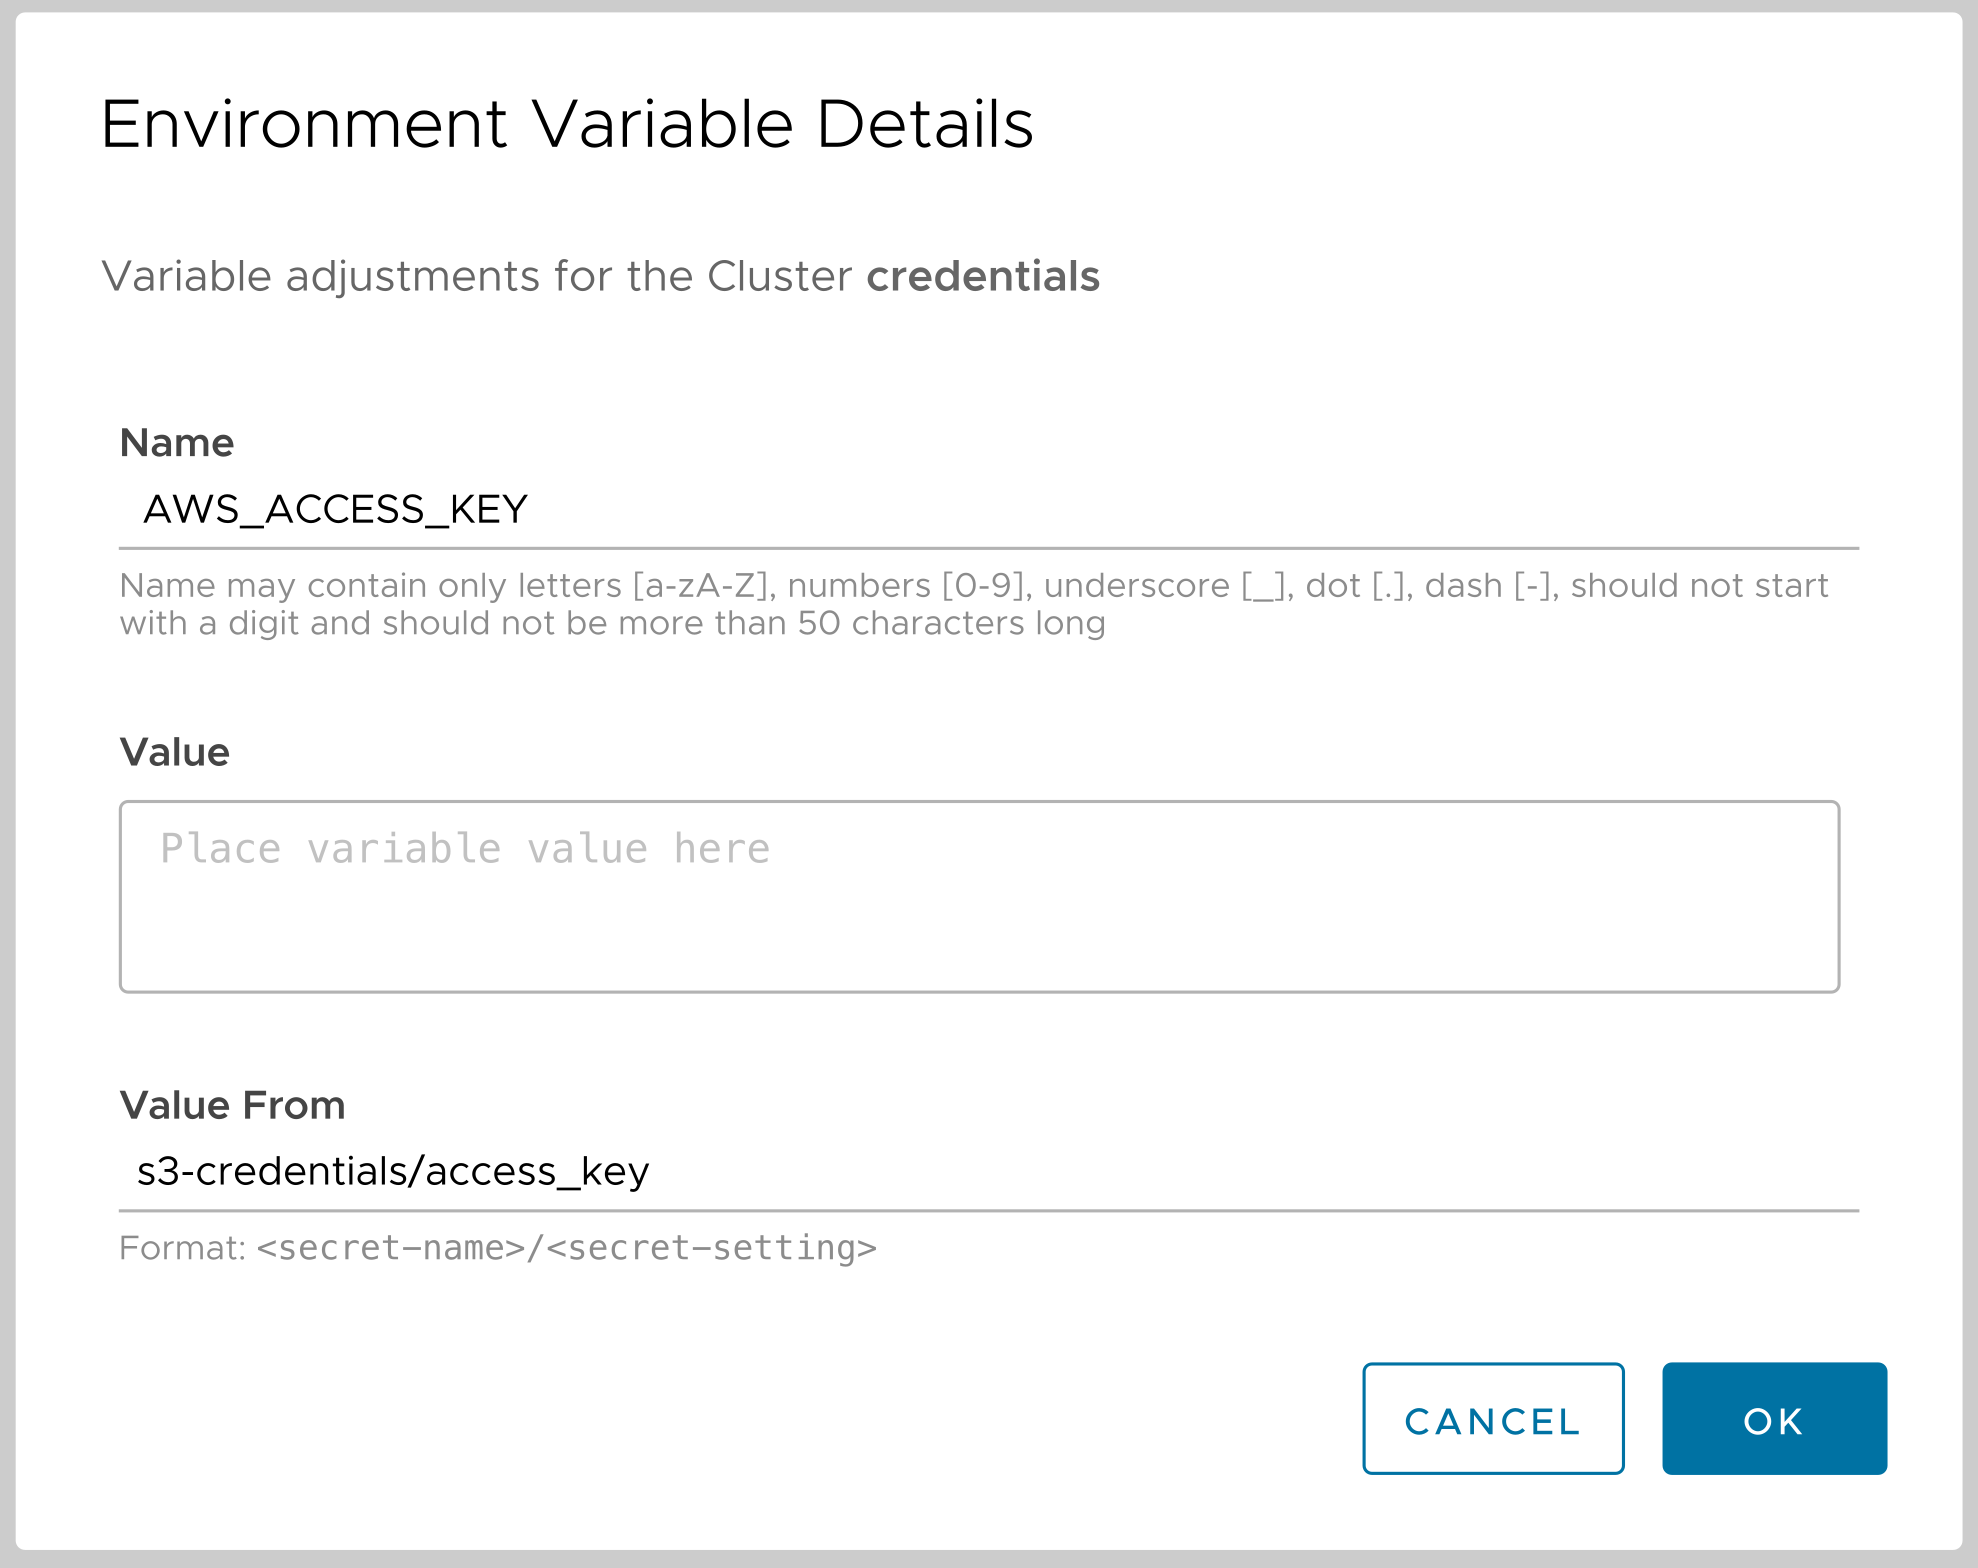
Here we’re defining the variable AWS_ACCESS_KEY. In the dialog we have two choices: we can use Value to enter text as the value of the variable, or we can use Value From to specify a key in a Kubernetes Secret. Here we’ve entered s3-credentials/access_key. The format is secret-name/secret-key. The AWS_SECRET_KEY environment variable is created the same way.
Now we’ve got our environment variables defined:
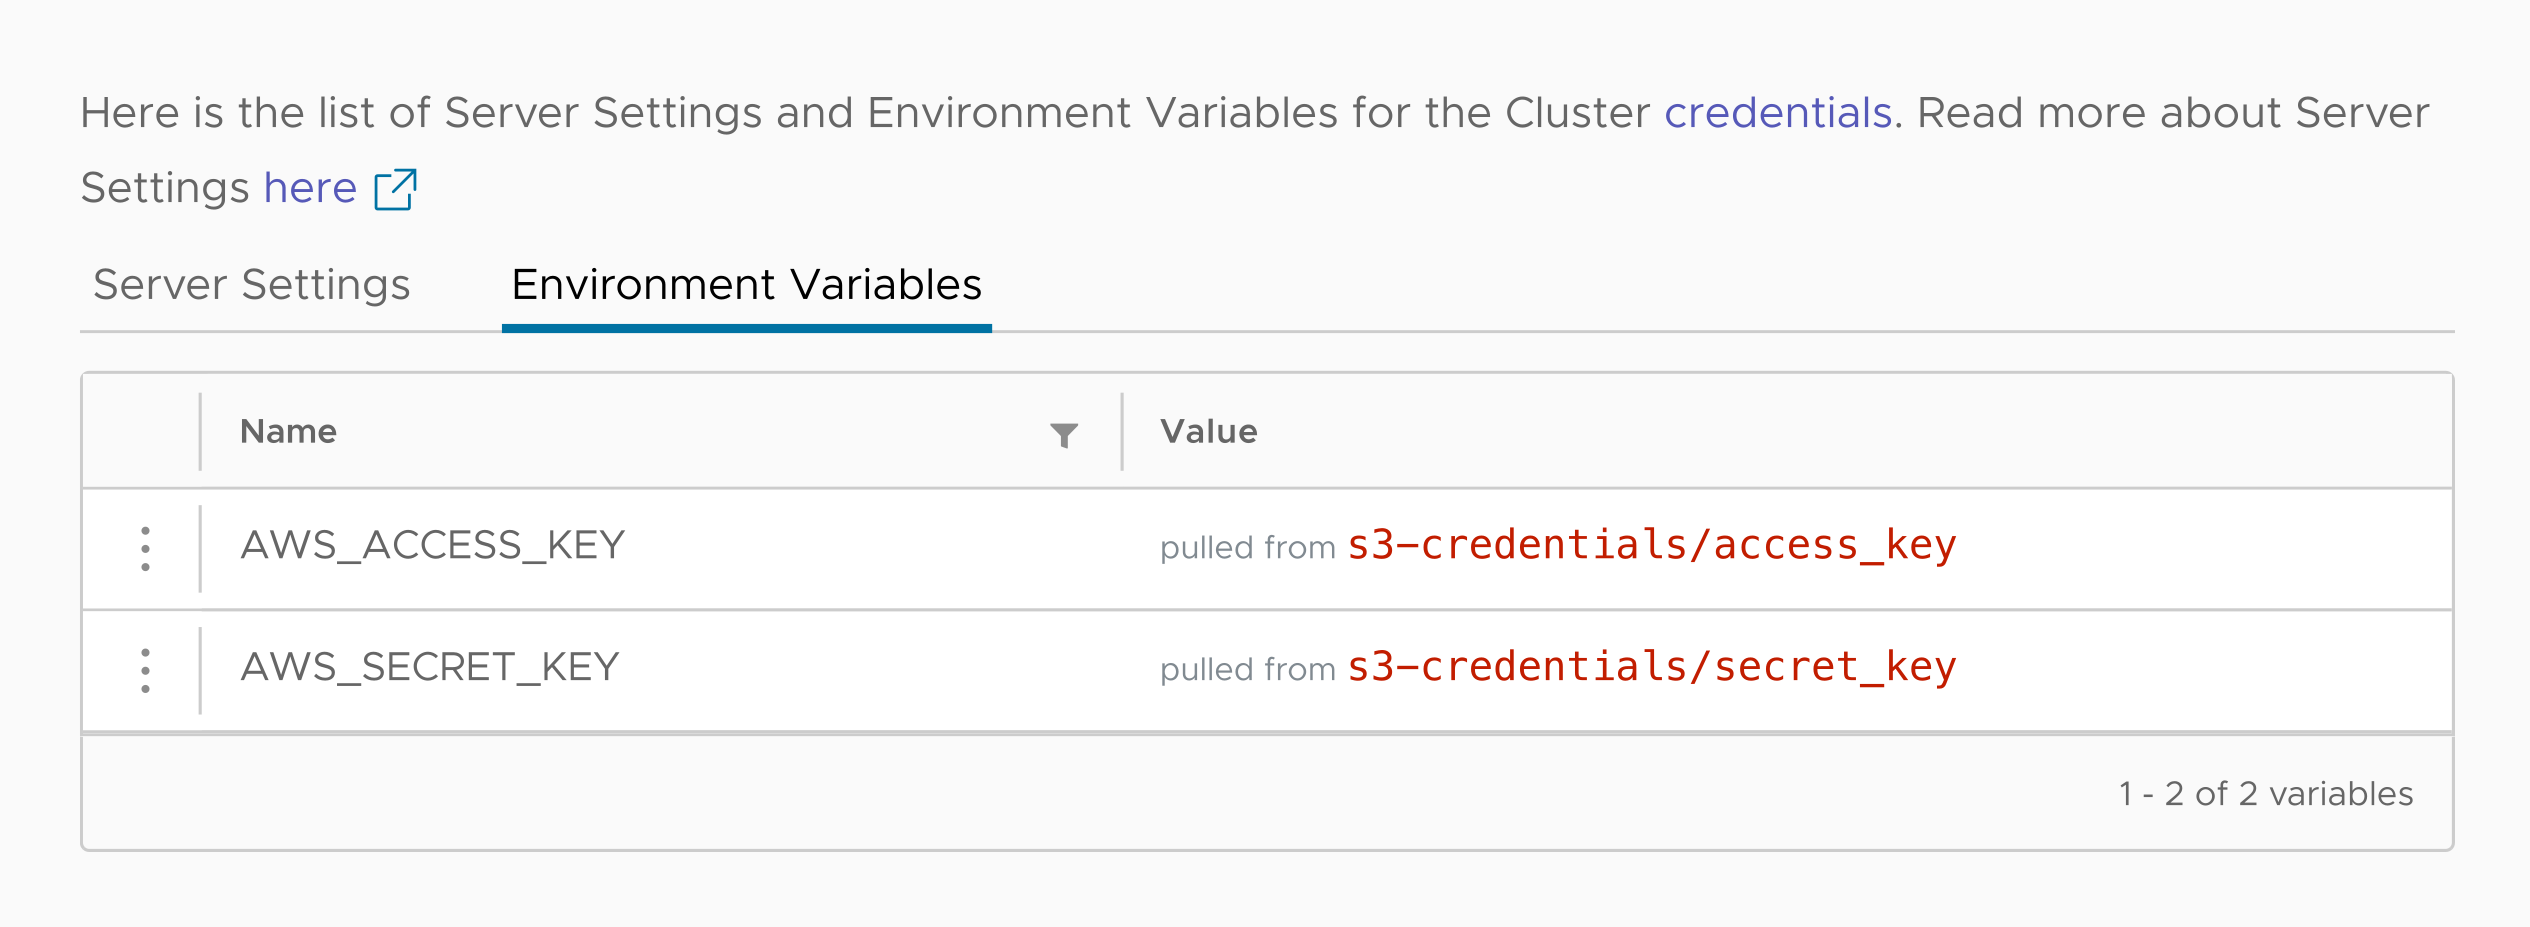
The display shows us the name of each variable and where its value comes from, but there’s no way for the person using the ACM to see its actual value. The ACM doesn’t access the Secret, it simply creates the YAML instructions that tell the Kubernetes cluster how to set the values.
By default, ClickHouse uses the environment variables AWS_ACCESS_KEY_ID and AWS_SECRET_ACCESS_KEY to access an S3 bucket if you don’t explicitly specify any credentials. It’s easy to set those variables in the ACM, but that limits you to a single set of credentials. Using our own variable names lets us configure as many sets of credentials as we need, then use them with different buckets.
Now it’s time to use these variables to configure ClickHouse.
Step 3. Configuring ClickHouse
Everything is in place, we just need to create the s3.xml file and insert the values of the environment variables in it. That couldn’t be simpler:
<clickhouse>
  <s3>
    <endpoint-name>
      <endpoint>https://acm-example-bucket.s3.us-east-1.amazonaws.com/ch-data/</endpoint>
      <access_key_id from_env="AWS_ACCESS_KEY"/>
      <secret_access_key from_env="AWS_SECRET_KEY"/>
    </endpoint-name>
  </s3>
</clickhouse>
Our configuration file uses the enormously helpful from_env attribute, which says the values of the <access_key_id> and <secret_access_key> elements should be the values of the named environment variables. Notice that we refer to the variable as AWS_ACCESS_KEY, not $AWS_ACCESS_KEY.
So we have our s3.xml file set up; all we have to do is store it in the /etc/clickhouse-server/config.d directory and we’ll be good to go. However, an administrator is unlikely to give many people access to the file system, especially that directory. As you probably guessed, the ACM makes this easy.
We’ll go back to the Configure Settings menu, only this time we’ll look at the Server Settings tab:
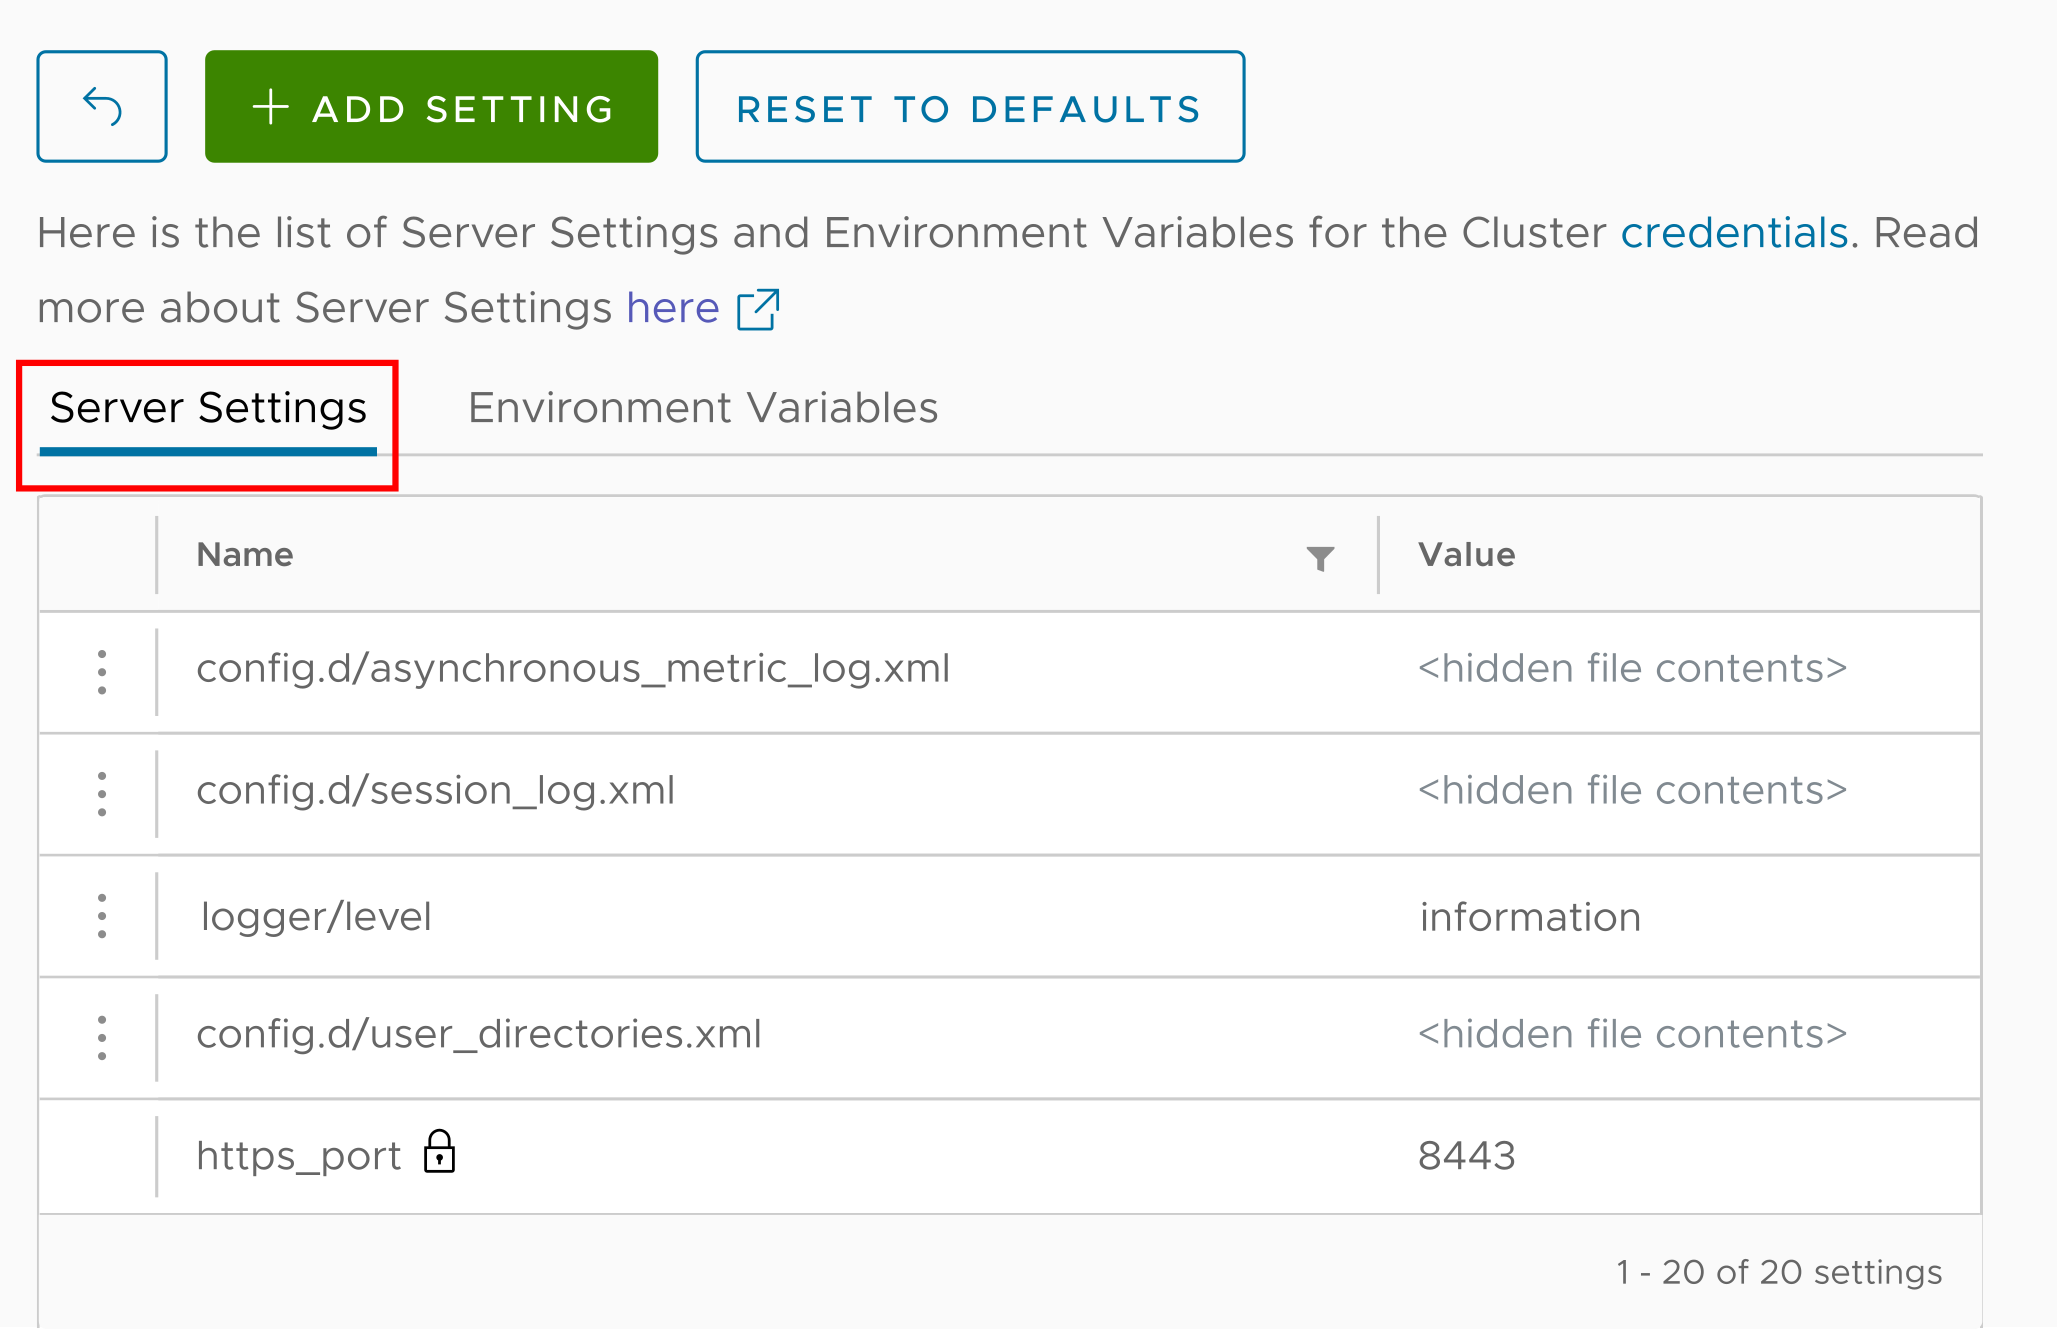
Clicking the ADD SETTING button lets us create a new system setting. It’s easy to create different types of settings:
- Attributes – name/value pairs. In the display above, the attribute
logger/levelhas the valueinformation, and the attributehttps_portis8443. config.dfiles – a file in theconfig.ddirectory. Give the file a name, paste its contents into the text area (the contents are XML in our case, but they could be anything), and the ACM creates the file for you.users.dfiles – similar toconfig.d, except the file you create goes into theusers.ddirectory.
What we want to do here is create a new XML file in the config.d directory. Here’s the dialog that makes it easy:
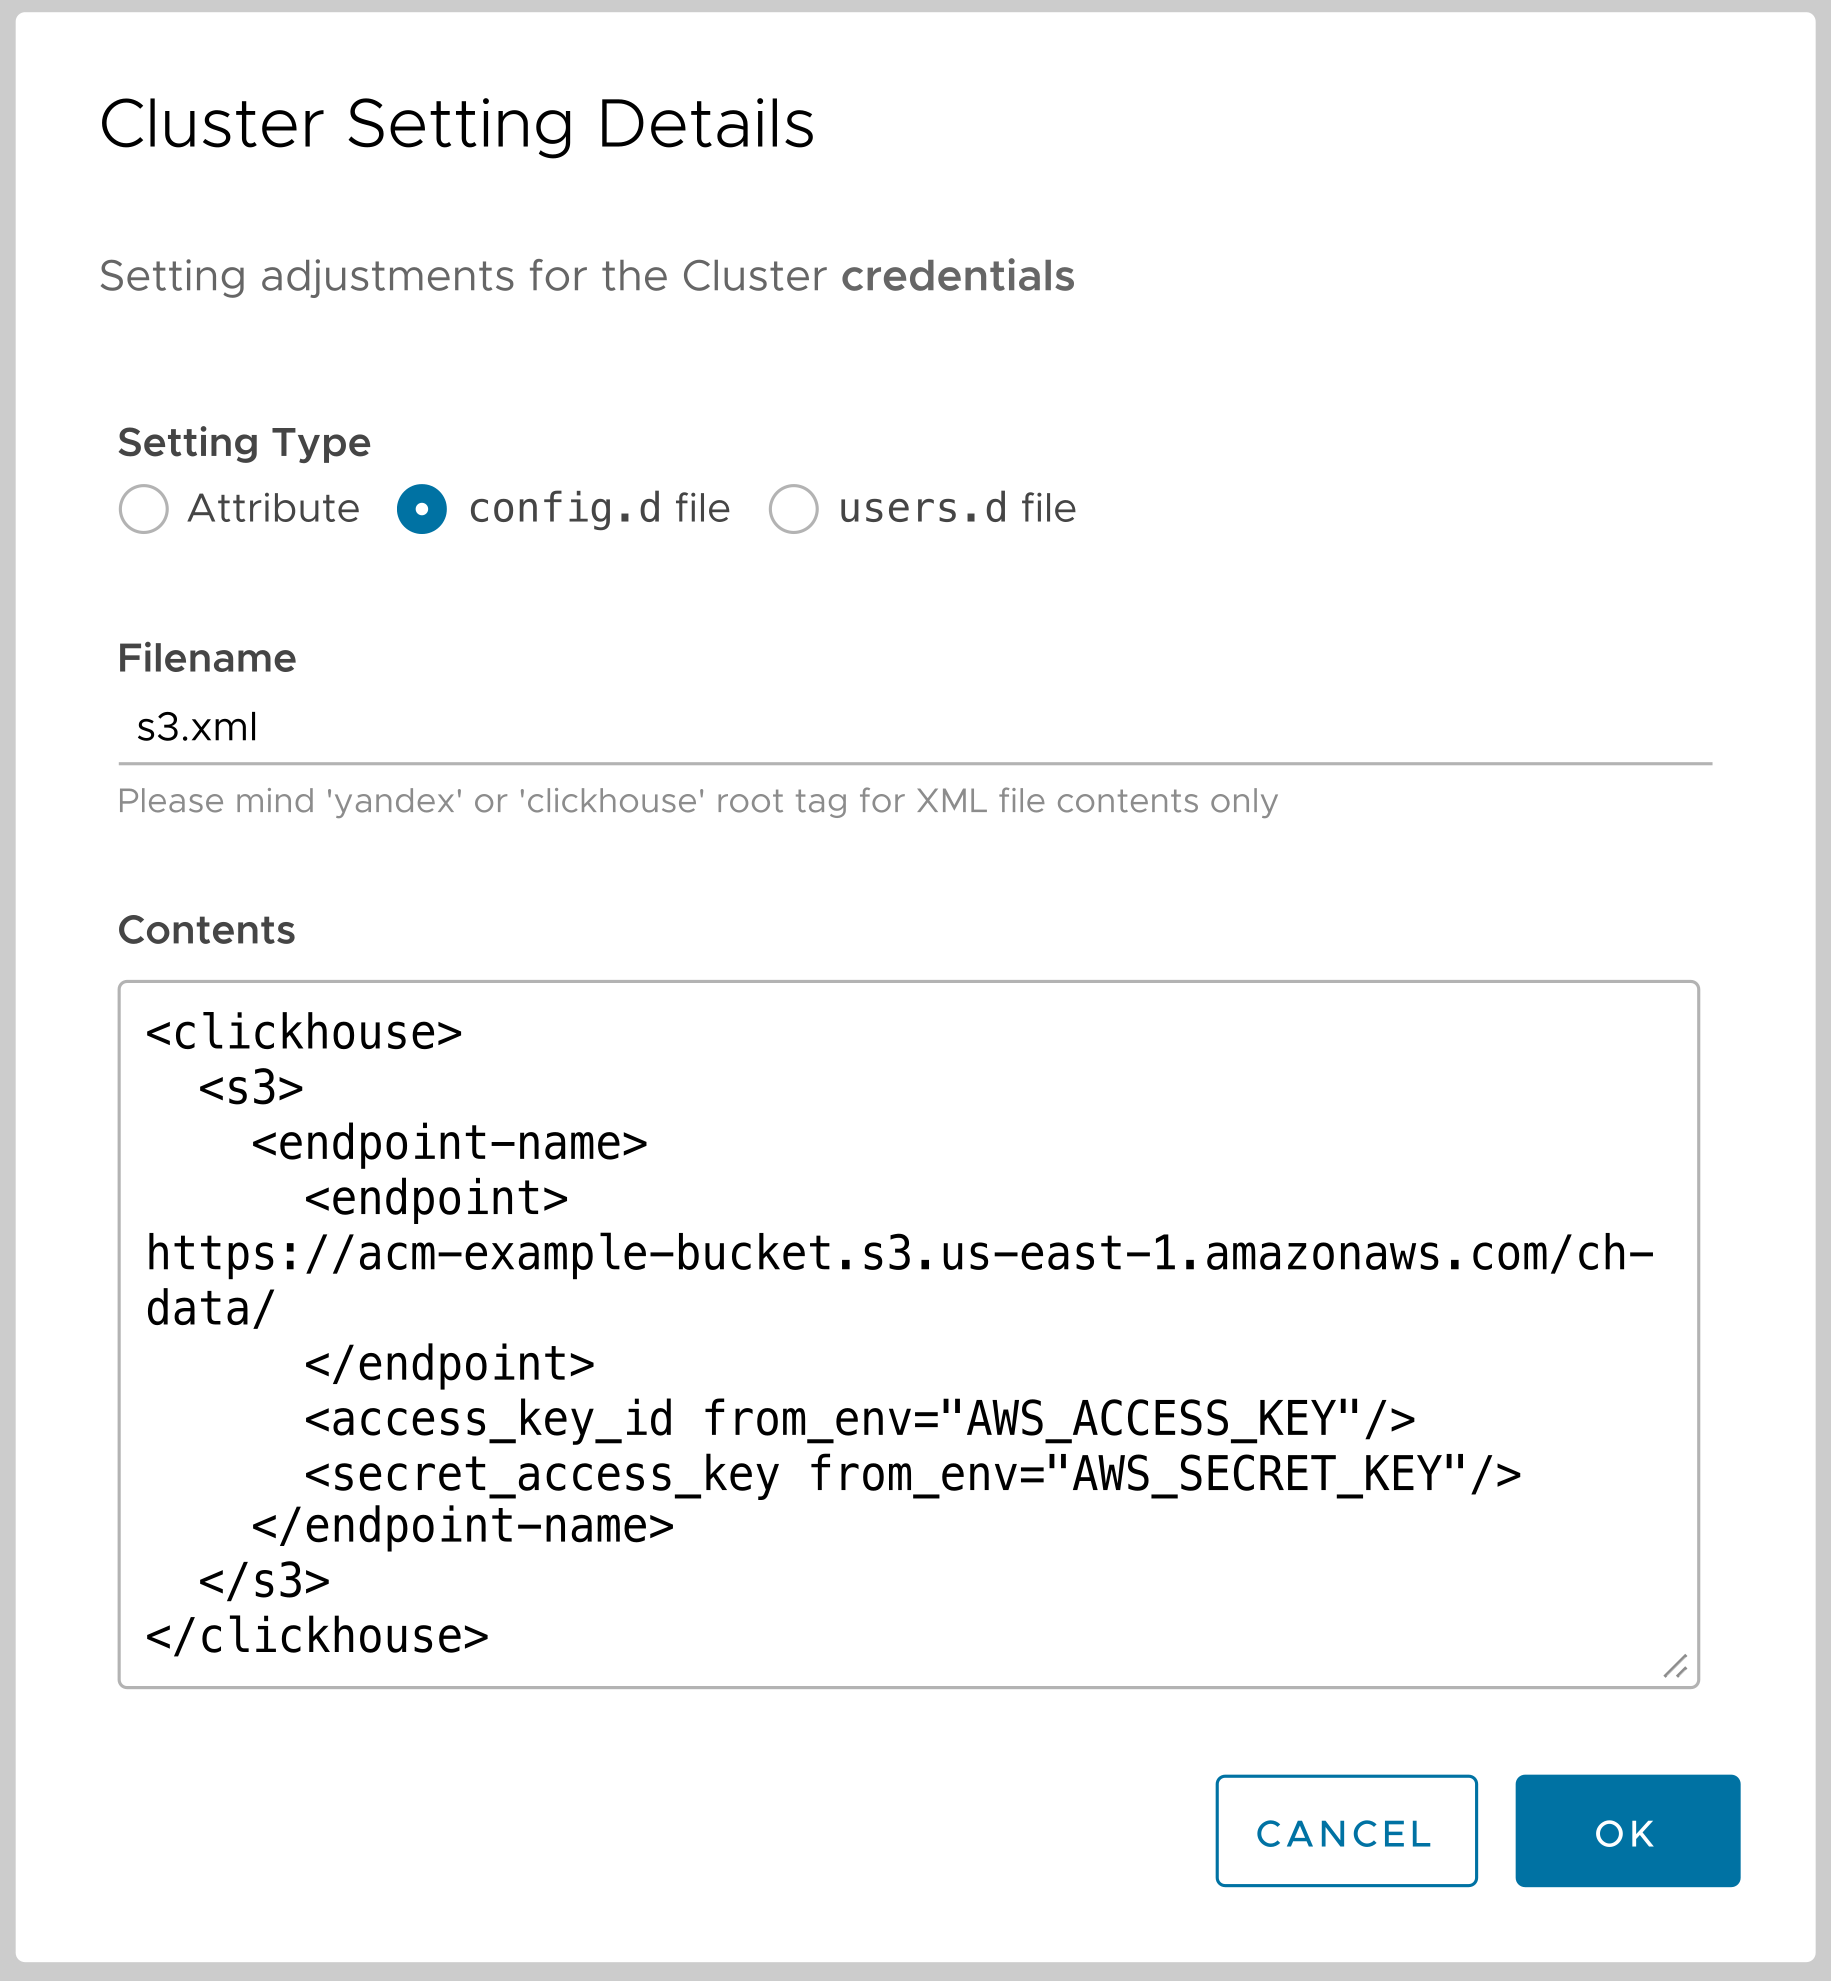
When we click OK, the s3.xml file is created in /etc/clickhouse-server/config.d and the ClickHouse configuration is updated. We’re done!
But did this actually work?
I’m glad you asked that question. Let’s start by looking at our ClickHouse cluster running in our Kubernetes cluster. (A regular user wouldn’t have this kind of access to the system, of course.) Here are the Kubernetes pods in the altinity-cloud-managed-clickhouse namespace:
⯠kubectl get pods --namespace altinity-cloud-managed-clickhouse
NAME READY STATUS RESTARTS AGE
chi-credentials-credentials-0-0-0 2/2 Running 0 15m
chi-credentials-credentials-0-1-0 2/2 Running 0 13m
clickhouse-operator-7c8c676976-krxnc 2/2 Running 0 26h
zookeeper-1839-0 1/1 Running 0 11h
zookeeper-1839-1 1/1 Running 0 11h
zookeeper-1839-2 1/1 Running 0 11hOur ClickHouse cluster has two nodes, represented by the two chi-credentials-credentials-* pods. (chi stands for ClickHouse Installation, by the way.) Now we’ll pick one of the two pods and use kubectl exec to make sure our configuration is set correctly:
⯠kubectl exec --namespace altinity-cloud-managed-clickhouse --stdin --tty chi-credentials-credentials-0-0-0 -- /bin/bash
Defaulted container "clickhouse-pod" out of: clickhouse-pod, clickhouse-backup
> clickhouse@chi-credentials-credentials-0-0-0:/$ cat /etc/clickhouse-server/config.d/s3.xml
<clickhouse>
<s3>
<endpoint-name>
<endpoint>
https://acm-example-bucket.s3.us-east-1.amazonaws.com/ch-data/
</endpoint>
<access_key_id from_env="AWS_ACCESS_KEY"/>
<secret_access_key from_env="AWS_SECRET_KEY"/>
</endpoint-name>
</s3>
</clickhouse>
> clickhouse@chi-credentials-credentials-0-0-0:/$ echo $AWS_ACCESS_KEY
KAA...PDH
> clickhouse@chi-credentials-credentials-0-0-0:/$ echo $AWS_SECRET_KEY
1qy...tpg
> clickhouse@chi-credentials-credentials-0-0-0:/$ exitWe connected to the running pod and took a look at /etc/clickhouse-server/config.d/s3.xml. The ACM created the file just as we asked. Next, we looked at the values of the two environment variables we created with the ACM. The values of the variables are the original values we passed as input to kubectl when we created the Secret, not the values stored in the Secret itself.
Okay, fine, but let’s see this in action!
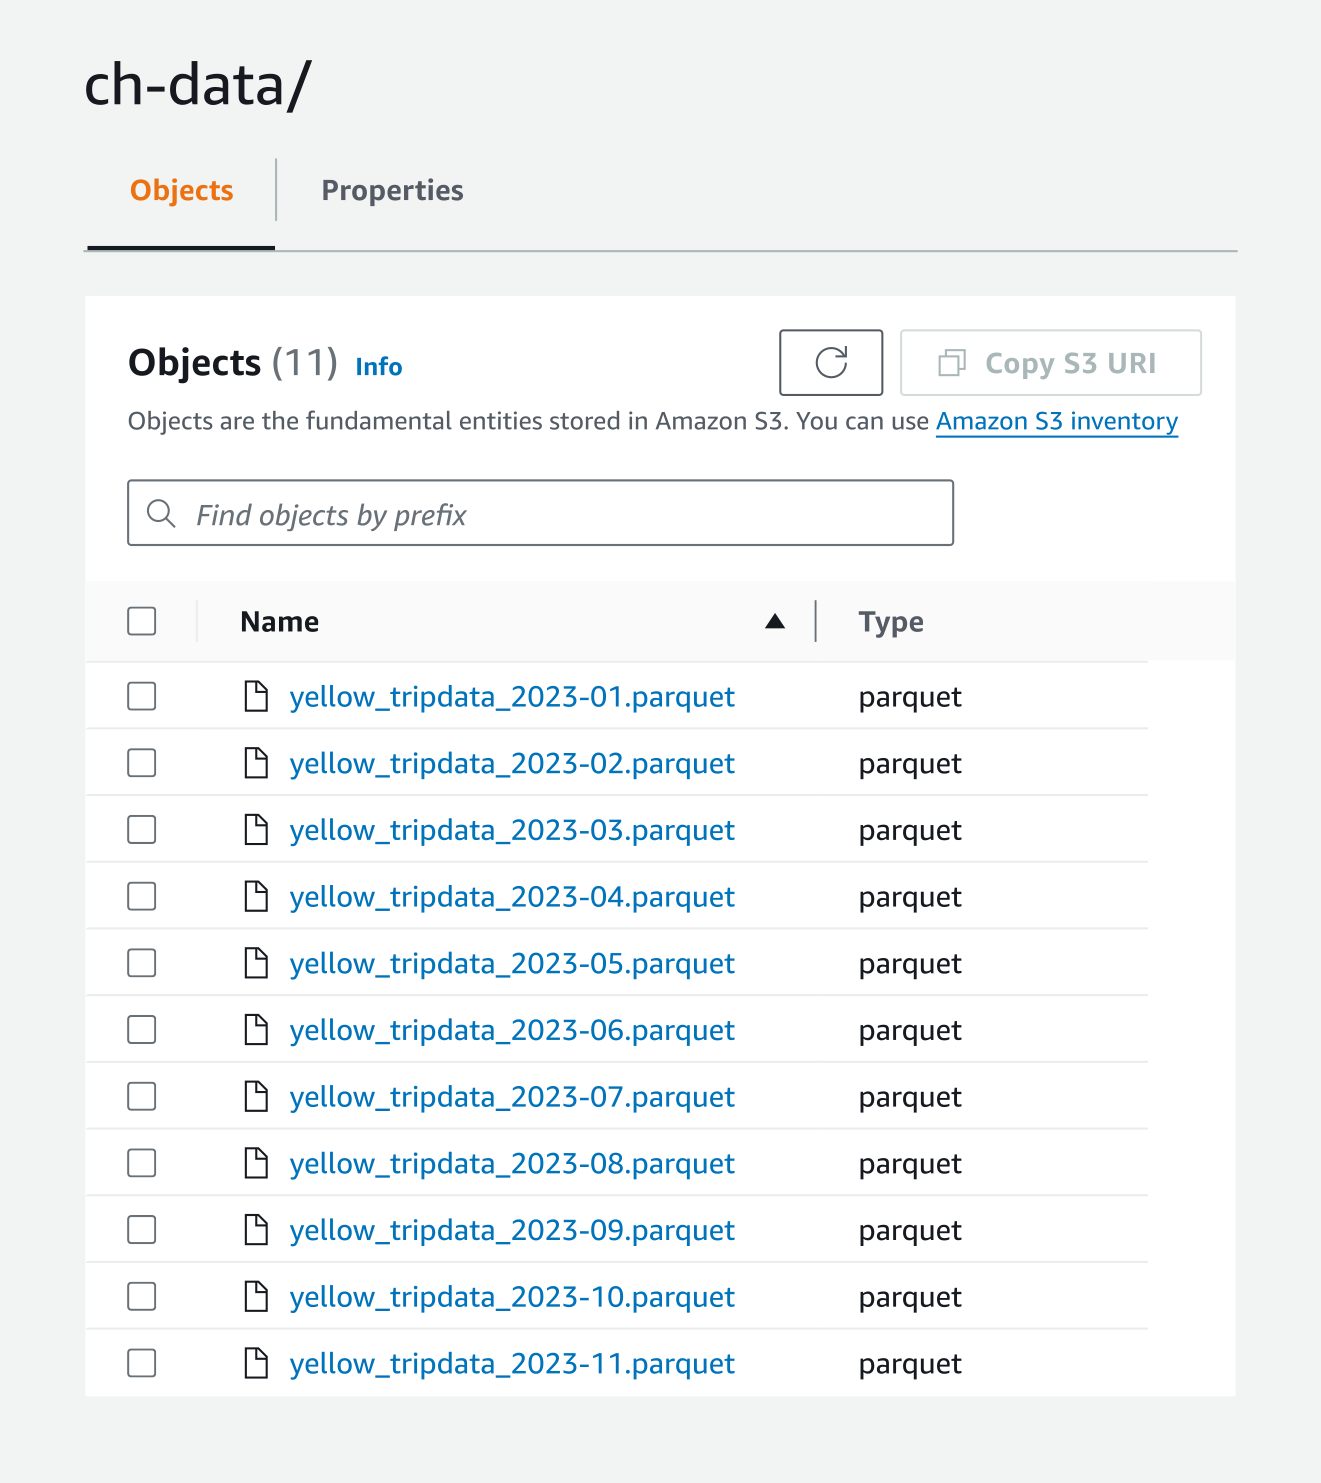
We’ve set up our ClickHouse configuration so that we have access to an S3 bucket. To wrap things up, let’s actually put some data out there and do something with it. We’ll use the Trip Record database from the New York City Taxi and Limousine Commission. To have some data to work with, we uploaded the .parquet files for Yellow Taxi trip data from January through November 2023:
Now we’ll create a database named yellow_taxi from the parquet files in our bucket:
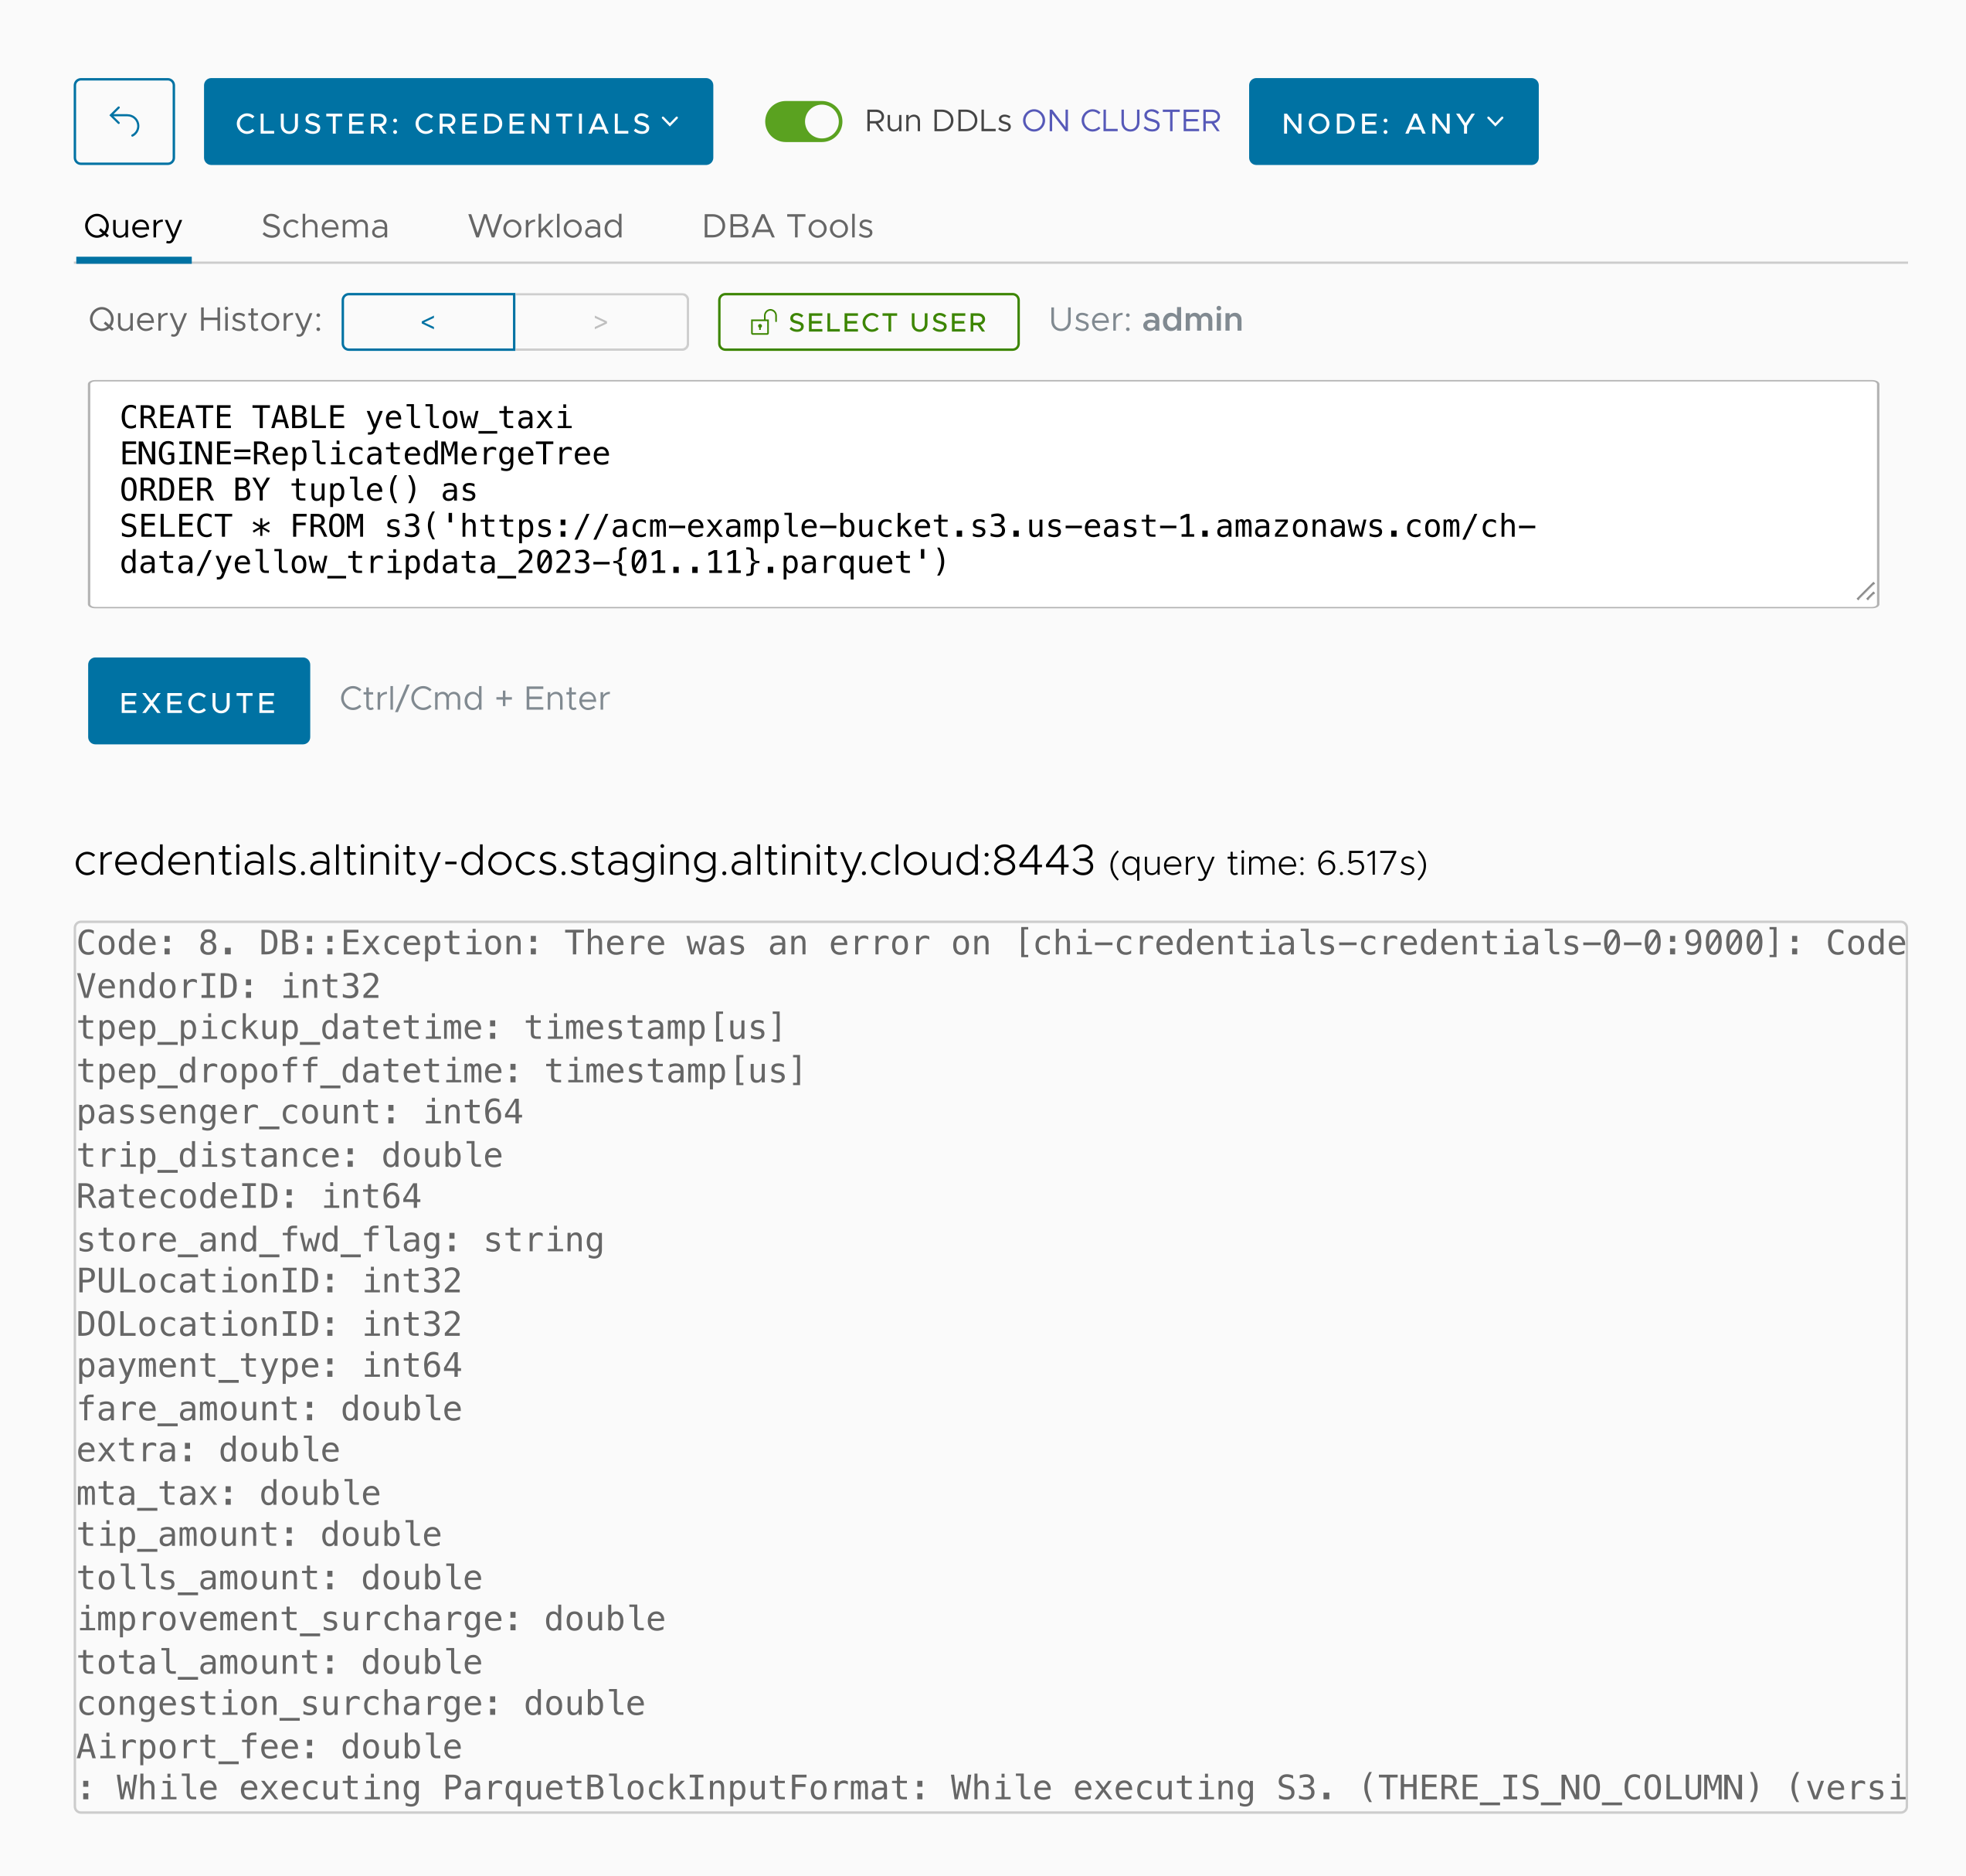
We called the s3() function with the wildcard filename pattern of yellow_tripdata-{01..11}.parquet to select all of the files in the bucket. That’s the only parameter we need. The access key and secret key come from the environment variables, and ClickHouse assumes this is a parquet file because of the .parquet extension. (The error message comes from the data set; at least one row in one of the parquet files refers to a field name that doesn’t exist. Finding and fixing that annoyance is left as an exercise for the reader.)
Now let’s run SELECT count(*) to see how many rows our new database has:
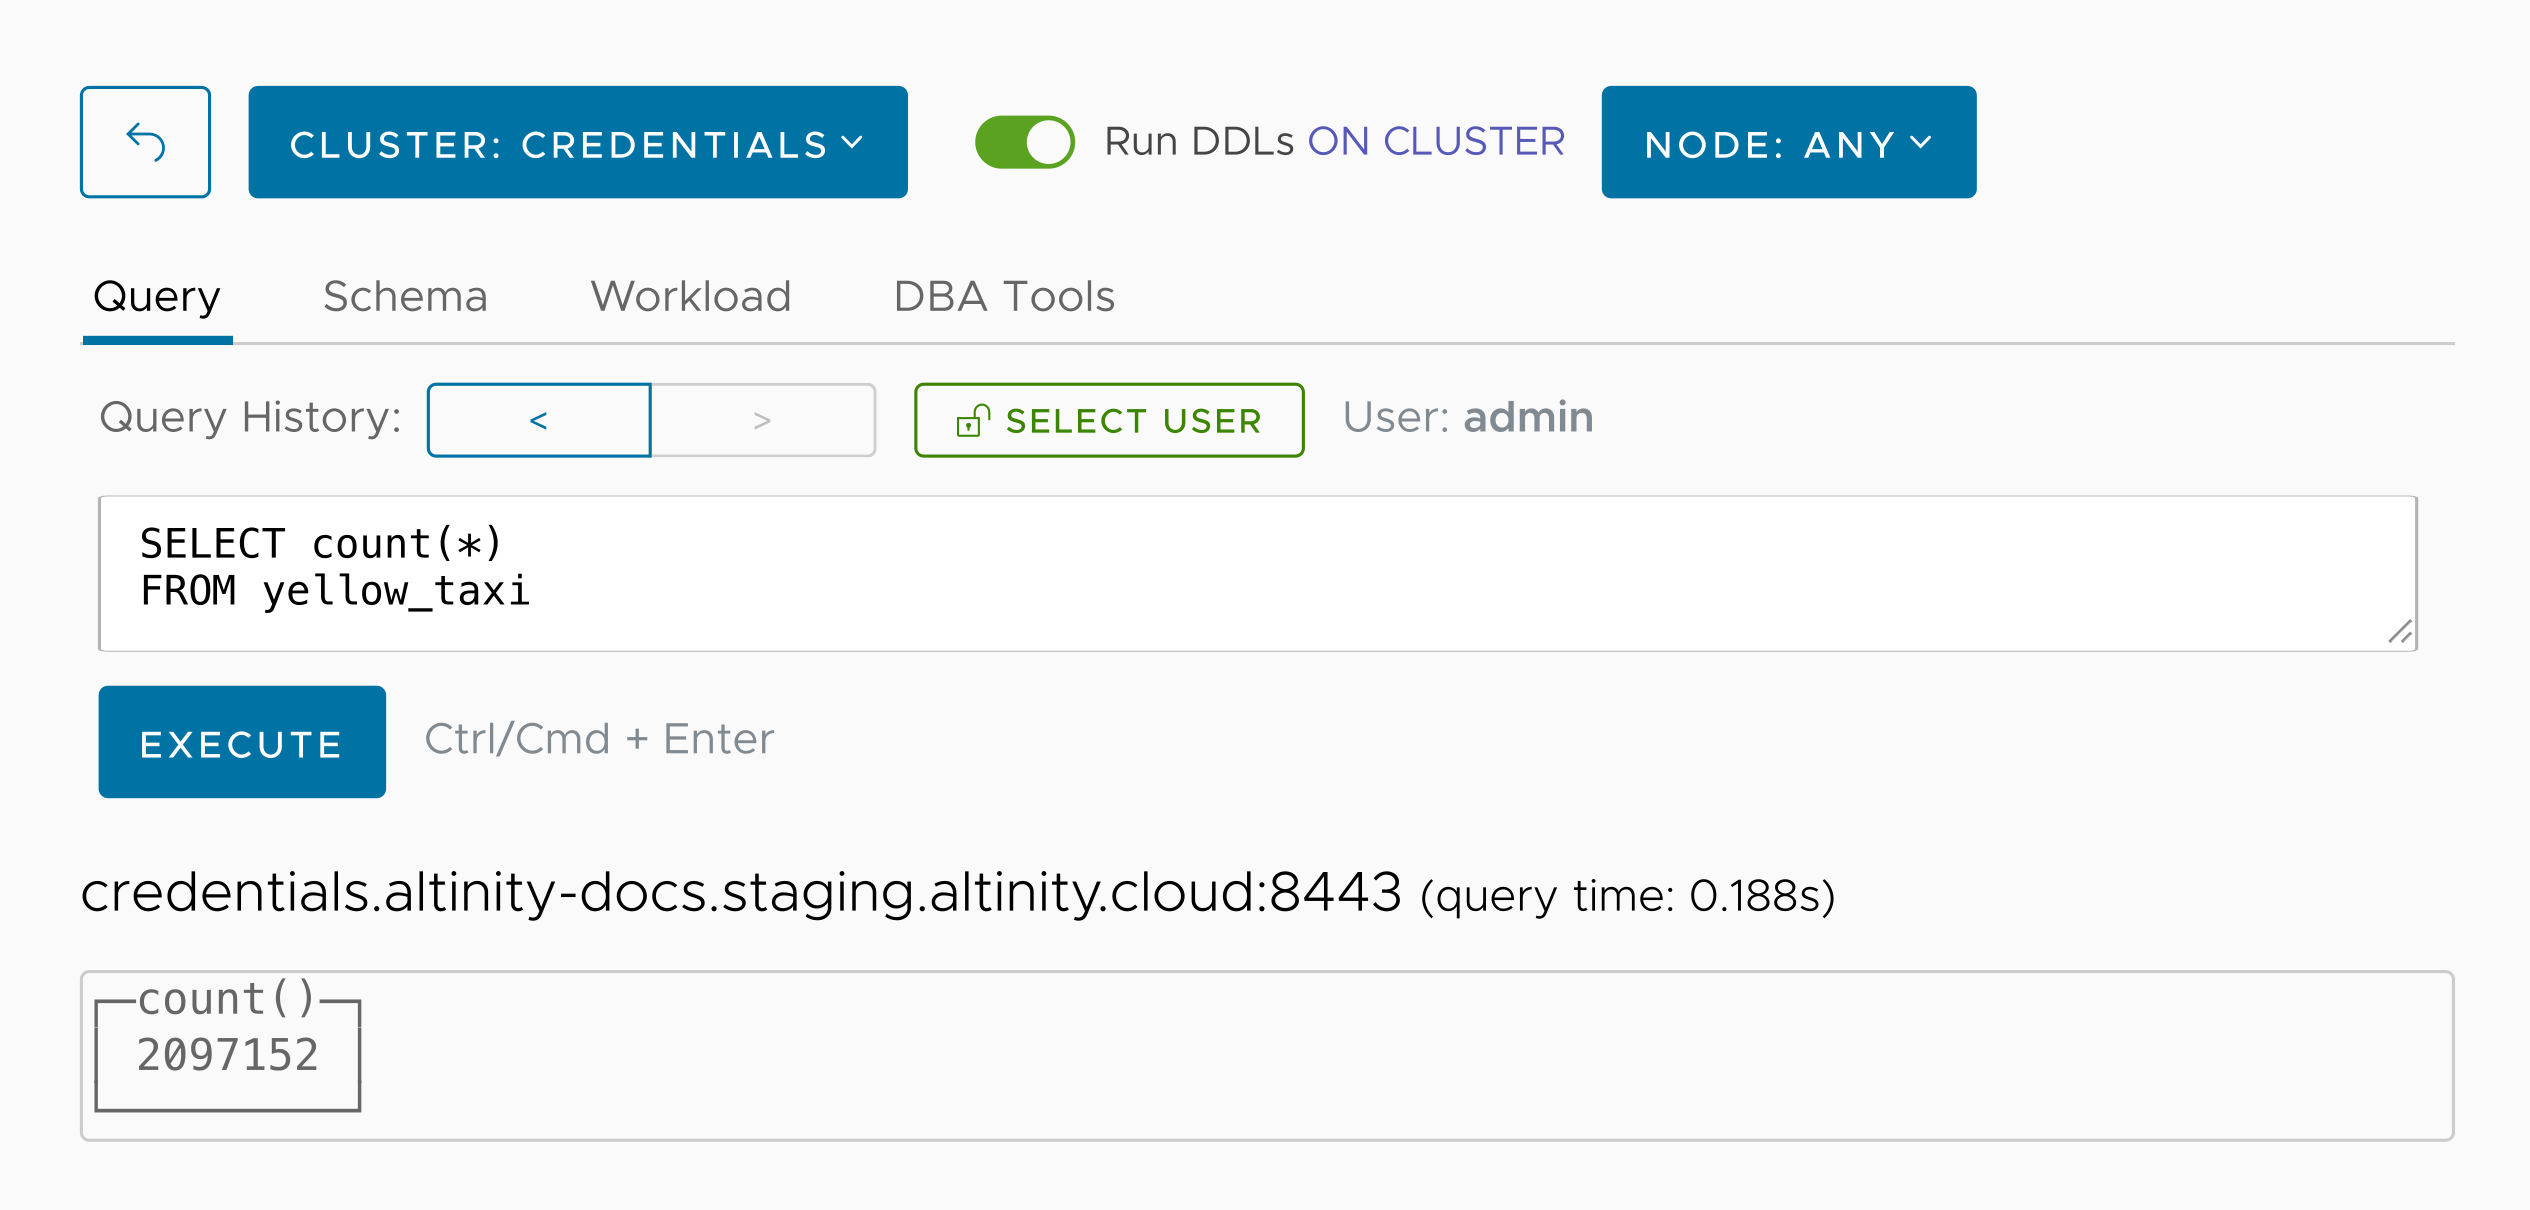
We’ve got 2,097,152 rows. Here are the first ten:
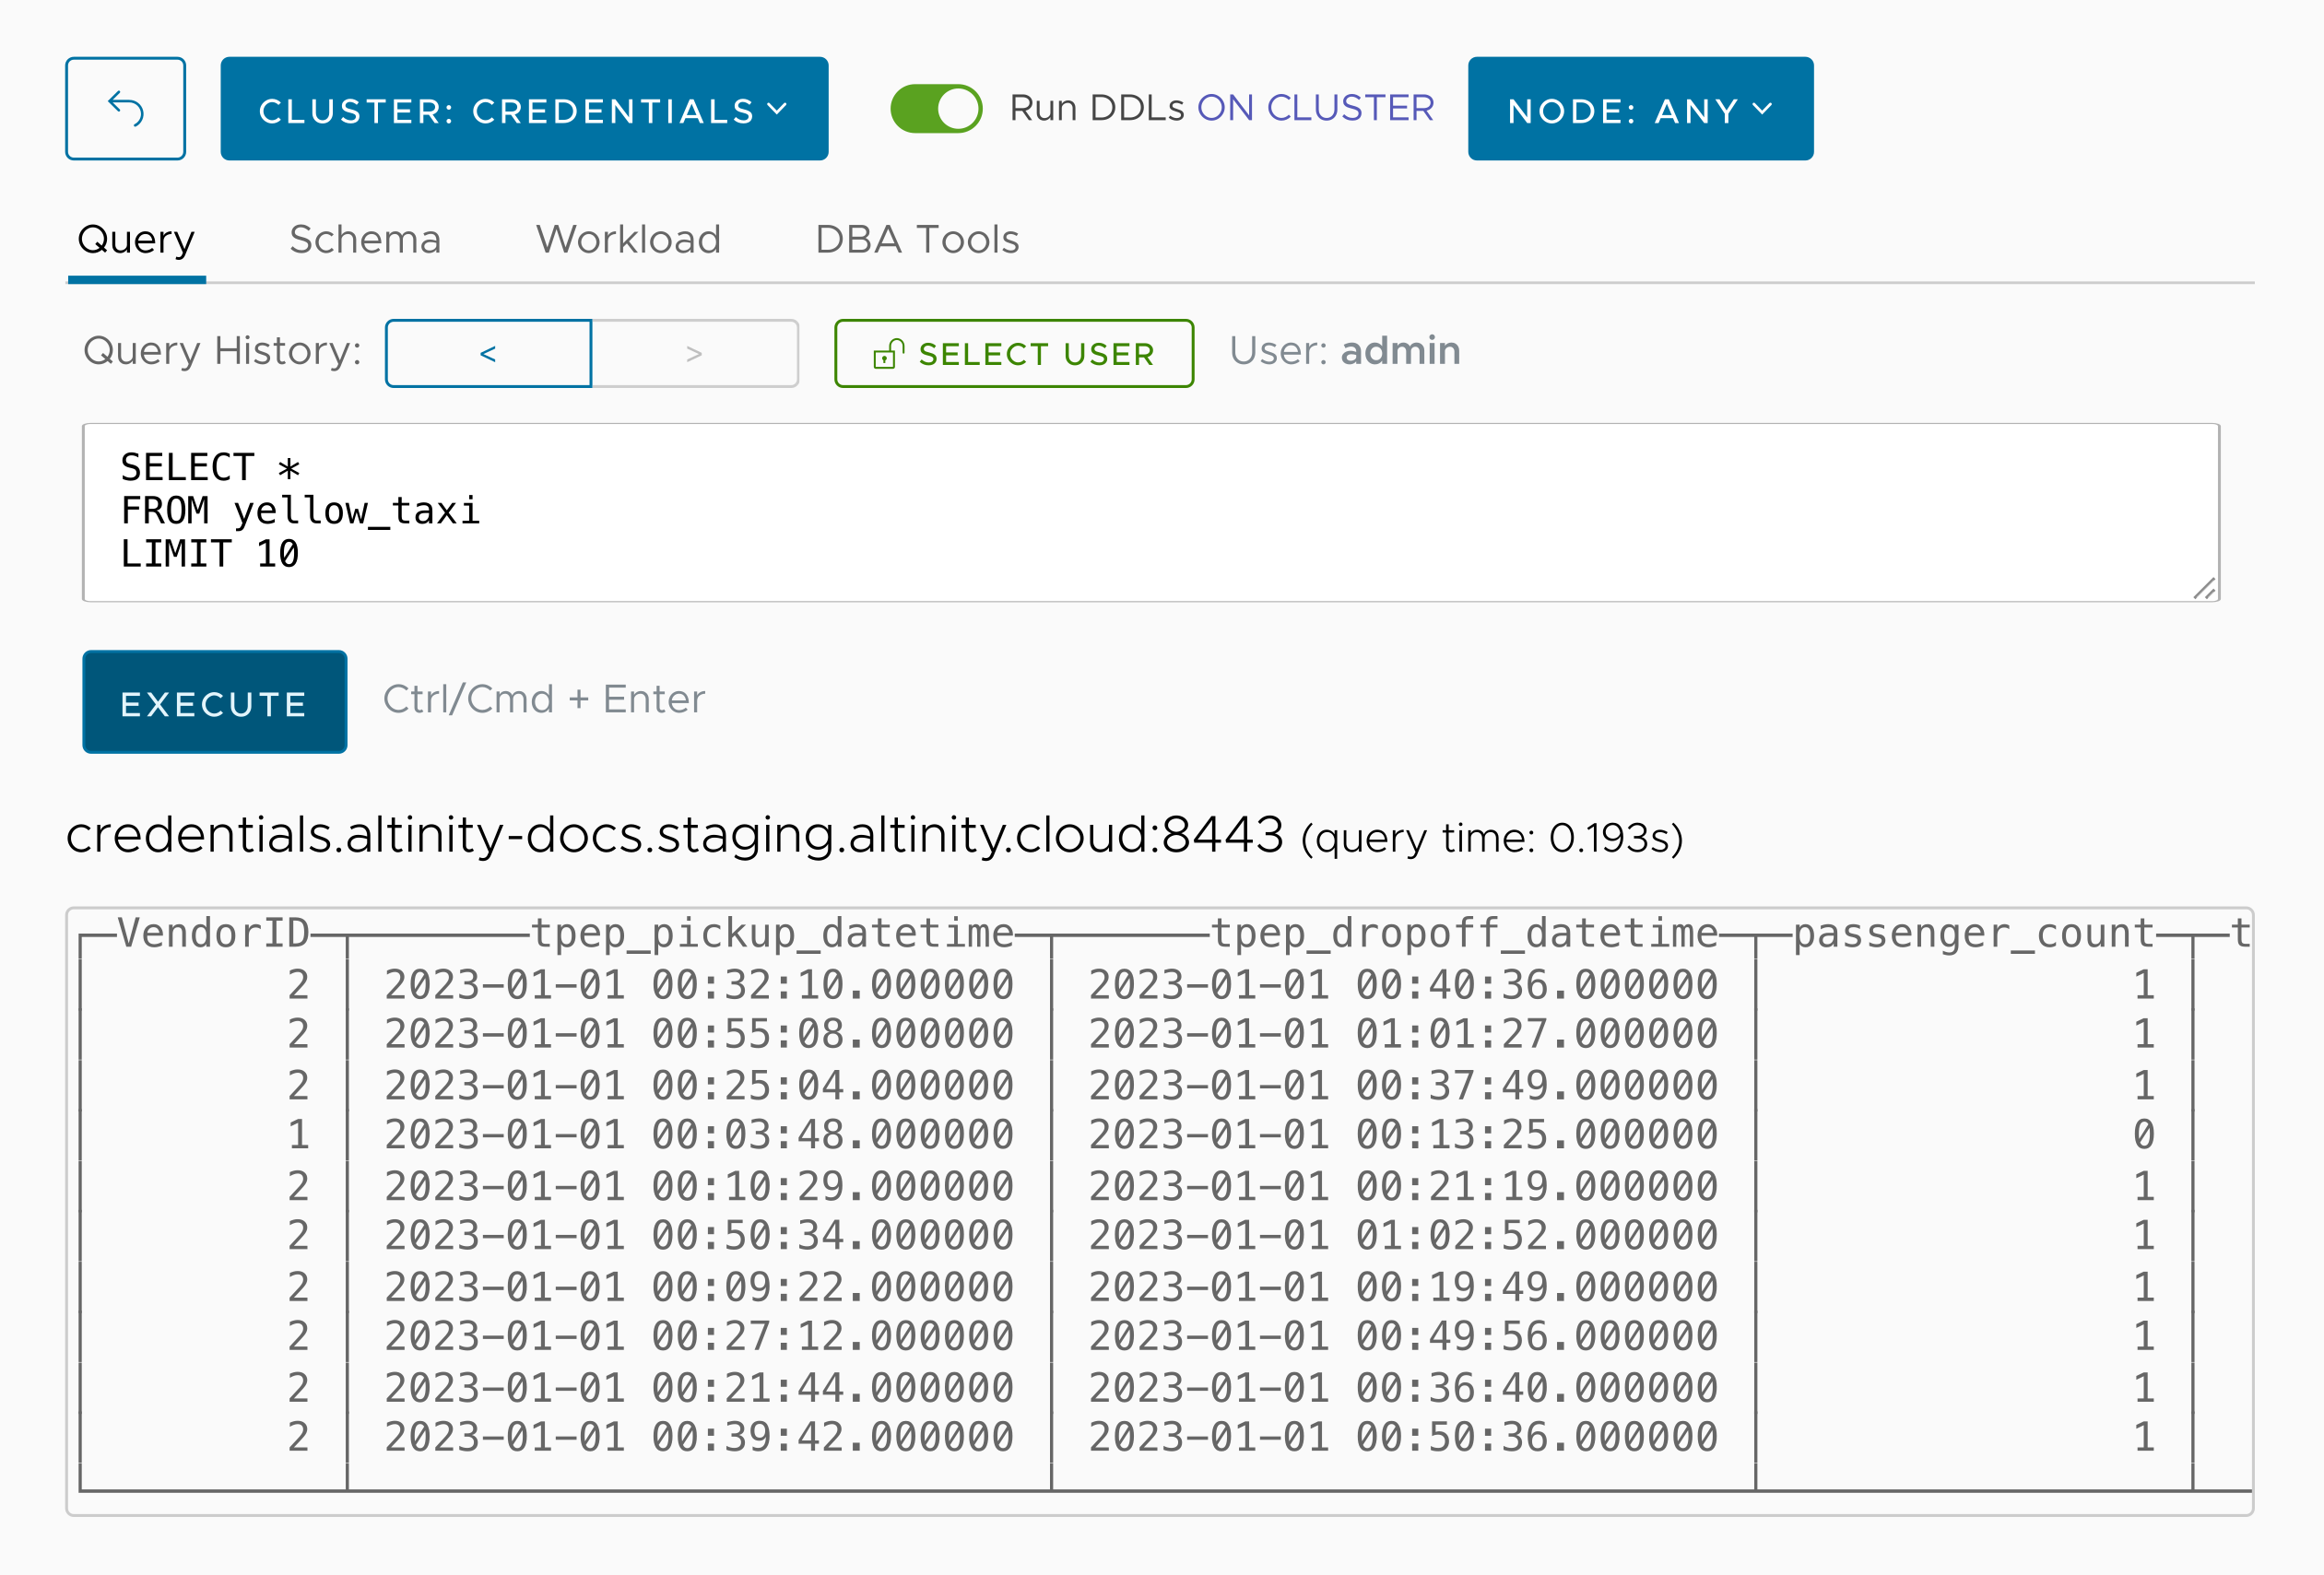
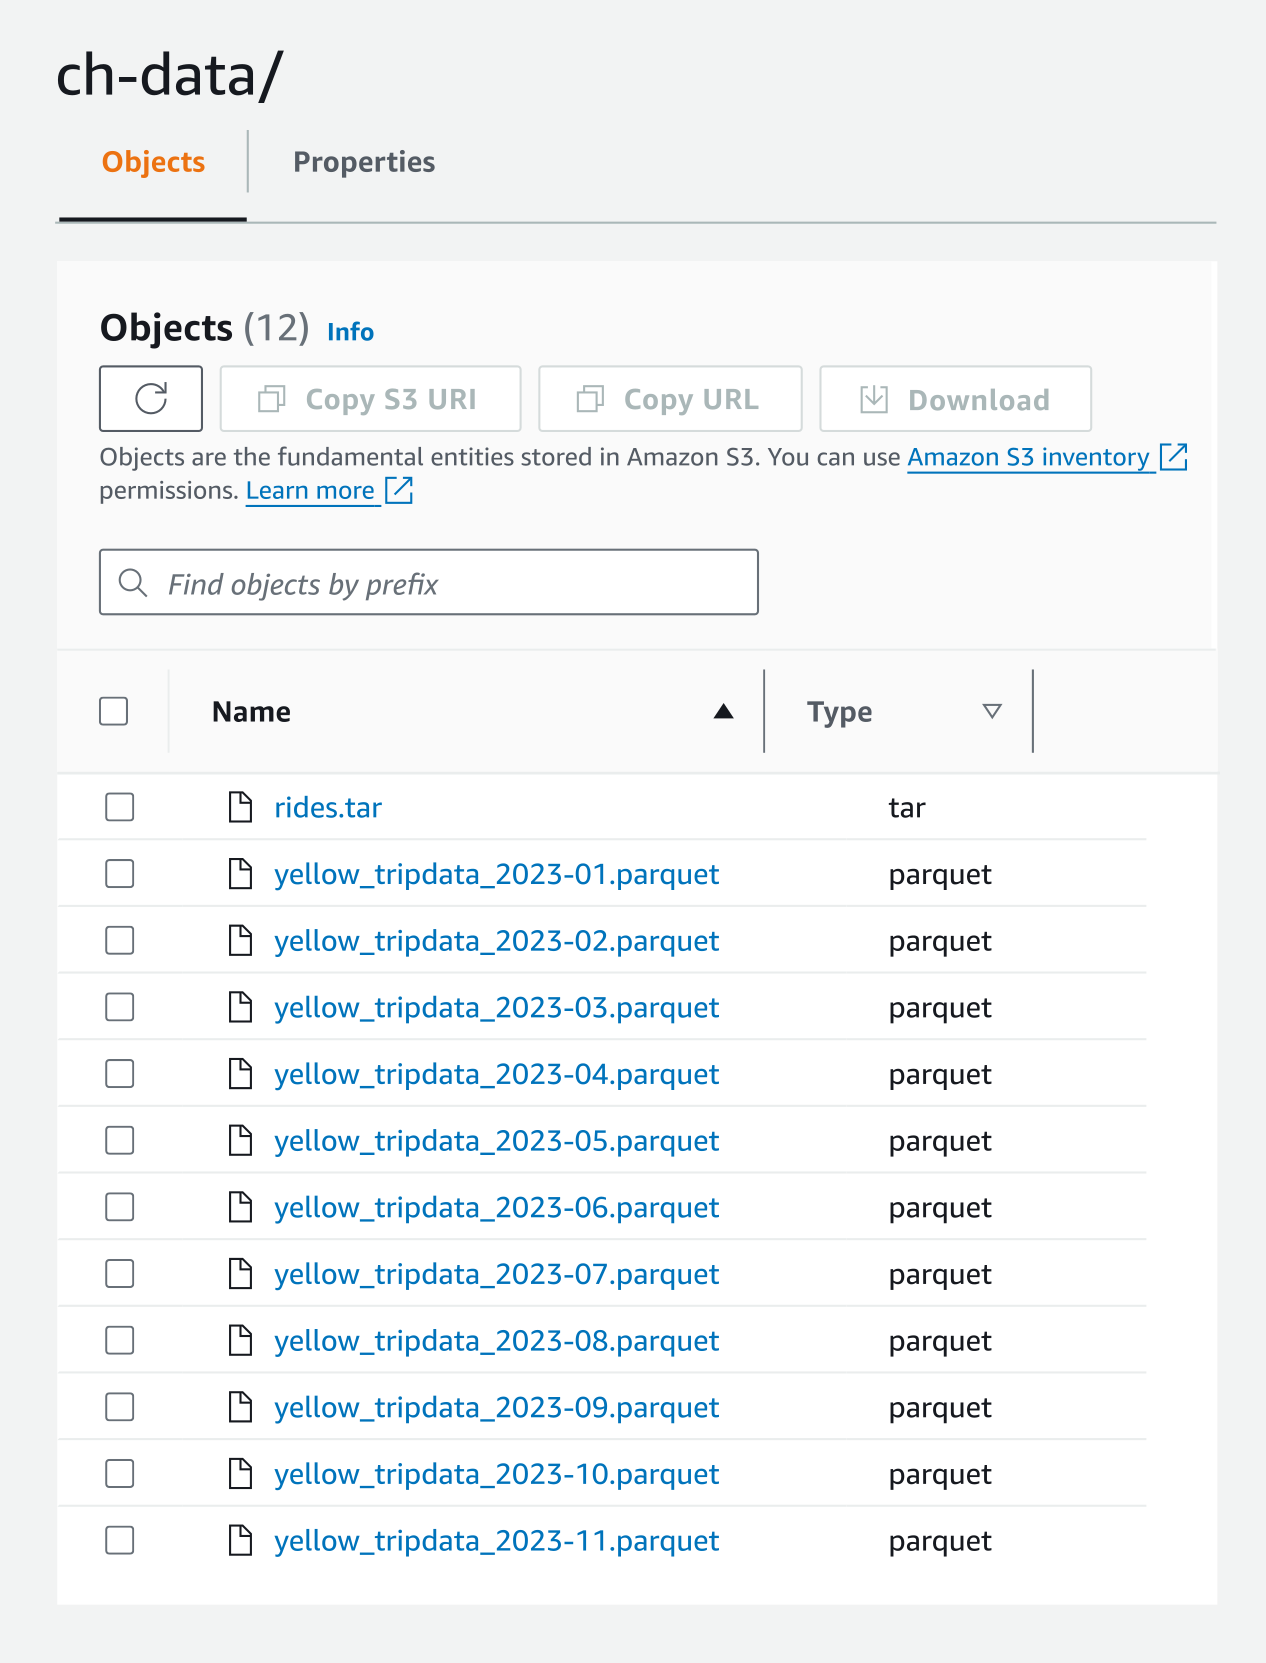
So we successfully read data stored in an access-controlled S3 bucket and created a database with it. One final thing to wrap up our example: we’ll write data back to the bucket. Let’s write the data in yellow_taxi to a .tar file in our bucket:
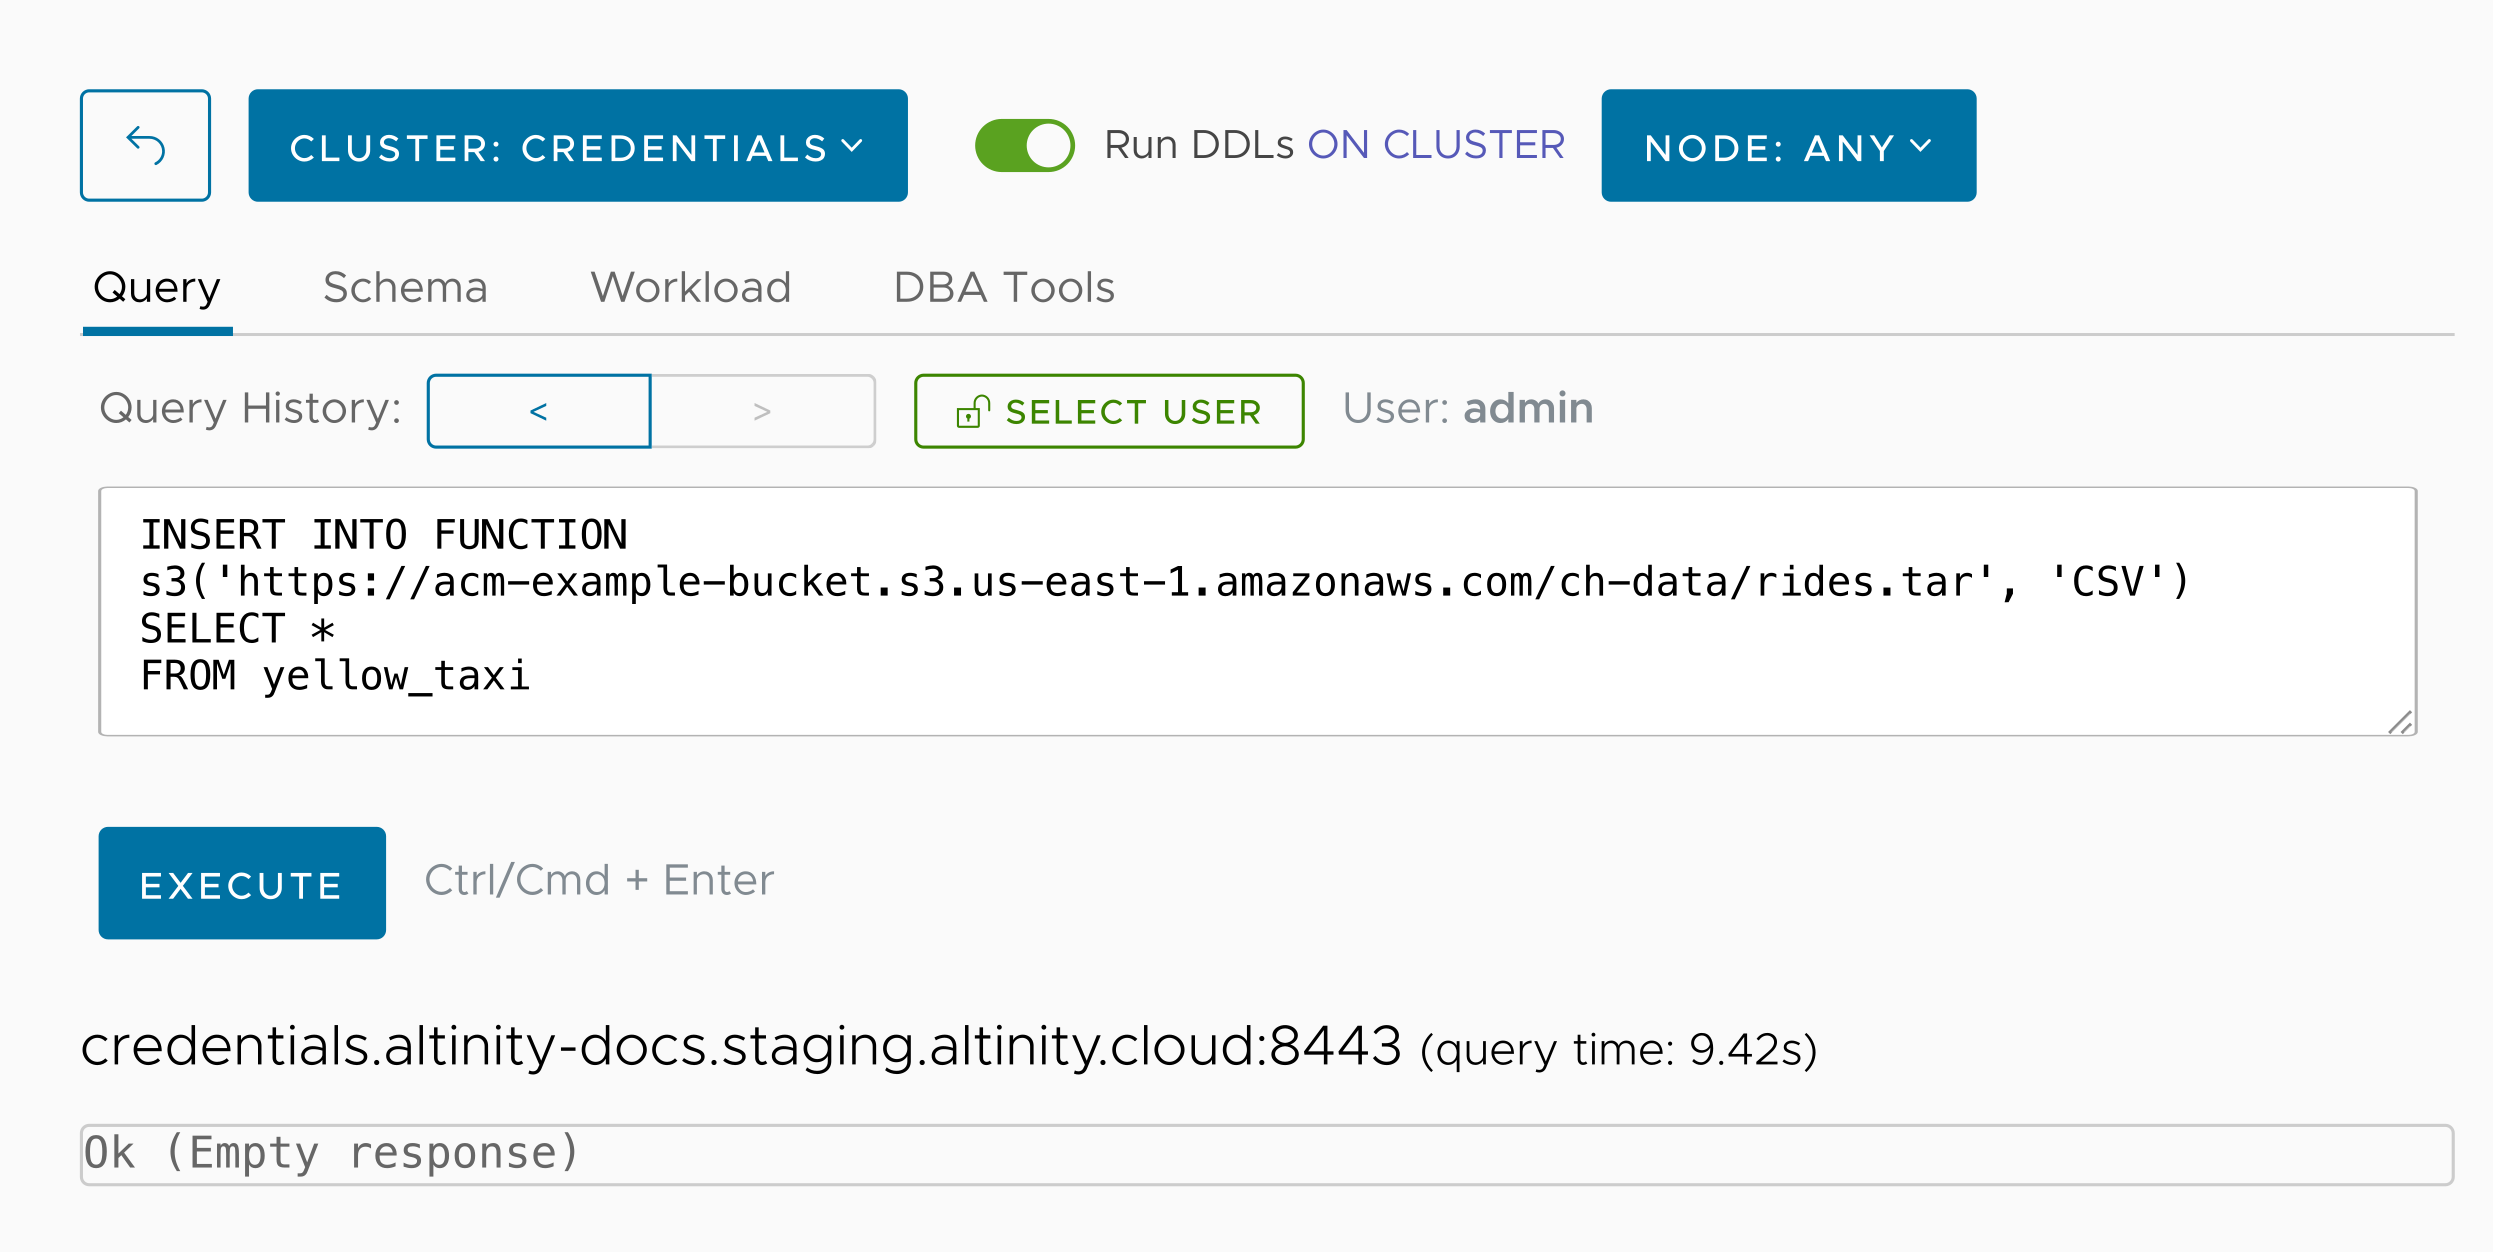
As you’d expect, going back to the AWS console shows our new file:
And we’re done!
Summary
Combining Kubernetes Secrets and environment variables is a great way to manage credentials when you’re running ClickHouse on Kubernetes. This approach is elegant and secure, and the Altinity Cloud Manager makes it easy to reference Secrets stored in the underlying Kubernetes infrastructure. In our example, if a ClickHouse administrator wants to set up another S3 bucket as a ClickHouse data source, they can do that without access to any AWS credentials. And Altinity.Cloud and the Altinity Cloud Manager won’t access those credentials either.
We hope this technique makes life easier for anyone running ClickHouse on Kubernetes, and we encourage you to sign up for a free trial of Altinity.Cloud to see for yourself. Cheers!
ClickHouse® is a registered trademark of ClickHouse, Inc.; Altinity is not affiliated with or associated with ClickHouse, Inc.