Introducing Altinity Ice – A Simple Toolset for Iceberg REST Catalogs

As readers of this blog know, Altinity’s Project Antalya adapts ClickHouseⓇ to use Apache Iceberg tables as native storage. We use Apache Iceberg tables extensively, which also means we depend on Iceberg REST catalogs. Along the way, we discovered something surprising: There aren’t a lot of simple tools to start Iceberg catalogs and load Parquet files into them.
So…we wrote the tools ourselves. Today we’re proud to introduce Altinity ice, an open source project to set up Iceberg REST catalogs and ingest data using two simple commands. The ice-rest-catalog command runs an Iceberg REST catalog, and the ice command loads data into Iceberg. With these two commands and a bit of scripting you can set up an Iceberg data lake in practically any location. It will soon be a part of Altinity.Cloud, which will help ensure project ice is robust no matter where you run.
This blog explains ice and how to use it with Project Antalya as well as upstream ClickHouse. We invite you to try it out and help us make it better.
What exactly is an Iceberg REST catalog?
Catalogs are a key part of managing tables in data lakes. To understand what an Iceberg Rest Catalog is, let’s start by splitting up the name into its constituent parts.
- Apache Iceberg is an open table format, which is a protocol for managing tables on object storage. Iceberg tables consist of data, usually Parquet files, and metadata, which describes tables and identifies which data files belong to each.
- An Iceberg Catalog is a service that lets users find the metadata for Iceberg tables. It corresponds to a DATABASE in ClickHouse, which is a list of tables.
- An Iceberg REST Catalog is a catalog that has a REST interface, so that clients can call it easily across the network.
Libraries that access Iceberg files use the catalog to manage table metadata, which they read to find table files and query them. Here’s a simple diagram that shows the steps to update a table and record the change in the catalog. These steps happen under the covers in most Iceberg libraries, so you don’t have to worry about the exact details of what’s happening.
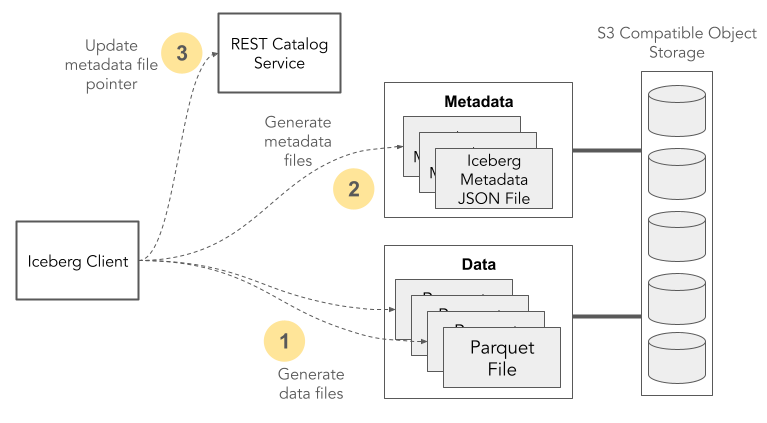
Reading Iceberg tables works in essentially the opposite order. Clients fetch the current table metadata location from the catalog, read the metadata files, and then fetch table data. For more details look at the Apache Iceberg Table Spec and REST Catalog Spec.
Why is Altinity creating a new catalog implementation?
There are plenty of catalogs already for Iceberg, so we weren’t looking to create yet another. That said, we needed a portable toolset to set up Iceberg catalogs–and more generally Iceberg data lakes–in any location: from laptops to CI/CD pipelines to cloud platforms. In addition to other uses we will host it in Altinity.Cloud so that our users can easily use Iceberg tables for shared storage.
We’re also big fans of simple CLIs with minimal dependencies. The alternative is to write custom programs with low-level calls and complex dependencies each time you want to manage Iceberg tables or load data. It’s far more productive to use a generic tool that executes these operations in any location with single line commands.
Our implementation is a wrapper over the Iceberg Java API classes that implement the Iceberg REST catalog service and Iceberg APIs. This has one more benefit. The Java API is effectively the reference implementation of the Apache Iceberg specification. Ice is a convenient educational tool for learning about Iceberg itself.
Installing ice
Ice builds generate two executables: ice-rest-catalog and ice. Here’s how to install them on Linux.
First, ensure you have installed Java 21 or greater. Here’s the installation command for recent Ubuntu versions. (For a more general cross platform installation check out Temurin.)
sudo apt install openjdk-21-jdkNext, install the latest ice and ice-catalog-builds from the ice GitHub releases page using the handy commands shown there. Find the latest version and use that. Here are examples for ice 0.2.0.
curl -sSL https://github.com/altinity/ice/releases/download/v0.2.0/ice-0.2.0 \
  -o ice && chmod a+x ice && sudo mv ice /usr/local/bin/
curl -sSL https://github.com/altinity/ice/releases/download/v0.2.0/ice-rest-catalog-0.2.0 \
  -o ice-rest-catalog && chmod a+x ice-rest-catalog \
  && sudo mv ice-rest-catalog /usr/local/bin/
Check the installation of your treasures using the handy -V option.
$ ice -V
0.2.0
$ ice-rest-catalog -V
0.2.0
There are no other dependencies. You are ready to start using ice.
Trying ice out using Docker
The ice project includes easy-to-follow examples for a variety of environments. We’ll work through examples using docker compose followed by a command line setup using devbox.
If you just want a quick tour that works practically anywhere, the docker example is for you. It sets up an Apache Iceberg data lake using docker compose. The topology looks like the following. Ports are mapped externally so you can connect to containers from outside.

This example depends on docker and docker-compose. If you don’t have them already, installation instructions are here.
Next, clone the ice project code and cd to the docker-compose example directory.
git clone https://github.com/Altinity/ice
cd ice/examples/docker-compose
Bring up the example cluster with docker compose. If you are curious about what’s being installed, have a look in the docker-compose.yaml file beforehand. It’s short and easy to read.
docker compose upOnce the cluster is up, invoke ice to add a Parquet file to the nyc.taxis table in Iceberg. The ice insert commands creates the table automatically if it does not already exist.
ice insert nyc.taxis -p \
https://d37ci6vzurychx.cloudfront.net/trip-data/yellow_tripdata_2025-01.parquet
The docker-compose.yaml file thoughtfully configures a prewired database named ice that connects ClickHouse to the REST catalog. You can use docker exec to run queries directly in the ClickHouse container as shown in the following example. The queries count the rows and show the ice database definition.
docker exec -it docker-compose-clickhouse-1 clickhouse client
...
SELECT count(*) FROM ice.`nyc.taxis`;

SHOW CREATE DATABASE ice FORMAT Raw;
Clean up by bringing docker compose down and deleting log files. Sudo is necessary due to root ownership of logs generated by docker containers.
docker compose down -v && sudo rm -rf data/The docker example is great because it runs practically anywhere. On the other hand, it hides important details like how ClickHouse connects to the Iceberg REST catalog, which is important to understand what’s actually happening with your data. It’s time to understand how things are wired together under the covers.
Digging further into Iceberg with ice and Project Antalya
For deeper exploration let’s run another example at the Linux command line. Running on the command line allows us to see the details of setting up an Iceberg data lake and accessing it, including logs and configuration files.
We are going to set up an Iceberg REST Catalog and an S3 compatible object store, load data, and query it using Altinity’s project Antalya. It’s a variation on the ice scratch example with slightly more flowery language. Here’s a picture of what the configuration will look like.

Let’s start by cd’ing to the scratch examples directory and starting a devbox shell. If you don’t have devbox already, check out the devbox GitHub project for instructions on installation. (Devbox is kind of like npm for the Linux shell. The packages to install are defined in the devbox.json file.)
cd ../scratch
devbox shell
Invoke commands to bring up S3-compatible object storage (minio) with a bucket to hold data and start the Iceberg REST catalog. Important note: local-minio and local-mc are wrapper scripts. They are handy but are not guaranteed to remain exactly the same over time. Check the README.md for current instructions if you run into problems.
local-minio &
local-mc mb --ignore-existing local/bucket1
ice-rest-catalog &
Congratulations! You have a fully functional Iceberg data lake running from the command line. We can now study its habits.
Loading and describing table data
Let’s use the same command as in the docker example to load in data from the famous NYC taxi dataset. It’s best to run it in a different window so you can see the log messages easily.
ice insert nyc.taxis -p \
https://d37ci6vzurychx.cloudfront.net/trip-data/yellow_tripdata_2025-01.parquet
…
2025-05-30 10:25:20 [main] INFO o.a.i.SnapshotProducer > Committed snapshot 3714649723353136168 (MergeAppend)
Use ice describe to get information about the data you just loaded.
ice describe
- kind: "Table"
  metadata:
    id: "nyc.taxis"
  data:
    location: "s3://bucket1/nyc/taxis"
…
The output shows a table. We mentioned earlier that ice insert automatically creates a table definition if it does not already exist. It does so by introspecting the Parquet schema of the first file loaded and converting it to an Iceberg schema definition.
Accessing the data using Project Antalya binary
Let’s count the data and have a look at some stats using a Project Antalya binary. If you don’t have Project Antalya packages already installed, look up the latest binary from the Altinity Project Antalya repo at builds.altinity.cloud. Download it by any convenient method. Here’s an example for pulling an amd64 binary using wget.
wget https://builds.altinity.cloud/antalya-bin-repo/amd64/v25.2.2.28788.altinityantalya/self-extracting/clickhouse \
&& chmod +x clickhouse
Now we can fire up clickhouse local to access the data we loaded using ice.
./clickhouse local
Decompressing the binary..................
ClickHouse local version 25.2.2.28788.altinityantalya (altinity build).
Inside clickhouse local, we’ll use CREATE DATABASE to connect to the catalog using the Iceberg engine. Note: ClickHouse version 24.4+ uses the DataBaseCatalog engine. The older Iceberg engine syntax will continue to be supported in newer versions of Project Antalya builds, so you don’t have to change your DDL commands.
SET allow_experimental_database_iceberg = 1;

DROP DATABASE IF EXISTS ice;

CREATE DATABASE ice
ENGINE = Iceberg('http://localhost:5000')
SETTINGS
  auth_header = 'Authorization: Bearer foo',
  storage_endpoint = 'http://localhost:9000',
  warehouse = 's3://bucket1';
You can now start to explore data in Iceberg .
SHOW TABLES FROM ice;

SELECT count() FROM ice.`nyc.taxis`;
That’s it. We’ve set up object storage and a Iceberg REST catalog, added Parquet data into an automagically created Iceberg table, and queried the data using clickhouse local. After conducting experiments you can clean up as follows:
- Terminate processes for ice-rest-catalog and minio.
- rm -rf data/
Tips and ideas for further exploration
There are a number of ice features that our examples skipped over.
Wildcards
You can insert multiple input files using asterisk symbols (*) as wildcards. The following command loads all files for a single day from the AWS BTC public dataset.
ice insert btc.transactions -p --s3-no-sign-request \
  s3://aws-public-blockchain/v1.0/btc/transactions/date=2025-01-01/*.parquet
The following command loads all files for the first day of each month in 2025.
ice insert btc.transactions -p --s3-no-sign-request \
  s3://aws-public-blockchain/v1.0/btc/transactions/date=2025-0*-01/*.parquet
Partitioning and Sorting
Ice supports Iceberg partition and sorting specifications when inserting data. Execution engines like ClickHouse use this information to optimize queries, for example to prune partitions without looking at files. Here’s an example that provides both. You can see the partitioning at work in the logs–ice will break up the input into separate Parquet files.
ice insert nyc.taxis_p_by_day \
  -p https://d37ci6vzurychx.cloudfront.net/trip-data/yellow_tripdata_2025-01.parquet \
  --partition='[{"column":"tpep_pickup_datetime","transform":"day"}]' \
  --sort='[{"column":"tpep_pickup_datetime"}]'
Updates to partition specs on later inserts are not currently supported–once you pick one you have to stick with it.
Ice configuration files
You might wonder how the ice command finds the REST catalog. The connection data is in .ice.yaml, which is stored in the current directory and looks like the following for the scratch example directory.
$ cat .ice.yaml
uri: http://localhost:5000
bearerToken: foo
httpCacheDir: data/ice/http/cache
There is a similar file for the ice-rest-catalog in the same directory. It provides configuration required to run a REST catalog server.
$ cat .ice-rest-catalog.yaml
uri: jdbc:sqlite:file:data/ice-rest-catalog/db.sqlite?journal_mode=WAL&synchronous=OFF&journal_size_limit=500

# To use etcd instead of sqlite, start etcd with `etcd --data-dir=data/etcd`, then uncomment the line below
#uri: etcd:http://localhost:2379

warehouse: s3://bucket1

s3:
  endpoint: http://localhost:9000
  pathStyleAccess: true
  accessKeyID: miniouser
  secretAccessKey: miniopassword
  region: minio

bearerTokens:
- value: foo

anonymousAccess:
  enabled: true
  accessConfig: {}
Querying table metadata data
As we showed previously, you can fetch summary table metadata with ice using a command like the following.
ice describe nyc.taxis_p_by_dayIf you want full information, you can query the REST catalog directly using curl. The output will show the table schema, partitioning, and ordering. Piping the output through the jq processor makes it somewhat human readable.
curl http://localhost:5000/v1/namespaces/nyc/tables/taxis_p_by_day | jqThe HTTP response also includes the URLs for JSON metadata files. You can fetch metadata files out from object storage for closer inspection using any tool that can copy from S3. Here’s how to download a file from minio using the mc-local wrapper included in the ice scratch example.
local-mc cp local/bucket1/nyc/taxis_p_by_day/metadata/00002-df48b90c-8ad6-4a97-8300-e53b59336ae1.metadata.json .Just transform the s3:// prefix to local/. This might not be super obvious if you have not used Minio previously.
Gaining a deeper understanding of Apache Iceberg
Ice lets you set up Iceberg data lakes anywhere you want. One of the key benefits for beginners is that you can now explore Apache Iceberg freely. Iceberg behavior is a lot easier to understand when you see it in action in a dev environment where you can examine the code and also access metadata and data files easily.
Speaking of code, it’s easy to bring up ice Java code in an IDE to examine and change code. I use VS Code on WSL2 for Java work. Install the Java Extension Pack and Debugger and you should be ready to go. Here’s the command I use to get started.
cd ice
code .
That’s it. Any IDE that can read maven pom.xml files should be similarly quick to start. Have fun!
Conclusion for now and more to come
This blog introduced ice, our new toolkit for setting up and loading data into Apache Iceberg catalogs. It is simple to set up and use. We invite you to try it out and help us make it better. Join our Slack Workspace, log issues on the project, and submit PRs on the code. We welcome contributions to all Altinity projects.
To recap, we showed off a couple of toy examples to help readers get started, but Ice is not a toy. We are using it in Altinity.Cloud to integrate Apache Iceberg tables as shared object storage for ClickHouse applications. The roadmap includes features up to and including compaction. Our next article will show you how to use Ice on Kubernetes to load large datasets that you can use for testing.
In the meantime I would like to thank the Altinity team including Stas Shyiko, Kanthi Subramanian, and Alexander Zaitsev. It’s been really fun writing this blog about your work.
ClickHouse® is a registered trademark of ClickHouse, Inc.; Altinity is not affiliated with or associated with ClickHouse, Inc.