How To Configure A ‘Kerberized’ Kafka Deployment For ClickHouse®
If you love ClickHouse®, Altinity can simplify your experience with our fully managed service in your cloud (BYOC) or our cloud and 24/7 expert support. Learn more.
It’s a lazy Monday afternoon. You look with satisfaction over your carefully curated ClickHouse installation. Suddenly, a question pops into your mind about Kerberos. Why do I need that? Well, let me elaborate.
Kerberos is a secure authentication protocol for networked systems. It was developed at the Massachusetts Institute of Technology (MIT) and first released in the 1980s. The protocol provides secure authentication of users and services, allowing them to communicate over an insecure network such as the Internet. Kerberos uses secret-key cryptography to secure communications and relies on a trusted third-party authentication server, known as the Key Distribution Center (KDC).
One implementation of Kerberos is Microsoft’s Active Directory a.k.a. AD, which provides centralized authentication and authorization. Active Directory uses Kerberos to provide single sign-on capabilities for Windows-based computers, allowing users to access network resources with a single set of credentials. In addition to managing user and computer accounts, Active Directory also includes features such as group policy, trust relationships, and the ability to integrate with other directory services such as LDAP and NIS. Also, AD allows users to integrate the authentication of external services like Kafka or ClickHouse.
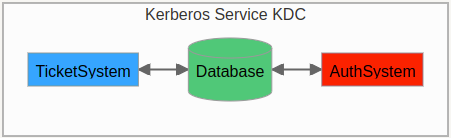
The above image shows a diagram of a Kerberos service and its components.
Now I can provide an answer to your original question. This article will be a showcase on how to add a “kerberized” Kafka & ClickHouse service so you can benefit from a centralized authentication and authorization mechanism. Also if your organization uses AD you can do the same. Because Kerberos provides a high standard security framework for authentication, authorization and role-based permissions, you’ll be in good hands.
Preliminary
Let’s begin by saying that security is very important. Here a list of good practices for Kafka and ClickHouse:
- Use encryption for all data in transit and at rest.
- Enable authentication and authorization through Kerberos or other secure mechanisms.
- Regularly rotate and renew security credentials.
- Monitor network activity for unusual or suspicious behavior.
- Limit network exposure by allowing only necessary traffic to flow between systems.
- Use strong passwords and regularly update them.
- Implement access controls for sensitive data and systems.
- Keep all software and systems up-to-date with the latest security patches.
- Conduct regular security assessments and vulnerability scans.
- Develop a comprehensive disaster recovery and business continuity plan.
In our test environment, some of these practices will be bypassed to make it easy to test the deployment, but if you’re going to deploy in production, hey, security first!
Authentication in Kafka is done by using Simple Authentication and Security Layer, aka SASL, and complementing it with an encrypted transport channel using SSL/TLS. But wouldn’t it be nice if you had a Kerberos auth service like AD, used by other apps, and you could add Kafka and ClickHouse as authenticated services?
If this is your case, then you are in luck! If you have the Kerberos service up and running then we can continue right away. If not, I recommend reading some info about the Kerberos protocol and getting a grasp on how it works and the main jargon used. There are many resources online that you can use. You may start with these:
I have deployed a Kerberos service with this krb5.conf config file for a specific realm that we’re going to use as an example. This file is important because it will be used by the different services (Kafka, ZooKeeper and ClickHouse).
I chose a simplified version of Kerberos that you can find in this repo:
https://github.com/lesandie/clickhouse-tests/tree/main/kafka-kerberos
It provides a standalone KDC server in a docker container, exposing default KDC ports: 749 TCP and 88 UDP. This is a good environment to learn Kerberos and test different scenarios.
Additionally, a default KDC admin principal kadmin/admin@ALTINITY.TEST is set up and may be used for KDC functionality testing such as kadmin commands.
As you can see, the realm is ALTINITY.TEST and the domain used is altinity_default. Because we’re using docker, it is advisable to create a docker network of type bridge to deploy all of our infrastructure: Kerberos, Kafka, ZooKeeper and ClickHouse. Docker will use the name of the network to craft the FQDN of each service, concatenating the container and network name like this: kafka.altinity_default or zookeeper.altinity_default. This FQDN will be used by the Kerberos service to check if a request comes from a domain managed by the realm. We can deactivate all of DNS features to simplify the environment by setting dns_canonicalize_name = false. This would mean that short hostnames won’t be canonicalized to FQDN, and the docker network would not be needed. Let’s stick with the defaults.
Another question you may have is: Why do we need ZooKeeper? ZooKeeper is used by Kafka to manage all metadata information about producers, brokers, and consumers, and also acts as a coordinator for Kafka clusters. In newer versions of Kafka (2.8.0+), ZooKeeper is not needed, but well-known Kafka distributions like Confluent use ZooKeeper to manage this complexity. So in our case, and because we’re using Confluent, a ZooKeeper instance is also used in our configuration with Kerberos services.
Kerberos Configuration
Have a look at the README.md to see the details and commands to build the Kerberos image. I’ve modified a script (init-script-kdc.sh) that will automate all the following steps but you can repeat all of them yourself if you wish to test how they work.
OK! So after reading that, let’s get our hands dirty! First, we need to connect to the Kerberos service CLI interface by executing the command kadmin.local inside the kerberos container.
Start the kerberos service and get an interactive session into the container:
> docker-compose up -d kerberos
> docker exec -it kdc-server /bin/bash
Now let’s create a principal (user) to admin the realm, using the command addprinc
$ kadmin.local
Authenticating as principal root/admin@ALTINITY.TEST with password.

kadmin.local: addprinc -pw <admin_pass> kadmin/admin@ALTINITY.TEST
Principal "kadmin/admin@ALTINITY.TEST" created.
After that, we need to create the rest of the principals that are going to be used by the different services (Kafka, ZooKeeper and ClickHouse). Here is a list of the principals:
- Kafka: kafka/cp-kafka.altinity_default@ALTINITY.TEST
- ZooKeeper: zookeeper/cp-zookeeper.altinity_default@ALTINITY.TEST
- ZooKeeper client for Kafka broker: zkclient@ALTINITY.TEST
- ClickHouse: user1@ALTINITY.TEST
So, why do we need another principal for Kafka client? Kafka will need to authenticate to ZooKeeper as a client, because as explained earlier, Confluent Kafka uses ZooKeeper for distributed coordination between brokers and to store metadata. One point to note is that the principal uses the FQDN with the name of the container and the docker network. Docker will canonicalize the name by concatenating the name of the container and the name of the docker network. These can be found in the docker-compose.yaml file.
Next, we need to export the keytabs (user definition with the private key) for each of these principals. These keytabs will be used by the different services similar to public key authorization in ssh. All keytabs need to be copied/distributed between the different services. For our case the magic of docker and volumes allows us to generate all of these keytabs in one location that is exposed in different volumes for the different services. Let’s look at the kadmin commands:
kadmin.local: addprinc -randkey zookeeper/cp-zookeeper.altinity_default@ALTINITY.TEST
Principal “zookeeper/cp-zookeeper.altinity_default@ALTINITY.TEST” created

kadmin.local: ktadd -norandkey -k /tmp/secrets/kerberized_zookeeper.keytab zookeeper/cp-zookeeper.altinity_default@ALTINITY.TEST
Entry for principal zookeeper/cp-zookeeper.altinity_default@ALTINITY.TEST with kvno1 added to keytab WRFILE:/tmp/secrets/kerberized_zookeeper.keytab

kadmin.local: addprinc -randkey kafka/cp-kafka.altinity_default@ALTINITY.TEST
Principal “kafka/cp-kafka.altinity_default@ALTINITY.TEST” created

kadmin.local: ktadd -norandkey -k /tmp/secrets/kerberized_kafka.keytab kafka/cp-kafka.altinity_default@ALTINITY.TEST
Entry for principal kafka/cp-kafka.altinity_default@ALTINITY.TEST with kvno1 added to keytab WRFILE:/tmp/secrets/kerberized_kafka.keytab

kadmin.local addprinc -randkey zkclient@ALTINITY.TEST
Principal “zkclient@ALTINITY.TEST” created

kadmin.local: ktadd -norandkey -k /tmp/secrets/zkclient.keytab zkclient@ALTINITY.TEST
Entry for principal zkclient@ALTINITY.TEST with kvno1 added to keytab WRFILE:/tmp/secrets/zkclient.keytab

kadmin.local addprinc -randkey user1@ALTINITY.TEST
Principal “user1@ALTINITY.TEST” created

kadmin.local: ktadd -norandkey -k /tmp/secrets/clickhouse.keytab user1@ALTINITY.TEST
Entry for principal user1@ALTINITY.TEST with kvno1 added to keytab WRFILE:/tmp/secrets/clickhouse.keytab
NOTE: if you’re using AD, all of these steps could be done using the GUI provided by AD. Here are some resources to check for doing the above steps:
- https://learn.microsoft.com/en-us/azure/purview/create-service-principal-azure
- https://social.technet.microsoft.com/wiki/contents/articles/36470.active-directory-using-kerberos-keytabs-to-integrate-non-windows-systems.aspx
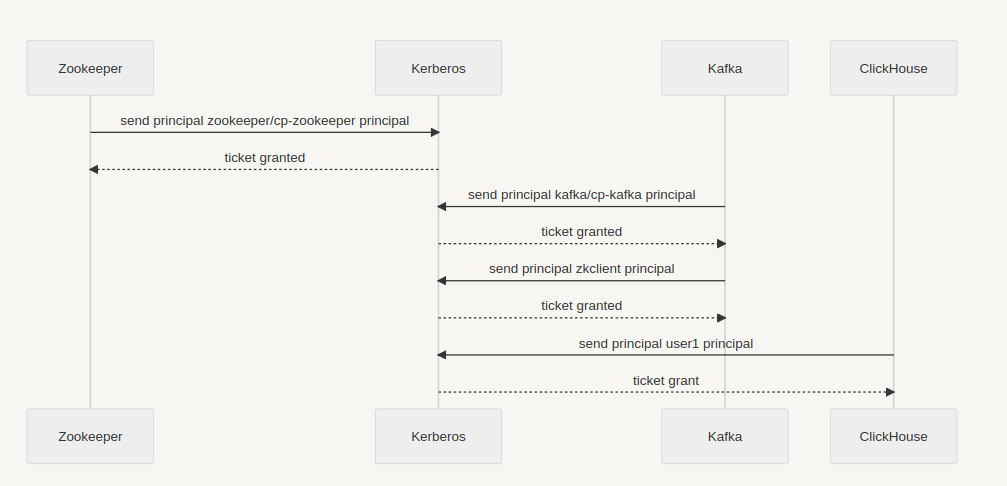
The next picture shows the interaction between the different services and the Kerberos KDC service. Every service sends an authentication request to KDC, which searches in the Kerberos database to see if the principal exists and confirms the authentication. It then sends a ticket to the requesting service.
Kafka and ZooKeeper Docker Configuration
Let’s go through the docker-compose file with all the services defined, some needed configuration files for Kafka and ZooKeeper and do this step by step. You don’t need to edit or modify any service, this configuration works out-of-the-box but if you need to edit something, then this step by step description will help you to do so.
1. Check Kerberos service definition:
kerberos:
   container_name: kdc-server
   hostname: kdc-server
   image: altinity/kdc-server:latest
   volumes:
     # This is needed otherwise there won't be enough entropy to generate a new kerberos realm
     - /dev/urandom:/dev/random
     - ./configs/secrets:/tmp/secrets
   ports:
     - "749:749"
     - "88:88/udp"
   networks:
       - altinity_default
We simply need to put the name of the created image, expose the directory where all the keytabs and krb5.conf file will be copied and expose the ports. To build the image refer to the README.md file of the repo.
2. Check ZooKeeper service definition:
zookeeper:
   image: confluentinc/cp-zookeeper:latest
   container_name: cp-zookeeper
   hostname: cp-zookeeper
   depends_on:
     - kerberos
   environment:
     ZOOKEEPER_CLIENT_PORT: 2181
     ZOOKEEPER_TICK_TIME: 2000
     ZOOKEEPER_AUTHPROVIDER_SASL: org.apache.zookeeper.server.auth.SASLAuthenticationProvider
     KAFKA_OPTS: -Djava.security.auth.login.config=/etc/zookeeper/secrets/zookeeper_jaas.conf -Djava.security.krb5.conf=/etc/zookeeper/secrets/krb5.conf
   ports:
     - 22181:2181
   volumes:
     - ./configs/secrets:/etc/zookeeper/secrets
   networks:
     - altinity_default
For ZooKeeper configuration we need to add the authentication challenge using ZOOKEEPER_AUTHPROVIDER_SASL environment variable and introduce 2 external files described below, to enable this authentication mechanism using the environment variable KAFKA_OPTS:
- A JAAS file to define the authentication mechanism to use by ZooKeeper server and clients. In our case the file contents are these:
Server {
   com.sun.security.auth.module.Krb5LoginModule required
   useKeyTab=true
   storeKey=true
   keyTab="/etc/zookeeper/secrets/kerberized_zookeeper.keytab"
   principal="zookeeper/cp-zookeeper.altinity_default@ALTINITY.TEST";
};
Client {
   com.sun.security.auth.module.Krb5LoginModule required
   useKeyTab=true
   storeKey=true
   keyTab="/etc/zookeeper/secrets/zkclient.keytab"
   principal="zkclient@ALTINITY.TEST";
};- The Kerberos service definition file krb5.conf where the realm is defined.
3. Check Kafka service definition
The Kafka service definition is similar to the ZooKeepers’. The files used are similar but some new params are needed:
kafka:
   image: confluentinc/cp-kafka:latest
   container_name: cp-kafka
   hostname: cp-kafka
   depends_on:
     - zookeeper
   ports:
     - 29092:29092
     - 29093:29093
   environment:
     KAFKA_BROKER_ID: "1"
     KAFKA_ZOOKEEPER_CONNECT: cp-zookeeper:2181
     KAFKA_SASL_ENABLED_MECHANISMS: GSSAPI
     KAFKA_SASL_KERBEROS_SERVICE_NAME: kafka
     KAFKA_ADVERTISED_LISTENERS: INTERNAL_PLAIN://cp-kafka:9092,INTERNAL_SASL://cp-kafka:9093,EXTERNAL_PLAIN://localhost:29092,EXTERNAL_SASL://localhost:29093
     KAFKA_INTER_BROKER_LISTENER_NAME: INTERNAL_PLAIN
     KAFKA_LISTENER_SECURITY_PROTOCOL_MAP: INTERNAL_PLAIN:PLAINTEXT,INTERNAL_SASL:SASL_PLAINTEXT,EXTERNAL_PLAIN:PLAINTEXT,EXTERNAL_SASL:SASL_PLAINTEXT
     KAFKA_OFFSETS_TOPIC_REPLICATION_FACTOR: 1
     KAFKA_OPTS: -Djava.security.auth.login.config=/etc/kafka/secrets/broker_jaas.conf -Djava.security.krb5.conf=/etc/kafka/secrets/krb5.conf
   volumes:
     - ./configs/secrets:/etc/kafka/secrets
   networks:
     - altinity_default
For Kafka, it is important to define how the ZooKeeper service can be located using the env variable KAFKA_ZOOKEEPER_CONNECT. Also we need to define the authentication mechanism that is going to be used with Kerberos, which in our case is GSSAPI using the variable KAFKA_SASL_ENABLED_MECHANISMS, and last but not least, define a name for the authentication service with KAFKA_SASL_KERBEROS_SERVICE_NAME.This name will be used by other services like ClickHouse. You can check all of these environment variable definitions for the docker image in the Confluent github repo.
We define the listener names and ports for Kafka service using KAFKA_ADVERTISED_LISTENERS variable:
- INTERNAL_PLAIN for service without authentication only accessible from the internal docker network. We can use this service to create test topics or produce messages.
- INTERNAL_SASL for service with authentication only accessible from the internal docker network. This one will be used by all services
- EXTERNAL_PLAIN and EXTERNAL_SASL for services that may access the Kafka broker outside the internal docker network.
The last section of the Kafka service definition describes the KAFKA_OPTS, as in the zookeeper definition, both JAAS files are also needed: one for kafka service and the other for kerberos service (krb5.conf)
4. Check ClickHouse docker configuration
And last but not least, the ClickHouse service configuration. This is an easy one:
clickhouse:
   image: clickhouse/clickhouse-server:22.8
   container_name: clickhouse-22.8
   hostname: clickhouse
   depends_on:
     - kafka
   ports:
     - "8122:8123"
     - "9002:9000"
     - "9092:9009"
   user: "1000:1000"
   environment:
     - "KRB5_CONFIG=/var/lib/clickhouse/user_files/krb5.conf"
   volumes:
     - ./configs/clickhouse.d/etc/clickhouse-server/config.d
     - ./configs/secrets:/var/lib/clickhouse/user_files
     - ./:/var/log/clickhouse-server
   #OS ulimits
   ulimits:
     nproc: 65535
     nofile:
       soft: 262144
       hard: 262144
   networks:
       - altinity_default
As you can see, we need to specify the Kerberos definition service file using KRB5_CONFIG variable so ClickHouse knows how to connect to the Kerberos service to authenticate and receive a ticket. This file describes to ClickHouse the realm and details of the service.
Now we need to define our Kafka Engine table that will consume from the Kafka broker. We are going to use a named collection to set all the related parameters for this service. As it is usually normal to have different Kafka brokers/clusters, each with a specific auth method, it is convenient to define a named collection for each Kafka service and use it specifically in the Kafka table definition. You can check out the file kafka.xml with the named collection and all the settings needed.
Starting All Services
Cool! We now have all the moving parts ready to be launched using docker-compose. To do this just simply execute docker-compose inside the repo directory:
> docker-compose up -dNow we can see that all services are up and running. We can check the logs for each running service using docker logs <service_name> if we need to troubleshoot because something is not working.
> docker logs cp-kafka
> docker logs cp-zookeeper
> docker logs kdc-server
Creating A Topic and Producing a Test Message
We need to create the topic in the Kafka broker. We can do it using kafkacat tool or simply creating an interactive shell session in the Kafka container as we’ve previously done with the Kerberos service, for creating the principals:
> docker-compose exec -it cp-kafka /bin/bashNow let’s create the topic, and check that it is up:
> Kafka-topics --bootstrap-server localhost:9092 --create --topic kerberos-test
Topic created

> kafka-topics --bootstrap-server localhost:9092 --list
kerberos_test
As you can see, we use the INTERNAL_PLAIN service to access Kafka, without authentication, and create the topics. This is convenient for testing purposes.
So, let’s feed some test data to the topic by using kafkacat. We can use other methods to produce messages but the easiest and most convenient is kafkacat, as it behaves as producer and also consumer. It is a good tool for testing purposes, worth learning about if you’re going to test/dev/deploy Kafka. Here we’re using the Kafka service EXTERNAL_PLAIN://localhost:29092 to produce the message without authentication. As I commented in the first part of the article, we’re bypassing basic security measures that SHOULD NOT be bypassed in production.
> echo '{"identifier":99, "some_string":"hola"}' | kafkacat -P -b localhost:29092 -t kerberos_test -z snappyCreating Kafka Table Engine and Consuming
Now it is time to create the Kafka table engine using clickhouse-client:
clickhouse-client –host localhost –port 9002

:) CREATE TABLE kafka_kerberos_test
(
   identifier UInt64,
   some_string String
)
ENGINE = Kafka(kafka_kerberos)
SETTINGS kafka_thread_per_consumer = 0, kafka_num_consumers = 1, kafka_handle_error_mode = 'stream', kafka_format = 'JSONEachRow'
After this, we can see in the ClickHouse server log that the table is connected to the Kafka topic and that it is waiting for data:
rdk:SASL] [thrd:GroupCoordinator]: GroupCoordinator/1: Send SASL Kafka frame to broker (50 bytes)
[rdk:SASL] [thrd:GroupCoordinator]: GroupCoordinator/1: GSSAPI authentication complete but awaiting final response from broker
[rdk:SEND] [thrd:GroupCoordinator]: GroupCoordinator/1: Sent SaslAuthenticateRequest (v0, 117 bytes @ 0, CorrId 5)
[rdk:RECV] [thrd:GroupCoordinator]: GroupCoordinator/1: Received SaslAuthenticateResponse (v0, 8 bytes, CorrId 5, rtt 0.64ms)
[rdk:SASL] [thrd:GroupCoordinator]: GroupCoordinator/1: Received SASL frame from broker (0 bytes)
[rdk:SASL] [thrd:GroupCoordinator]: GroupCoordinator/1: Authenticated as user1@ALTINITY.TEST using GSSAPI (GSSAPI)
And last step: check if the Kafka table in ClickHouse received the message:
clickhouse :) SET stream_like_engine_allow_direct_select = 1;

clickhouse :) SELECT * FROM kafka_kerberos_test;

SELECT *
FROM kafka_kerberos_test

┌─identifier─┬─some_string─┐
│         99 │ hola        │
└───────────┴──────────────┘

1 rows in set. Elapsed: 0.506 sec.
And that’s it! We’ve managed to configure and deploy a kerberized Kafka-ClickHouse environment.
Conclusion
In conclusion, integrating ClickHouse and Kafka with Kerberos authentication provides a secure and scalable solution for data transfer and management. By relying on a trusted third-party authentication server like Kerberos KDC, organizations can centralize authentication and authorization, reducing the risk of security breaches and improving overall security. Additionally, following good practices such as encryption, access controls, and regularly updating security credentials further enhances the security of the system.
Implementing Kerberos authentication for ClickHouse and Kafka can be complex, but it provides peace of mind knowing that data is secure and only accessible by authorized users and services. As organizations continue to collect and manage large amounts of data, the importance of security will only continue to grow, making solutions like this all the more critical.
We hope you liked this article. At Altinity, we’re committed to Open Source, we develop Open Source products and we share with the community: This is our identity 🙂. Contact us if you want to talk more about anything you’ve read here.
You can check the sources and bibliography used for this in the README.md of the repo.
ClickHouse® is a registered trademark of ClickHouse, Inc.; Altinity is not affiliated with or associated with ClickHouse, Inc.