Data Lake Query Acceleration using Standalone Antalya Swarms

Readers of this blog are aware that Altinity is extending open source ClickHouse® to combine its fast query and MergeTree tables with the scalability and low cost of data lake storage. We call the effort Project Antalya, and it is bearing fruit. Over the course of 2026, we will show how to use Antalya features to solve important problems in real-time analytics.
One of the key issues of data lakes is accelerating query on large datasets. In this article, we’ll show you how to solve it using a special configuration called a Standalone Swarm Cluster. Swarm clusters separate storage and compute using stateless ClickHouse servers, but you normally run Antalya builds to use them. Standalone swarm configurations remove this limitation. Any ClickHouse server can connect, regardless of version or build source.
Standalone swarms offer more than just additional compute capacity. You can place them close to data and use cheap spot instances. That enables you to reduce transfer as well as compute costs and also accelerate scan performance. These benefits are likewise available to any ClickHouse build.
Digging Into the Problem
First, a little background. Open source ClickHouse servers have abundant features for querying Parquet files stored on Iceberg, Hive, or plain S3 files. What they don’t have is scalable compute and network bandwidth to make such queries fast. Project Antalya introduced swarm clusters for this reason – easy-to-deploy clusters of stateless servers that handle query on Parquet data in object storage. Here’s the standard architecture.
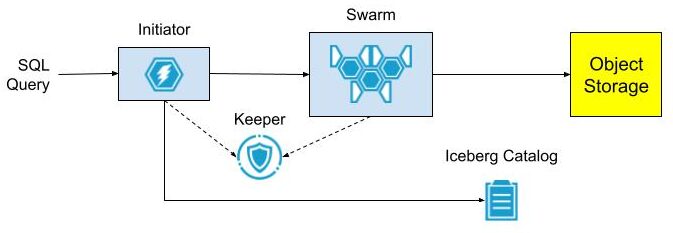
The architecture is easy to set up when all services are located within the same network, for example in Kubernetes. There is no obstacle to sharing DNS and TCP/IP access between the Initiator, swarm nodes, Keeper ensembles, and Iceberg Catalog.
It’s harder when the Initiator is on another network that does not share IP addresses or DNS with the swarm environment. Suppose the Initiator runs on AWS EC2 while the swarm and other services like Keeper are in Kubernetes. Exposing DNS names and internal IP addresses requires complex cloud configuration. This is even harder if the Initiator is across a public network on a data scientist laptop and Swarm nodes are in the cloud service “close” to the object storage data. We came up with a solution.
Standalone Swarm Architecture
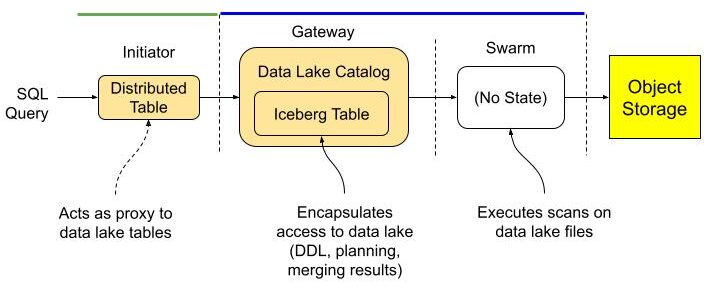
Standalone swarms solve the access problem by splitting swarm nodes, Keeper, and optionally the Iceberg Catalog into a separate Kubernetes cluster with an extra “gateway” cluster to provide a front door to access swarm nodes. The gateway has an external load balancer, so clients can reach it without any special network configuration.
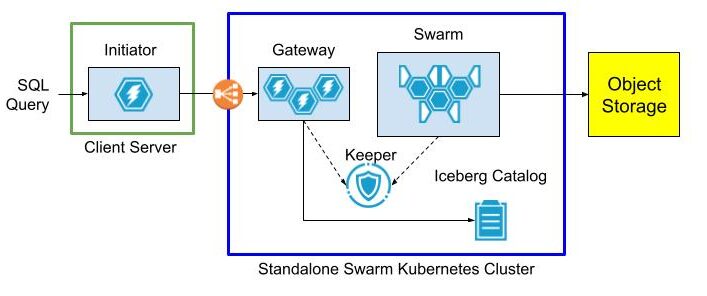
The gateway cluster has database definitions to expose data lake tables as well as user accounts so that clients can connect from outside networks as long as they can see the load balancer. Internals of the swarm cluster routing as well as query settings are completely hidden.
The following diagram shows the query flow.
Initiator, gateway, and swarm are just roles. You can name the actual clusters and servers within them anything you want.
Standalone Swarm Implementation
So much for theory. Let’s set up the standalone swarm.
Service Setup Overview
Our standalone swarm cluster is implemented in Kubernetes with the following services. For best results they should be based on the latest Antalya build.
- Antalya gateway cluster with at least one ClickHouse node.
- Antalya swarm cluster with auto-registration.
- Keeper ensemble.
- Altinity Ice REST Catalog.
Here are two ways to implement the configuration.
Method 1: Open Source
Follow the implementation procedure in https://github.com/Altinity/antalya-examples/tree/main/kubernetes. It sets up all required services, including the Iceberg REST catalog. The example uses the name “Vector” for the gateway cluster. Expose the Vector cluster and Ice REST Catalog load balancer ports. (E.g, by port forwarding as described in the README.md or by configuring public load balancers that expose access to Antalya servers and the Ice REST endpoint.)
Method 2: Altinity.Cloud
The other way is to set up all Standalone Swarm services in Altinity.Cloud. The Altinity Cloud Manager (ACM) documentation takes you through the easy process of creating clusters and swarm clusters. Use the latest Antalya builds for both gateway and swarm clusters.
- Using the ACM, create or get access to an Altinity.Cloud environment and open the Clusters tab.
- Use the LAUNCH CLUSTER function to start a gateway cluster with at least one available node. The examples that follow call this cluster my-gateway.
- Use the LAUNCH SWARM function to start a swarm cluster with at least one available node. The examples that follow call this cluster my-swarm.
- Ensure that your Altinity.Cloud environment has a configured Iceberg REST Catalog. We’ll read data from tables listed in this catalog. You can access the REST Catalog externally using connection details available in Altinity.Cloud. (Locate the Environment that contains your Antalya clusters.)
Configure Gateway Cluster for External Access
To access our standalone swarm, we’ll need to define a ClickHouse login with settings to access the swarm for queries. These settings are hidden to applications that connect to the gateway. First, add a user with privileges on the swarm.
-- RBAC setup for swarm user. Apply to gateway server(s).
DROP SETTINGS PROFILE IF EXISTS swarm_exec_profile ON CLUSTER '{cluster}';
DROP ROLE IF EXISTS swarm_exec_role ON CLUSTER '{cluster}';
DROP USER IF EXISTS swarm_exec_user ON CLUSTER '{cluster}';

-- Set the swarm cluster name and create a read-only role for queries.
CREATE SETTINGS PROFILE swarm_exec_profile ON CLUSTER '{cluster}'
SETTINGS
  object_storage_cluster = 'my-swarm'
READONLY;

CREATE ROLE swarm_exec_role ON CLUSTER '{cluster}'
  SETTINGS PROFILE 'swarm_exec_profile';

REVOKE ON CLUSTER '{cluster}' ALL FROM swarm_exec_role ;
GRANT ON CLUSTER '{cluster}' SELECT ON *.* TO swarm_exec_role;

-- Create a user with the above role.
CREATE USER swarm_exec_user ON CLUSTER '{cluster}'
  IDENTIFIED WITH SHA256_PASSWORD BY 'topsecret'
  HOST ANY
  DEFAULT ROLE swarm_exec_role;
Set Up Databases on the Gateway Cluster
Any table that we want to query needs to be visible on the gateway cluster. The simplest way is to add a database definition like the following.
CREATE DATABASE IF NOT EXISTS ice ON CLUSTER '{cluster}'
  ENGINE = DataLakeCatalog('https://iceberg-catalog.my-environment.altinity.cloud')
  SETTINGS catalog_type = 'rest',
    auth_header = 'Authorization: Bearer someToken',
    warehouse = 's3://my-bucket';
If you are an Ice Rest Catalog managed by Altinity.Cloud, you can get the connection URL, auth_header, and warehouse values by opening the environment that hosts your standalone cluster and selecting the Catalogs tab. (Contact your Org Admin if you cannot access this tab.)
Testing The Standalone Swarm
Let’s check the standalone swarm set to ensure it’s ready for use. First, we connect with our new account on the query gateway cluster.
Next we run queries to check that tables are visible and that we can issue a query on one of them. If your catalog has tables and access is properly configured you will see something like this:
SHOW TABLES FROM ice

   ┌─name─────────────────────────────────┐
1. │ aws-public-blockchain.btc            │
2. │ aws-public-blockchain.btc_live       │
3. │ aws-public-blockchain.btc_ps_by_date │
4. │ default.ontime                       │
5. │ ssb.lineorder_wide                   │
   └──────────────────────────────────────┘

SELECT count(), Carrier FROM ice.`default.ontime`
GROUP BY Carrier ORDER BY Carrier ASC

    ┌─count()─┬─Carrier─┐
 1. │ 3805480 │ AA      │
 2. │  455873 │ AL      │
 3. │  597874 │ AS      │
 4. │ 2125898 │ CO      │
 5. │ 3986228 │ DL      │
. . .
    └─────────┴─────────┘
The standalone swarm is ready for use.
Configure The Initiator ClickHouse Server
Add Cluster Definition for the Gateway
To use ClickHouse with our standalone swarm we need to do a bit of setup. First, let’s add a cluster definition to the configuration with the host, port, and credentials of the gateway cluster. Place the contents in /etc/clickhouse-server/config.d/swarm.xml. Restart the server for the settings to take effect.
<clickhouse>
  <remote_servers>
    <swarm>
       <shard>
          <replica>
              <host>my-gateway.my-environment.altinity.cloud</host>
              <port>9440</port>
              <secure>1</secure>
              <user>swarm_exec_user</user>
              <password>topsecret</password>
           </replica>
       </shard>
    </swarm>
  </remote_servers>
</clickhouse>
We can now route queries to the remote swarm.
Set Up Proxy Table Definitions
The next step is to set up remote tables on the client ClickHouse server. We do this for each data lake table we want to query via the remote swarm. For this demonstration we’ll just use a single table. Connect to the client ClickHouse and issue the following commands.
CREATE DATABASE IF NOT EXISTS ice_remote_swarm;

CREATE TABLE ice_remote_swarm.`default.ontime`
AS cluster(`swarm`, `ice`, `default.ontime`)
Let’s test that we can access the table.
SELECT count() FROM ice_remote_swarm.`default.ontime`

   ┌──count()─┐
1. │ 25801548 │ -- 25.80 million
   └──────────┘

1 row in set. Elapsed: 0.239 sec.
The response is pretty quick. We’ll get back to that shortly.
Optional Configuration for Testing
At this point our initiator server can query data lake tables through the standalone swarm. In this article, however, we go one step further and configure the cluster to connect directly to Iceberg. That allows us to run an apples-to-apples comparison with routing queries through the standalone swarm. If you don’t want to perform such a test, skip this section.
Configure A Filesystem Cache for S3 Reads on Parquet
One more thing–we need to configure caching for Parquet data read from S3. The following configuration file defines a filesystem cache for that purpose. Add it to /etc/clickhouse-server/config.d/cache.xml and restart the ClickHouse server.
<clickhouse>
  <filesystem_caches>
    <parquet_cache>
      <path>/var/lib/clickhouse/parquet_cache</path>
      <max_size>40Gi</max_size>
    </parquet_cache>
  </filesystem_caches>
</clickhouse>
You’ll need to ensure that the following settings are enabled to use the cache.
enable_filesystem_cache = 1
filesystem_cache_name = 'parquet_cache'
You can assign the values in a settings profile (XML or in SQL) or by appending them to queries after the SETTINGS keyword. (See below for more on the latter approach.)
Configure Direct Access to Data Lake
Finally we need to add a database definition that points to the Iceberg REST catalog.
CREATE DATABASE IF NOT EXISTS ice ON CLUSTER '{cluster}'
  ENGINE = DataLakeCatalog('https://iceberg-catalog.my-environment.altinity.cloud')
  SETTINGS catalog_type = 'rest',
    auth_header = 'Authorization: Bearer someToken',
    warehouse = 's3://my-bucket';
Let’s confirm that direct queries on the data lake work.
SELECT count()
FROM ice_direct.`default.ontime`

   ┌──count()─┐
1. │ 25801548 │ -- 25.80 million
   └──────────┘

1 row in set. Elapsed: 1.045 sec.
At this point all is in readiness. Time for some tests.
Testing The Standalone Swarm
Test Procedure
We can now measure the performance of the standalone swarm and compare it to reading data lake files directly from the client ClickHouse server. We use the following test query to look for Carriers with the worst cancellation record in a single year. Here’s an example.
SELECT Carrier, toYear(FlightDate) AS Year,
    (sum(Cancelled) / count(*)) * 100. AS cancelled_pct
FROM ice_direct.`default.ontime`
GROUP BY Carrier, Year HAVING cancelled_pct > 1.
ORDER BY cancelled_pct DESC LIMIT 2

   ┌─Carrier─┬─Year─┬──────cancelled_pct─┐
1. │ EA      │ 1989 │ 10.321500966388536 │
2. │ UA      │ 1992 │ 2.4398772291075796 │
   └─────────┴──────┴────────────────────┘
It’s not a big query and the dataset we’re using is relatively small (25M rows). However it’s enough to see basic behavior.
We run the test using a laptop that is running a local Client Server as shown above. The full test rig is shown below:
- Client Server Host – A Dell XPS 15 with Intel(R) Core(TM) i7-13700H, 32 GiB RAM, SSD drive. Win 11 Pro with ClickHouse running on WSL2.
- Gateway Cluster – A single AWS m8g.xlarge VM with 14 GiB RAM and 4 vCPUs allocated to ClickHouse.
- Swarm Cluster – 2 AWS m8g.xlarge VM with 14 GiB RAM and 4 vCPUs allocated to ClickHouse.
The standalone swarm is located in AWS US-East-1. The laptop is operating from California on a Comcast Internet connection measured at 415 Mbps download and 38.61 Mbps upload. (Pretty good connectivity by US standards.)
Here’s how we run the test.
- Clear caches on all hosts, including the local Client Server and all servers in the remote swarm. The commands to clear caches are the following.
SYSTEM DROP ICEBERG METADATA CACHE ON CLUSTER '{cluster}';
SYSTEM DROP FILESYSTEM CACHE ON CLUSTER '{cluster}';
SYSTEM DROP PARQUET METADATA CACHE ON CLUSTER '{cluster}';- Run queries 5 times for each of the following scenarios.
- Laptop directly to Iceberg using table ice_direct.`default.ontime` without caching enabled for S3, Iceberg metadata, or Parquet performance. This shows worst case performance on the laptop.
- Laptop directly to Iceberg using table ice_direct.`default.ontime` with caching enabled. This shows best case performance on the laptop.
- Laptop to the standalone swarm (through the proxy table ice_swarm.`default.ontime`).
In case you are wondering how to manage settings, the simplest way for testing is to turn them on and off explicitly. Here’s an example with all caches on.
SELECT Carrier, toYear(FlightDate) AS Year,
    (sum(Cancelled) / count(*)) * 100. AS cancelled_pct
FROM ice_direct.`default.ontime`
GROUP BY Carrier, Year HAVING cancelled_pct > 1.
ORDER BY cancelled_pct DESC LIMIT 2
SETTINGS enable_filesystem_cache = 1,
  filesystem_cache_name = 'parquet_cache',
  use_iceberg_metadata_files_cache = 1,
  input_format_parquet_use_metadata_cache = 1;
To turn them off, flip the 1’s to 0’s. Not pretty but it does the job.
Performance Test Results
The following graph compares performance of direct query on the data lake with caches enabled versus the standalone swarm. As we can see, query on the standalone swarm is faster in all cases, but performance converges as caches fill on the laptop. As long as the dataset is small and can fit in laptop caches, the difference in response narrows significantly after running a couple of queries.
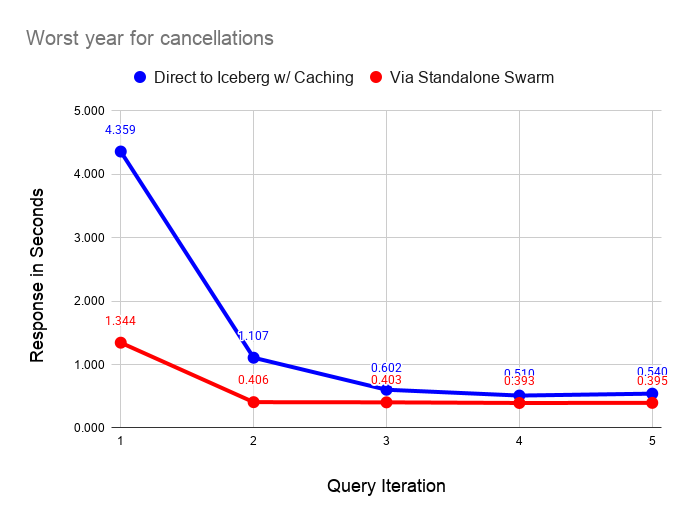
The following graph performs the same test as before but with all caching disabled on the laptop server. As before, querying via the swarm is faster in all cases. The interesting feature of this graph is the instability of reading from the data lake, even on a fast home Internet connection.

Ping times on the Internet connection are quite stable, which means that small requests go through quickly and reliably. However, the response on downloads from S3 is quite variable. The queries are pulling 111 MiB of data from S3 as shown by the following query on the filesystem cache size after a test run.
SELECT
    cache_name,
    formatReadableSize(sum(size)) AS size
FROM system.filesystem_cache
GROUP BY cache_name

   ┌─cache_name────┬─size───────┐
1. │ parquet_cache │ 111.24 MiB │
   └───────────────┴────────────┘
I ran these tests a couple of dozen times and found that the uncached response varied between 2 and 10 seconds. By contrast the standalone swarm returns query results in 0.4 seconds once caches fill with relatively little variance across runs. The data shared across the Internet connection is very small in the latter case, since scanning and aggregation occurs on the standalone swarm.
It’s also important to note that the dataset we are querying is also quite small, hence shows the laptop performance in a favorable light. The standalone swarm performance looks vastly better as the dataset size increases. You would not want to use direct query from the laptop in this case.
Using Standalone Swarms With Non-Antalya Servers
As we mentioned in the introduction, standalone swarms can accelerate data lake queries on any ClickHouse version. Let’s demonstrate this with clickhouse-local using the latest upstream Official ClickHouse build. It won’t take long.
Start by installing Official ClickHouse. I love this quick download with curl. It’s the handiest database installation of all time.
curl https://clickhouse.com/ | sh
. . .
Successfully downloaded the ClickHouse binary, you can run it as:
    ./clickhouse
Now start clickhouse-local.
./clickhouse local
Decompressing the binary......
ClickHouse local version 26.3.1.357 (official build).
…And run a query directly against the standalone swarm. The call to remoteSecure() feels a little hacky but we’re moving fast and breaking things. Elegance can come later.
:) SELECT Carrier, toYear(FlightDate) AS Year,
    (sum(Cancelled) / count(*)) * 100. AS cancelled_pct
FROM remoteSecure('my-gateway.my-environment.altinity.cloud:9440', ice, 'default.ontime', 'swarm_exec_user', 'topsecret')
GROUP BY Carrier, Year HAVING cancelled_pct > 1.
ORDER BY cancelled_pct DESC LIMIT 2

   ┌─Carrier─┬─Year─┬──────cancelled_pct─┐
1. │ EA      │ 1989 │ 10.321500966388536 │
2. │ UA      │ 1992 │ 2.4398772291075796 │
   └─────────┴──────┴────────────────────┘

2 rows in set. Elapsed: 1.097 sec. Processed 25.80 million rows, 365.33 MB (23.53 million rows/s., 333.17 MB/s.)
Peak memory usage: 26.18 MiB.
Q.E.D. This query should work with any version of ClickHouse, but note that the query host nam is not real.
For now, you need to set up your own standalone swarm cluster as described above. We’re building a Project Antalya public demo environment that you will be able to use from any location. It should be out in a few weeks.
Conclusion
Standalone swarm clusters are a neat variation on Antalya swarms that allow any ClickHouse server to accelerate queries on data lakes. Standalone swarms are (a) movable and (b) completely encapsulate swarm hosts, settings, and cache configuration for high performance. For this reason standalone swarms can also eliminate transfer costs from public clouds.
There’s more to come. Standalone swarms are a linchpin that makes it easier to extend existing ClickHouse tables onto cheap Iceberg storage using Antalya Hybrid tables. We will expand on this important use case shortly in a new blog article that will appear shortly.
Modern data lakes open up exciting new possibilities for cheap, real-time analytics. We hope you have enjoyed this article and that it inspires you to create new applications with Project Antalya. If you need help, please contact us or join our Slack workspace to ask questions.
ClickHouse® is a registered trademark of ClickHouse, Inc.; Altinity is not affiliated with or associated with ClickHouse, Inc.