Amplifying ClickHouse® Capacity with Multi-Volume Storage (Part 1)

As longtime users know well, ClickHouse has traditionally had a basic storage model. Each ClickHouse server is a single process that accesses data located on a single storage device. The design offers operational simplicity–a great virtue–but restricts users to a single class of storage for all data. The downside is difficult cost/performance choices, especially for large clusters.
Over the course of 2019 Altinity and the ClickHouse Community have worked hard to enable ClickHouse tables to divide storage into volumes containing multiple devices and move data automatically between them. Such multi-volume storage is a feature of ClickHouse starting in version 19.15. It has a number of uses, of which the most important is storing hot and cold data on different types of storage. This configuration is known as tiered storage; used properly it can improve the economics of ClickHouse servers enormously.
In the blog series that follows we will introduce multi-volume storage and show how it works. We’ll demonstrate how it enables tiered storage and illustrate other uses as well. The article you are now reading introduces multi-volume storage and shows basic configuration. We will complete the story in the succeeding articles.
Motivation and use for multi-volume storage
Suppose you have a ClickHouse cluster to process service logs that keeps 30 days of data. Users run 95% percent of queries interactively on data from the current day. The remaining 5% are long-running batch queries for trend analysis and machine learning. So here’s the choice: use fast SSD storage to run common queries quickly on 3% of data, or inexpensive, high-density disk that is adequate for the other 97%. It’s fast or cheap, not both.
Fortunately, there’s a much better answer: tiered storage. The idea is that you store new data on fast storage, like NVMe SSD, and move it later to slower storage, such as high-density disk. Not only does this save on storage, but you can often reduce the overall number of servers without giving up performance. It’s a double win for efficiency that can reduce hardware costs up to 80% as this example spreadsheet shows. Not surprisingly tiered storage has been a top feature request for years.
About six months ago, I wrote an article on how to store the data of one logical table on several physical disks with the help of the Merge engine and some manual manipulation of parts. The approach allowed motivated users to solve the problem of multi-tier storage, but it was a very inconvenient workaround.
ClickHouse multi-volume storage makes tiered storage possible and even quite convenient. You can store table data on multiple devices, grouped into volumes, and even move data across volumes automatically. Multi-volume storage solves other problems as well. For instance, multi-volume storage also provides a simple mechanism to extend server capacity by attaching new devices.
ClickHouse multi-volume architecture
Before getting into examples, I would like to give a bit of background on how multi-volume storage works in ClickHouse. A picture is worth a thousand words, so let’s start with that.
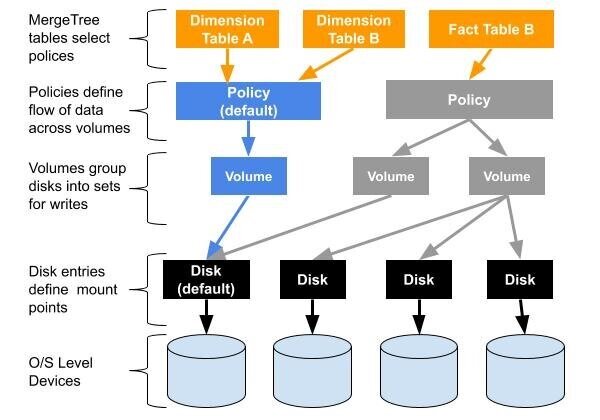
This scheme may seem complex but is actually quite simple. Each MergeTree table is associated with a storage policy. Policies are just rules for writing MergeTree table data. They group disks into one or more volumes. They also define write order to disks within each volume and how data moves between volumes if there is more than one.
Storage policies are backwards compatible with older tables. ClickHouse always has a disk called ‘default’ that points to the data directory path from config.xml. There is also a corresponding policy called ‘default’. If a MergeTree table does not have a storage policy, ClickHouse will use the default policy and write to the default disk.
That’s it for theory. From this point on we’ll explain everything by examples.
Server setup
Let’s prepare to use multi-volumes with a soup-to-nuts installation of a ClickHouse server with multiple block devices. (Note: you can cheat and point ClickHouse to different directories on the same storage device. However, features like renaming, hardlinks, and free space detection will work differently.)
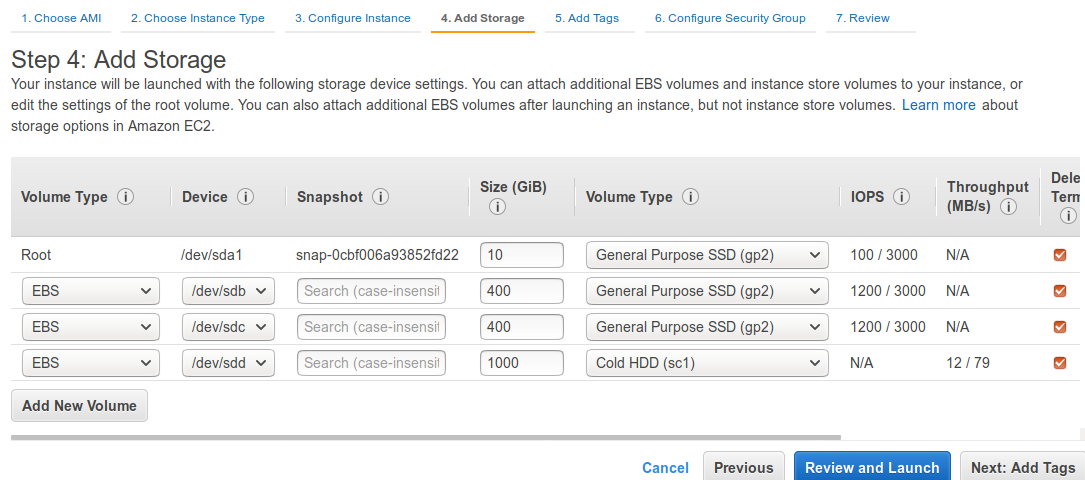
First of all, we need a server with several hard drives. For this particular test, I spun up a t3.medium EC2 instance on AWS with Ubuntu 18.04, then connected three additional storage volumes.
2 x gp2 SSD 400GB ($37 / month each)
1 x sc1 HDD 1000GB ($25 / month).
When the instance comes up, you can see the extra block devices using the handy lsblk command.
$ lsblk
NAME        MAJ:MIN RM  SIZE RO TYPE MOUNTPOINT
loop0         7:0    0   89M  1 loop /snap/core/7713
loop1         7:1    0   18M  1 loop /snap/amazon-ssm-agent/1480
nvme0n1     259:0    0  400G  0 disk
nvme2n1     259:1    0   10G  0 disk
└─nvme2n1p1 259:3    0   10G  0 part /
nvme1n1     259:2    0 1000G  0 disk
nvme3n1     259:4    0  400G  0 disk
Let’s format the disks with the ext4 file system and mount them.
sudo mkfs -t ext4 /dev/nvme0n1
sudo mkfs -t ext4 /dev/nvme1n1
sudo mkfs -t ext4 /dev/nvme3n1

sudo mkdir /mnt/ebs_gp2_1
sudo mkdir /mnt/ebs_gp2_2
sudo mkdir /mnt/ebs_sc1_1

sudo mount -o noatime,nobarrier /dev/nvme0n1 /mnt/ebs_gp2_1
sudo mount -o noatime,nobarrier /dev/nvme3n1 /mnt/ebs_gp2_2
sudo mount -o noatime,nobarrier /dev/nvme1n1 /mnt/ebs_sc1_1
To keep this example simple, we’ll skip adding the volumes to fstab, so they will not be mounted automatically after restart. (For EC2 hosts you can do that step using instructions in https://docs.aws.amazon.com/AWSEC2/latest/UserGuide/ebs-using-volumes.html#ebs-mount-after-reboot.)
Now I install ClickHouse. We currently recommend the latest stable 19.15 release for testing. (Later versions are fine as well. Examples in this post are based on version 19.16.3.6.)
sudo apt-get install dirmngr
sudo apt-key adv --keyserver hkp://keyserver.ubuntu.com:80 --recv E0C56BD4

echo "deb http://repo.yandex.ru/clickhouse/deb/stable/ main/" | sudo tee /etc/apt/sources.list.d/clickhouse.list
sudo apt-get update

sudo apt-get install -y clickhouse-server clickhouse-client

sudo systemctl start clickhouse-server
sudo systemctl status clickhouse-server

clickhouse-client --query='SELECT version()'
19.16.3.6
Configuring Disks for ClickHouse
At installation time ClickHouse sets up a default configuration with data stored as usual on the root partition in the folder /var/lib/clickhouse/data. To see this we can use the new system.disks table that shows the disks that ClickHouse knows about.
SELECT
    name,
    path,
    formatReadableSize(free_space) AS free,
    formatReadableSize(total_space) AS total,
    formatReadableSize(keep_free_space) AS reserved
FROM system.disks

┌─name────┬─path─────────────────┬─free─────┬─total────┬─reserved─┐
│ default │ /var/lib/clickhouse/ │ 7.49 GiB │ 9.63 GiB │ 0.00 B   │
└────────┴──────────────────────┴──────────┴──────────┴───────────┘
Since we have extra disks available, let’s now make ClickHouse aware of them. We’ll add the following configuration to /etc/clickhouse-server/config.d/storage.xml. (Note the convention to put storage configuration in config.d. This keeps it from disappearing on upgrade, which would be bad.)
<yandex>
  <storage_configuration>
    <disks>
      <!--
          default disk is special, it always
          exists even if not explicitly
          configured here, but you can't change
          it's path here (you should use <path>
          on top level config instead)
      -->
      <default>
         <!--
             You can reserve some amount of free space
             on any disk (including default) by adding
             keep_free_space_bytes tag
         -->
         <keep_free_space_bytes>1024</keep_free_space_bytes>
      </default>

      <ebs_gp2_1>
         <!--
         disk path must end with a slash,
         folder should be writable for clickhouse user
         -->
         <path>/mnt/ebs_gp2_1/</path>
      </ebs_gp2_1>

      <ebs_gp2_2>
          <path>/mnt/ebs_gp2_2/</path>
      </ebs_gp2_2>

      <ebs_sc1_1>
          <path>/mnt/ebs_sc1_1/</path>
      </ebs_sc1_1>
    </disks>
  </storage_configuration>
</yandex>
To apply the changes we must restart ClickHouse. This is needed every time we change the storage configuration. Let’s try it.
$ sudo systemctl restart clickhouse-server
$ sudo systemctl status clickhouse-server
â— clickhouse-server.service - ClickHouse Server (analytic DBMS for big data)
Loaded: loaded (/etc/systemd/system/clickhouse-server.service; enabled; vendor preset: enabled)
Active: activating (auto-restart) (Result: exit-code) since Mon 2019-11-04 15:02:06 UTC; 4s ago
Process: 3146 ExecStart=/usr/bin/clickhouse-server --config=/etc/clickhouse-server/config.xml --pid-file=/run/clickhouse-server/clickhouse-server.pid (code=exited, status=70)
Main PID: 3146 (code=exited, status=70)Oops… ClickHouse can’t start. Looks like something is wrong with our config, let’s check the logs:
sudo tail -n 10 /var/log/clickhouse-server/clickhouse-server.err.log

… <Error> Application: DB::Exception: There is no RW access to disk ebs_gp2_1
Looks like I’ve forgotten to grant permissions for those folders to the ClickHouse user. Let’s fix that:
sudo chown clickhouse:clickhouse -R /mnt/ebs_gp2_1/ /mnt/ebs_gp2_2/ /mnt/ebs_sc1_1/
sudo systemctl restart clickhouse-server
sudo systemctl status clickhouse-server
The server status now looks much better.
sudo systemctl status clickhouse-server
â— clickhouse-server.service - ClickHouse Server (analytic DBMS for big data)
Loaded: loaded (/etc/systemd/system/clickhouse-server.service; enabled; vendor preset: enabled)
Active: active (running) since Mon 2019-11-04 15:10:55 UTC; 2s ago
Main PID: 3714 (clickhouse-serv)
Tasks: 40 (limit: 4633)
CGroup: /system.slice/clickhouse-server.service
└─3714 /usr/bin/clickhouse-server --config=/etc/clickhouse-server/config.xml --pid-file=/run/clickhouse-server/clickhouse-server.pid
... systemd[1]: Started ClickHouse Server (analytic DBMS for big data).Ok, now ClickHouse is running and we can see all the disks.
SELECT
    name,
    path,
    formatReadableSize(free_space) AS free,
    formatReadableSize(total_space) AS total,
    formatReadableSize(keep_free_space) AS reserved
FROM system.disks

┌─name──────┬─path─────────────────┬─free───────┬─total──────┬─reserved─┐
│ default   │ /var/lib/clickhouse/ │ 7.49 GiB   │ 9.63 GiB   │ 1.00 KiB │
│ ebs_gp2_1 │ /mnt/ebs_gp2_1/      │ 366.06 GiB │ 392.72 GiB │ 0.00 B   │
│ ebs_gp2_2 │ /mnt/ebs_gp2_2/      │ 372.64 GiB │ 392.72 GiB │ 0.00 B   │
│ ebs_sc1_1 │ /mnt/ebs_sc1_1/      │ 933.21 GiB │ 983.30 GiB │ 0.00 B   │
└──────────┴──────────────────────┴────────────┴────────────┴───────────┘.
At this point we have 4 available disks for the data. We’re ready to make ClickHouse start using them.
Conclusion and what’s next
This initial article introduced the new multi-volume feature in ClickHouse and showed how to define the disk configuration. The follow-on article will dive into storage policies, which allow users to group disks and define how parts flow between them. We’ll also show how to set up tiered storage as well as other useful storage configurations.
Meanwhile we hope you enjoyed this introduction and look forward to the next article. Stay tuned!
Read Part 2 here
ClickHouse® is a registered trademark of ClickHouse, Inc.; Altinity is not affiliated with or associated with ClickHouse, Inc.