Bring up ClickHouse® on Kubernetes with Argo CD


If you love ClickHouse®, Altinity can simplify your experience with our fully managed service in your cloud (BYOC) or our cloud and 24/7 expert support. Learn more.
ClickHouse users are creative and teach us new tricks constantly. Our customers introduced us to one of my favorites: Argo CD. It lets you store Kubernetes service configurations in GitHub projects, then deploy them on Kubernetes in a few simple commands or even automatically when you check in changes.
The Argo CD way of managing services is known as GitOps. You have probably heard of GitOps or use it today. Once you get it set up it can be addictively easy to use.
This article explains what Argo CD does, how to install it, and how to set up a simple ClickHouse stack. To follow along, you’ll need your own Kubernetes cluster. The Argo CD configuration used in this blog is located in the Altinity argocd-examples-clickhouse project on GitHub. I tested on Minikube running Kubernetes 1.27.4, but the examples should run anywhere.
Introducing Argo CD
Kubernetes is great for running container-based services, but it has a fundamental issue. There is no consistent definition of the “service” itself. Depending on the service, users may need to use Helm charts, YAML manifests, or Kustomize projects to install. This makes deployment confusing, especially for systems that consist of many services with different install patterns.
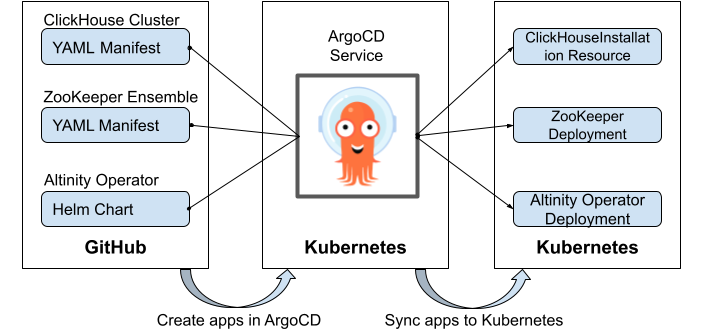
Argo CD solves the deployment problem. Users define Argo CD Applications, which map source configuration files (the “state”) in GitHub to a target Kubernetes cluster and name space. Argo CD handles standard deployment methods, including Helm Charts, manifest files, kustomize projects, and jsonnet, to name a few. Argo CD provides simple commands to define the application, install it, and keep it up to date when the definition changes in GitHub.
Here’s a simple illustration.
In short Argo CD is a way to implement GitOps on Kubernetes. If you want to know more about how it works, there is a nice overview in the documentation. Meanwhile, let’s show how to use it.
Install ARGOCD
Install Argo CD using the Getting Started instructions. Argo CD runs on a Kubernetes cluster. It does not have to be the same cluster where you install your stack. Here are sample commands to install it from a Linux system. (Note: This is a non-HA installation suitable for development. See the Argo CD docs for tips on HA installation.)
kubectl create namespace argocd
kubectl apply -n argocd -f https://raw.githubusercontent.com/argoproj/argo-cd/stable/manifests/install.yaml
You’ll also need to talk to Argo CD once it’s installed. Install the argocd command line tool.
curl -sSL -o argocd-linux-amd64 https://github.com/argoproj/argo-cd/releases/latest/download/argocd-linux-amd64
sudo install -m 555 argocd-linux-amd64 /usr/local/bin/argocd
rm argocd-linux-amd64
Finally, you’ll need to login. Expose the Argo CD API port, login using the default password, and reset it to something you can use permanently.
nohup kubectl port-forward svc/argocd-server \
 -n argocd 8080:443 > server.out 2>&1 &
kubectl port-forward svc/argocd-server -n argocd 8080:443 &
# Prints a password for one-time use. Use that to login.
argocd admin initial-password -n argocd
TEMPPWD=`argocd admin initial-password -n argocd | cut -f1 -d ' '`
argocd login localhost:8080 --username=admin \
 --password="$TEMPPWD" --insecure
echo $TEMPPWD
# Update password to 'secretsecret' using $TEMPPWD value to login
argocd account update-password
argocd login localhost:8080 --username=admin \
 --password="secretsecret" --insecure
Argo CD also has a UI. The Argo CD Getting Started pages explain how to enable it, but what you see above is plenty for this exercise.
Bringing up a ClickHouse Stack with Argo CD
OK, let’s now bring up a ClickHouse stack with the three components we listed earlier. We’ll start with the Altinity Kubernetes operator because it’s required to manage ClickHouse.
Installing clickhouse-operator
First, let’s create the namespace.
kubectl create namespace ch
Next, we need to create the app, which we will call clickhouse-operator. This app maps the clickhouse-operator resource files (a GitHub repo + path) to a specific Kubenetes cluster and namespace.
argocd app create clickhouse-operator \
 --repo https://github.com/Altinity/argocd-examples-clickhouse.git \
 --path apps/clickhouse-operator \
 --dest-server https://kubernetes.default.svc --dest-namespace ch
The create command just defines the app. It does not actually install it on Kubernetes. For that we need to “sync” the clickhouse-operator app to Kubernetes using the following command.
argocd app sync clickhouse-operator
A short flood of messages appears as Argo CD applies the operator manifest. Now we run the following two commands to see the state of the application and the resources Argo CD created from it.
$ argocd app list
NAME                        CLUSTER                         NAMESPACE  PROJECT  STATUS  HEALTH   SYNCPOLICY  CONDITIONS  REPO                                                        PATH                      TARGET
argocd/clickhouse-operator  https://kubernetes.default.svc  ch         default  Synced  Healthy  <none>      <none>      https://github.com/Altinity/argocd-examples-clickhouse.git  apps/clickhouse-operator
$ kubectl get all -n ch
NAME                                                                  READY   STATUS    RESTARTS   AGE
pod/clickhouse-operator-altinity-clickhouse-operator-6bb6949dcg2fzj   2/2     Running   0          58s

NAME                                                               TYPE        CLUSTER-IP      EXTERNAL-IP   PORT(S)    AGE
service/clickhouse-operator-altinity-clickhouse-operator-metrics   ClusterIP   10.110.94.177   <none>        8888/TCP   58s

NAME                                                               READY   UP-TO-DATE   AVAILABLE   AGE
deployment.apps/clickhouse-operator-altinity-clickhouse-operator   1/1     1            1           58s

NAME                                                                          DESIRED   CURRENT   READY   AGE
replicaset.apps/clickhouse-operator-altinity-clickhouse-operator-6bb6949dc4   1         1         1       58s
That’s it. The operator is up and running. There is no need to remember where the installation scripts are located or how to run them. Argo CD takes care of everything.
If you are curious what the resource files look like in GitHub, follow this link to see them. You will find that the clickhouse-operator is installed from a Helm Chart.
Installing the Remaining Services
We can now quickly install the ZooKeeper and ClickHouse cluster services using the same patterns.
argocd app create zookeeper \
 --repo https://github.com/Altinity/argocd-examples-clickhouse.git \
 --path apps/zookeeper \
 --dest-server https://kubernetes.default.svc --dest-namespace ch
argocd app create clickhouse \
 --repo https://github.com/Altinity/argocd-examples-clickhouse.git \
 --path apps/clickhouse \
 --dest-server https://kubernetes.default.svc --dest-namespace ch
argocd app sync zookeeper
argocd app sync clickhouse
Once the commands complete, we run argocd app list and kubectl get all -n ch to see the Argo CD status and the resources in Kubernetes.
At this point the stack is deployed and we can begin to use it. Once again, it’s no longer necessary to remember the location of a bunch of scripts to install the services in a ClickHouse stack. We use argocd app create and argocd app sync for each application, regardless of how they are actually deployed.
Important note: using argocd app commands is just one way to install Argo CD applications. Applications are actually Kubernetes resources that live in the argocd namespace. You can define applications yourself in Kubernetes using manifest files, like this. There are also multiple ways to sync applications to Kubernetes.
Further Operations on ClickHouse Stacks Using Argo CD
Deleting Services
It’s easy to remove services installed by Argo CD. The following commands eliminate the ClickHouse cluster and ZooKeeper from the stack.
argocd app delete clickhouse
argocd app delete zookeeper
Argo CD will ask to confirm deletion in each case. To avoid this we can add the ‘–yes’ option.
Note to users: The ClickHouse manifest has a reclaimPolicy setting to preserve storage even after cluster deletion. To delete storage you’ll need to find the corresponding Persistent Volume Claims (PVCs) using ‘kubectl get pvc -n ch’ and delete them manually. See this blog for more information.
Adding Different Services
We can now reconstitute the stack to set up ClickHouse using ClickHouse Keeper instead of ZooKeeper. The ClickHouse manifest uses the same DNS name for the [Zoo]Keeper connection, which allows the stack to use them interchangeably. Here are the commands.
argocd app create clickhouse-keeper \
 --repo https://github.com/Altinity/argocd-examples-clickhouse.git \
 --path apps/clickhouse-keeper \
 --dest-server https://kubernetes.default.svc --dest-namespace ch
argocd app create clickhouse \
 --repo https://github.com/Altinity/argocd-examples-clickhouse.git \
 --path apps/clickhouse \
 --dest-server https://kubernetes.default.svc --dest-namespace ch
argocd app sync clickhouse-keeper
argocd app sync clickhouse
We can of course add other services to the stack. The sample project also has application definitions for Prometheus, Grafana, and CloudBeaver. We’re working on improvements that will configure Prometheus metric storage and Grafana dashboards automatically.
Making Changes to Service Configurations
The whole point of GitOps with Argo CD is to make controlled and repeatable changes to applications. Up until now we’ve been using the Altinity argocd-examples-clickhouse repo. To make changes we’ll need our own copy so we can commit changes.
Let’s start by forking the repository in GitHub. Login to GitHub, navigate to the argocd-examples-clickhouse project, and bring up the page to create a new fork.
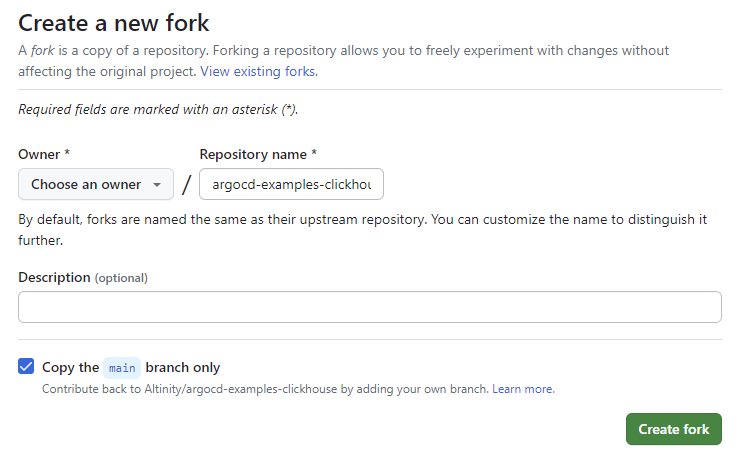
Let’s say the new fork is yourgithub/argocd-examples-clickhouse. We now delete the current ClickHouse cluster application in Argo CD and create a new one from the fork in GitHub.
argocd app create clickhouse \
 --repo https://github.com/yourgithub/argocd-examples-clickhouse.git \
 --path apps/clickhouse \
 --dest-server https://kubernetes.default.svc --dest-namespace ch
argocd app sync clickhouse
Within a minute or two a new ClickHouse cluster appears. We check the pods and see the following.
$ kubectl get pods -n ch --selector=app.kubernetes.io/instance=clickhouse
NAME                    READY   STATUS    RESTARTS   AGE
chi-argocd-demo-0-0-0   1/1     Running   0          3m1s
chi-argocd-demo-0-1-0   1/1     Running   0          2m48s
Let’s add a shard. We’ll clone the repo to a nearby host and edit the cluster definition in demo.yaml to increase the number of shards.
git clone git@github.com:yourgithub/argocd-examples-clickhouse.git
cd argocd-examples-clickhouse/apps/clickhouse
vi demo.yaml
After finishing, the differences in the file are as shown below. We check in and push the changes to our fork.
git diff
...
--- a/apps/clickhouse/demo.yaml
+++ b/apps/clickhouse/demo.yaml
@@ -7,7 +7,7 @@ spec:
     clusters:
       - name: "demo"
         layout:
-          shardsCount: 1
+          shardsCount: 2
           replicasCount: 2
         templates:
           podTemplate: server
...
git add demo.yaml
git commit -m 'Increase storage to 100Gi'
git push origin main
Finally, we tell Argo CD to sync the clickhouse app.
argocd app sync clickhouseArgoCD applies the new application resources. After a couple minutes the pods should look like the following.
$ kubectl get pods -n ch --selector=app.kubernetes.io/instance=clickhouse
NAME                    READY   STATUS    RESTARTS   AGE
chi-argocd-demo-0-0-0   1/1     Running   0          11m
chi-argocd-demo-0-1-0   1/1     Running   0          11m
chi-argocd-demo-1-0-0   1/1     Running   0          113s
chi-argocd-demo-1-1-0   1/1     Running   0          83s
The change has propagated and the new shard is up and running. Welcome to GitOps!
Conclusion
The simple examples in this article show how Argo CD lets you deploy, change, and remove analytic stacks on Kubernetes. We’ve seen how customers use Argo CD to combine ClickHouse with open source software like Prometheus, Superset, Grafana, and others into purpose-built stacks that beat Snowflake and BigQuery. We call this the modern analytic stack.
There’s a lot more to learn about using Argo CD and GitOps. Check out the Argo CD documentation if you have not done so already. Refer back to the Altinity argocd-examples-clickhouse project in GitHub. See also our recent webinars (here and here) on modern analytic stack, Kubernetes, and Argo CD.
I would like to thank the many Altinity customers who taught us about the power of Argo CD. We’re returning the favor with new Altinity.Cloud tools to help Argo CD and ClickHouse work even better together. To find out how Altinity can help you deliver modern analytic stacks, contact us to schedule an appointment or join our Slack workspace. See you soon!
ClickHouse® is a registered trademark of ClickHouse, Inc.; Altinity is not affiliated with or associated with ClickHouse, Inc.