Machine Learning Models as Tables

Guest post from Zoran Pandovski at MindsDB
Editor’s Note. The MindsDB team has come up with a creative way to integrate machine learning models with ClickHouse. We’re delighted to share it on the Altinity Blog. Contact us at info@altinity.com if you have something interesting to share with the community.
Add AutoML capabilities to your analytics data with MindsDB and ClickHouse
We will start this article by raising one of the most asked questions regarding Machine Learning, What is the difference between Machine Learning and Artificial Intelligence? When we think about machine learning we can think about it as a subset of Artificial Intelligence. In simple words, the idea behind machine learning is to enable machines to learn by themselves, by using small to large datasets and finding common patterns inside the data. That said, data is the core of any machine learning algorithm and having access to the data is one of the crucial steps for machine learning success. This will bring us to the second question, Where data lives these days?
A great deal in databases
With the increase of data in volume, variety, velocity in today’s databases. Is there a better place to bring machine learning to, than being able to do machine learning right in the databases?
We believe that database users meet the most important aspect of applied machine learning, which is to understand what predictive questions are important and what data is relevant to answer those questions. Additionally, adding the statistical analysis for creating the most appropriate model to that, will yield the best combination which is auto machine learning straight from the database. Bringing AutoML to those that know data best can significantly augment the capacity to solve important problems.
That’s why we decided to build a seamless integration with Clickhouse, in a way such that any ClickHouse user can create, train and test machine learning models with the same knowledge they have of Structured Query Language (SQL).
How can we achieve this?
We make use of ClickHouse’s neat capabilities of accessing external tables as if they were internal tables. As such, the integration of these models is painless and transparent allowing us to:
- Exposing machine learning models like tables that can be queried. You simply SELECT what you want to predict and you pass in the WHERE statement the conditions for the prediction.
- Automatically, build, test and train machine learning models with a simple INSERT statement, where you specify what you want to learn and from what query.
Why MindsDB?
MindsDB is a fast-growing Open Source AutoML framework with built-in explainability – a unique visualization capability that helps better understand and trust the accuracy of predictions.
With MindsDB, developers can build, train and test Machine Learning models, without needing the help of a Data Scientist/Machine Learning Engineer. It is different from typical AutoML frameworks in that MindsDB has a strong focus on trustworthiness by means of explainability, allowing users to get valuable insights into why and how the model is reaching its predictions.
Why ClickHouse?
Speed and efficiency are key to ClickHouse. ClickHouse can process queries up to 100 times faster than traditional databases and is the perfect solution for Digital advertising, E-commerce, Web and App analytics, Monitoring, Telecommunications analytics.
In the rest of this article, we will try to describe in detail the above points with integration between MindsDB, as an Auto-Machine Learning framework and ClickHouse, as an OLAP Database Management System
How to Install MindsDB
Installing MindsDB is as easy as any other Python package. All you need for installation are a Python version greater than 3.6.x and around 1 GB available disk space. Other than that you just use pip or pip3 to install it as:
pip install mindsdbFor more detailed installation instructions please check out installation docs. If you got an error or have any questions, please post them to our support forum community.mindsdb.com.
How to Install ClickHouse
If you already have ClickHouse installed and your analytics data saved then you’re ready to start playing with MindsDB, so just skip to the Connect MindsDB to ClickHouse section.
If not, ClickHouse can run on any Linux or Mac OS X with x86_64 CPU architecture. Depending on your machine check out available installation options. Once the installation is done, you can start the server as a daemon:
sudo service clickhouse-server startStarting the server will not display any output, so you can execute:
sudo service clickhouse-server statusTo check that the ClickHouse is running successfully. Next, use clickhouse-client to connect to it:
clickhouse-clientIf you get Code: 516. DB::Exception: Received from localhost:9000. DB::Exception: default: Authentication failed: error you will need to provide the default password that you added during the installation process:
clickhouse-client --password ******That’s it. You have successfully connected to your local ClickHouse server.
Import dataset to ClickHouse
As with any other database management system, ClickHouse also groups tables into databases. To list the available databases you can run a `show databases` query that will display the default databases:
SHOW DATABASES;For storing the data, we will create a new database called data:
CREATE DATABASE IF NOT EXISTS data;The dataset that we will use in this tutorial provides time-series air pollution measurement information from data.seoul. Let’s create a table and store the data in ClickHouse. Note that you can follow up to this tutorial with different data, just edit the example queries in line with your data.
CREATE TABLE pollution_measurement(
	`Measurement date` DateTime,
	`Station code` String,
	Address String,
	Latitude Float32,
	Longitude Float32,
	SO2 Decimal32(5),
	NO2 Decimal32(5),
	O3 Decimal32(5),
	CO Decimal32(5),
	PM10 Decimal32(1),
	`PM2.5` Decimal32(1)
) ENGINE = MergeTree()
  ORDER BY (`Station code`, `Measurement date`);
Note that we need to use backticks to escape the special characters in the column name.
The parameters added to the Decimal32(p) are the precision of the decimal digits for e.g Decimal32(5) can contain numbers from -99999.99999 to 99999.99999. The Engine = MergeTree, specify the type of the table in ClickHouse. To learn more about all of the available table engines head over to the table-engines documentation.
Lastly, what we need to do is to import the data inside the pollution_measurement table:
clickhouse-client --date_time_input_format=best_effort --query="INSERT INTO data.pollution_measurement FORMAT CSV" < Measurement_summary.csvThe –date_time_input_format=best_effort enables the datetime parser to parse the basic and all ISO 8601 date and time formats.
The pollution_measurement data should be added to the data.pollution_measurement table. To make sure it is successfully added execute SELECT query:
SELECT * FROM data.pollution_measurement LIMIT 5;
We are halfway there! We have successfully installed MindsDB and ClickHouse and have the data saved in the database. Now, we will use MindsDB to connect to ClickHouse and train and query Machine Learning models from the air pollution measurement data. If you don’t want to install ClickHouse locally, ClickHouse Docker image is a good solution.
Connect to MindsDB to ClickHouse
Let’s run MindsDB:
python3 -m mindsdb --api mysql --config config.jsonThe –api parameter specifies the type of API to use (mysql). The –config specifies the location of the configuration file. The minimum required configuration for connecting to ClickHouse is:
{
   "config_version": 1,
   "use_gpu": false,
   "api": {
       "http": {
           "host": "0.0.0.0",
           "port": "47334"
       }
"mysql": {
           "certificate_path": "/flows/config/cert.pem",
           "datasources": [],
           "host": "127.0.0.1",
           "log": {
               "console_level": "INFO",
               "file": "mysql.log",
               "file_level": "INFO",
               "folder": "logs/",
               "format": "%(asctime)s - %(levelname)s - %(message)s"
           },
           "password": "mysql pass",
           "port": "47335",
           "user": "mysql user"
       }
   },
   "debug": false,
   "integrations": {
       "default_clickhouse": {
           "enabled": true,
           "type": "clickhouse",
           "host": "localhost",
           "password": "pass",
           "port": 8123,
           "user": "default"
       }
   },
   "interface":{
       "datastore": {
           "enabled": false,
           "storage_dir": "/path/to/storage"
       },
 "mindsdb_native": {
           "enabled": true,
           "storage_dir": "/path/to/storage"
       }
   }
}
In the default_clickhouse key, include the values for connecting to ClickHouse. In the mindsdb_native storage_dir add a path to the location where MindsDB will save some configuration as (metadata and .pickle files). The Running on http://0.0.0.0:47334/ (Press CTRL+C to quit) message will be displayed if MindsDB is successfully started. That means MindsDB server is running and listening on localhost:47334.
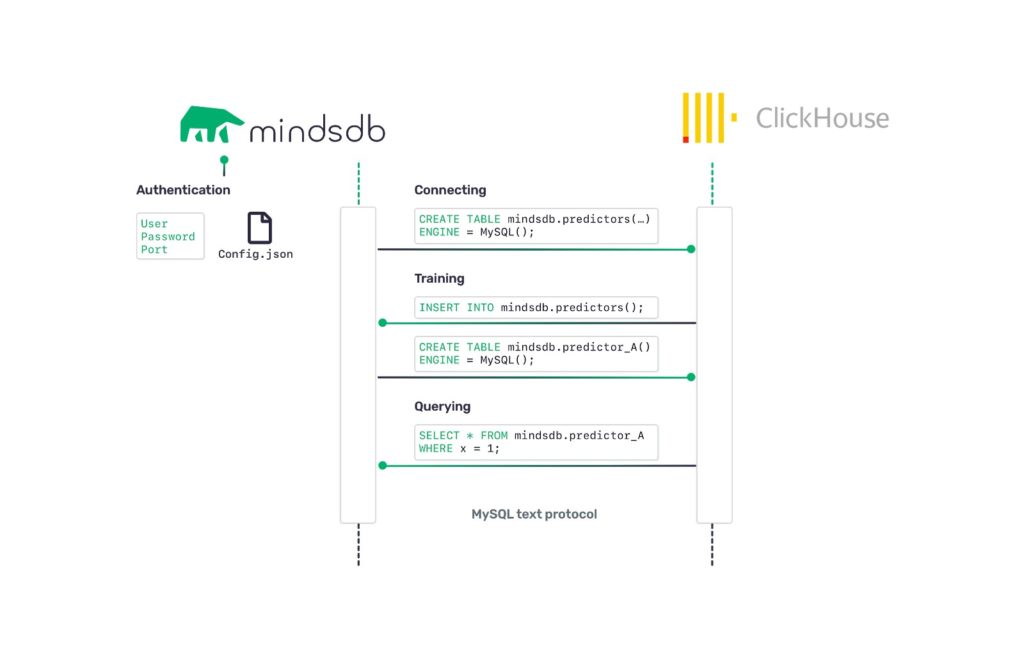
First, when MindsDB starts it creates a database and tables inside the ClickHouse. The database created is of ENGINE type MySQL(connection), where ‘connection’ is established from the parameters provided inside the config.json.
USE mindsdb;
SHOW TABLES;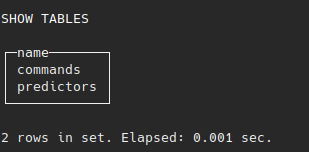
The default table created inside mindsdb database will be predictors where MindsDB shall keep information about the predictors(ML models), training status, accuracy, target variable and additional training options.
DESCRIBE TABLE predictors;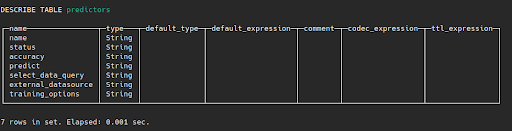
When a user creates a new model or makes a query to any table, the query is sent by MySQL text protocol to MindsDB, where it hits the MindsDB’s APIs responsible for training, analyzing, querying the models.
Now, we have everything ready to create a model. We are going to use the data inside the pollution_measurement table to predict the Sulfur Dioxide(SO2) in the air. Creating the model is as simple as writing the INSERT query, where we will provide values for the few required attributes. Before creating the predictor make sure mindsdb database is used:
use mindsdb;INSERT INTO predictors(name, predict, select_data_query) VALUES ('airq_predictor', 'SO2', 'SELECT * FROM data.pollution_measurement where SO2 > 0 ORDER BY rand() LIMIT 10000);The Predictor in MindsDB’s words means the Machine Learning model. The columns values for creating the predictor(model) are:
- name (string) – the name of the predictor.
- predict (string) – the feature you want to predict, in this example it will be SO2.
- select_data_query (string) – the SELECT query that will ingest the data to train the model.
- training_options (dictionary) – optional value that contains additional training parameters. For a full list of the parameters check the mindsdb.docs.
In the background, the INSERT to predictors query will call mindsdb-native that will do a black-box analysis and start a process of extracting, analyzing, and transforming the data. It will take some time to train the model depending on the data size, columns, columns type etc, so to keep it faster we are using 5000 random columns by adding ORDERED BY rand() LIMIT 10000 to the SELECT query. You should see a message like:
INSERT INTO predictors (name, predict_cols, select_data_query) VALUES

Ok.

1 rows in set. Elapsed: 0.824 sec.
To check if the training of the model successfully finished, you can run:
SELECT * FROM predictors WHERE name='airq_predictor'
Status complete means that the model training has finished successfully. Now, let’s create predictive analytics from the data by querying the created predictor. The idea was to predict the value of Sulfur Dioxide in the Seoul air station depending on the different measured parameters as NO2, O3, CO, location etc.
SELECT SO2 as predicted, SO2_confidence as confidence from airq_predictor
WHERE NO2=0.005 AND CO=1.2 AND PM10=5;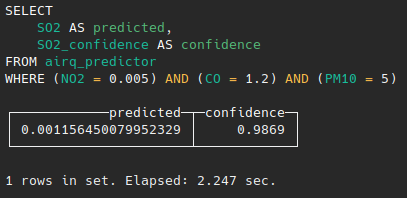
Now you can see that MindsDB predicted that the value of Sulfur Dioxide is 0.00115645 with around 98% confidence.
To get additional information about the predicted value and confidence, we should include the explain column. In that case, the MindsDB’s explain functionality apart from confidence can provide additional information such as prediction quality, confidence interval, missing information for improving the prediction etc. We can extend the query and include an additional column for explanation information:
SELECT
    SO2 AS predicted,
    SO2_confidence AS confidence,
    SO2_explain AS info
FROM airq_predictor
WHERE (NO2 = 0.005) AND (CO = 1.2) AND (PM10 = 5)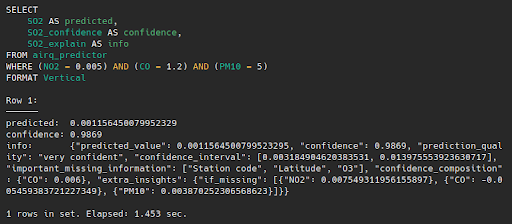
Now we get additional information:
{
    "predicted_value": 0.001156540079952395,
    "confidence": 0.9869,
    "prediction_quality": "very confident",
    "confidence_interval": [0.003184904620383531, 0.013975553923630717],
    "important_missing_information": ["Station code", "Latitude", “O3”],
    "confidence_composition": {
        "CO": 0.006
    },
    "extra_insights": {
        "if_missing": [{
            "NO2": 0.007549311956155897
        }, {
            "CO": 0.005459383721227349
        }, {
            "PM10": 0.003870252306568623
        }]
    }
}
By looking at the new information we can see that MindsDB is very confident about the quality of this prediction. The range of values where the predicted value lies within is determined inside the confidence interval. Also, the extra insights are providing SO2 value in a case where some of the included features (in WHERE clause) are not provided. MindsDB thinks that Station code and Latitude and O3 are very important features for more precise prediction so those values shall be included in the WHERE clause. Let’s try including Station code and see the new predictions:
SELECT
    SO2 AS predicted,
    SO2_confidence AS confidence
FROM airq_predictor
WHERE (NO2 = 0.005) AND (CO = 1.2) AND (PM10 = 5) AND (`Station code` = '32') AND `PM2.5`=50
Now the predicted value has changed by adding the feature that MindsDB thought is quite important for better prediction. Additionally we can try and predict the Sulfur Dioxide in the air in some future date. What we can do is just include the Measurement date value inside WHERE clause for the specific date we want to get prediction e.g:
SELECT
    SO2 AS predicted,
    SO2_confidence AS confidence
FROM airq_predictor
WHERE (NO2 = 0.005) AND (CO = 1.2) AND (PM10 = 5) AND (`Station code` = '32') AND `PM2.5`=50 AND `Measurement date`=’2020-07-03 00:01:00’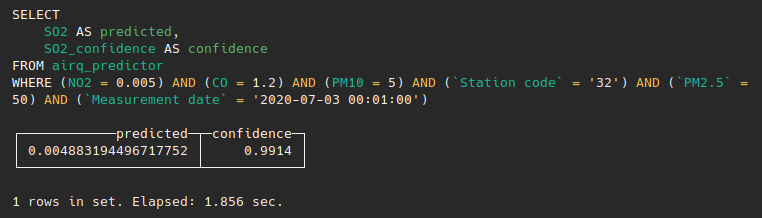
Or few weeks later as:
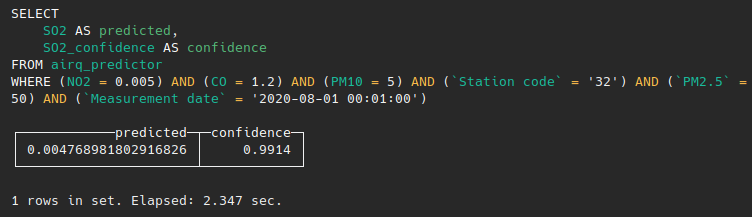
At the end, the whole flow was as simple as seeing MindsDB as a database inside ClickHouse and executing queries for INSERT and SELECT directly from it.

If you follow up to this tutorial with your own data, we are happy to hear about how MindsDB has come in useful to you. Everything that we did in this tutorial will be available through the MindsDB’s Graphical User Interface MindsDB Scout in the next release. That means with a few clicks on MindsDB Scout you can successfully train ML models from your ClickHouse database too.
ClickHouse® is a registered trademark of ClickHouse, Inc.; Altinity is not affiliated with or associated with ClickHouse, Inc.