ClickHouse Kafka Engine Tutorial


Our colleague Mikhail Filimonov just published an excellent ClickHouse Kafka Engine FAQ. It provides users with answers to common questions about using stable versions, configuration parameters, standard SQL definitions, and many other topics. Even experienced users are likely to learn something new.
But what if you are getting started and need help setting up Kafka and ClickHouse for the first time? Good news! This article is for you.
We’ll work through an end-to-end example that loads data from a Kafka topic into a ClickHouse table using the Kafka engine. We will also show how to reset offsets and reload data, as well as how to change the table schema. Finally, we’ll demonstrate how to write data from ClickHouse back out to a Kafka topic.
Prequisites
The exercises that follow assume you have Kafka and ClickHouse already installed and running. We used Kubernetes for convenience. The Kafka version is Confluent 5.4.0, installed using a Kafka helm chart with three Kafka brokers. The ClickHouse version is 20.4.2, installed on a single node using the ClickHouse Kubernetes Operator. For non-Kubernetes instructions on installation, look here for Confluent Kafka and here for ClickHouse.
The exercises should work for any type of installation, but you’ll need to change host names accordingly. You may also need to change the replication factor if you have fewer Kafka brokers.
Overview of Kafka-ClickHouse Integration
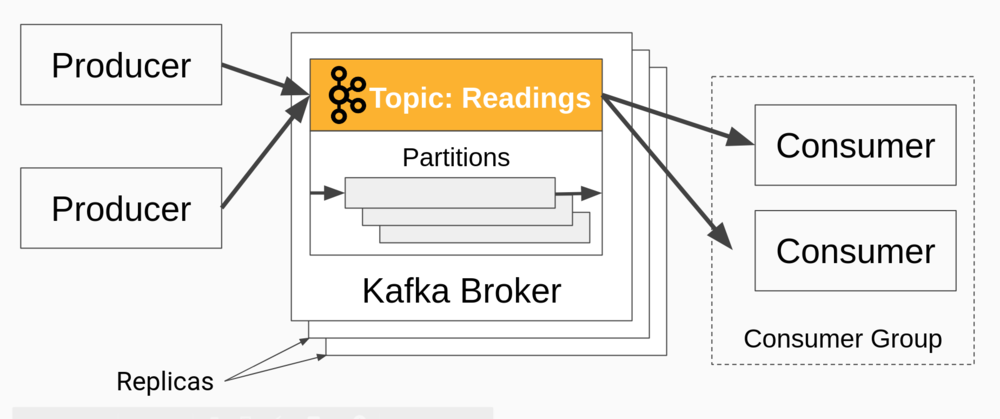
Kafka is an extremely scalable message bus. Its core is a distributed log managed by brokers running on different hosts. Here is a short description of the application model.
Producers write messages to a topic, which is a set of messages. Consumers read messages from the topic, which is spread over partitions. Consumers are arranged in consumer groups, which allow applications to read messages in parallel from Kafka without loss or duplication.
The following diagram illustrates the principle parts described above.
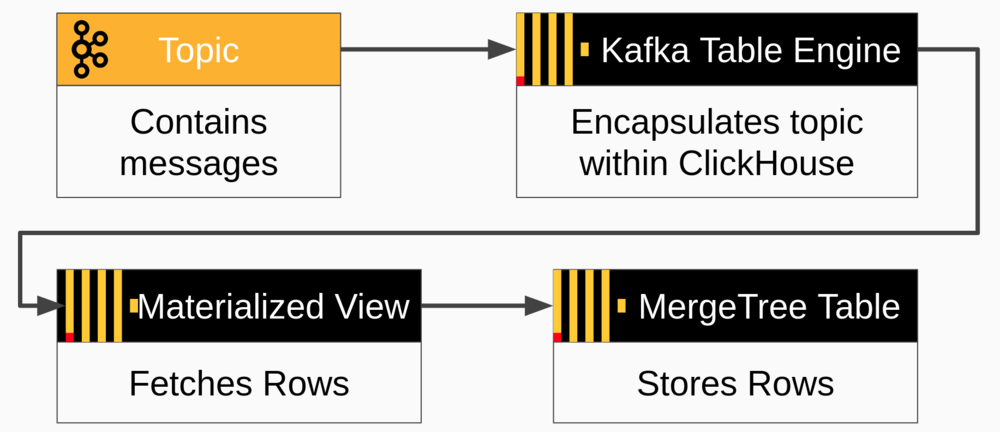
ClickHouse can read messages directly from a Kafka topic using the Kafka table engine coupled with a materialized view that fetches messages and pushes them to a ClickHouse target table. The target table is typically implemented using MergeTree engine or a variant like ReplicatedMergeTree. The flow of messages is illustrated below.
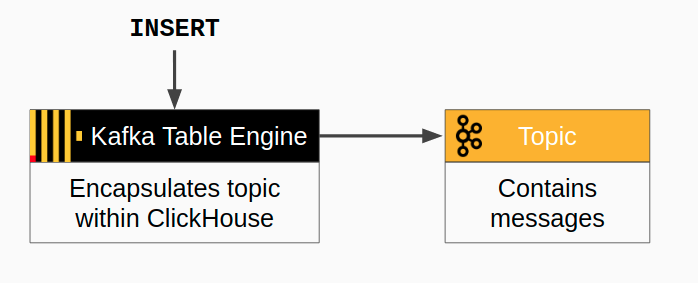
It is also possible to write from ClickHouse back to Kafka. The flow of messages is simpler–just insert into the Kafka table. Here is a diagram of the flow.
Creating a Topic on Kafka
Let’s now set up a topic on Kafka that we can use to load messages. Log in to a Kafka server and create the topic using a command like the sample below. ‘kafka’ in this example is the DNS name of the server. If you have a different DNS name, use that instead. You may also adjust the number of partitions as well as the replication factor.
kafka-topics \
--bootstrap-server kafka:9092 \
--topic readings \
--create --partitions 6 \
--replication-factor 2
Check that the topic has been successfully created.
kafka-topics --bootstrap-server kafka:9092 --describe readingsYou’ll see output like the following showing the topic and current state of its partitions.
Topic: readings    PartitionCount: 6    ReplicationFactor: 2    Configs:
    Topic: readings    Partition: 0    Leader: 0    Replicas: 0,2    Isr: 0,2
    Topic: readings    Partition: 1    Leader: 2    Replicas: 2,1    Isr: 2,1
    Topic: readings    Partition: 2    Leader: 1    Replicas: 1,0    Isr: 1,0
    Topic: readings    Partition: 3    Leader: 0    Replicas: 0,1    Isr: 0,1
    Topic: readings    Partition: 4    Leader: 2    Replicas: 2,0    Isr: 2,0
    Topic: readings    Partition: 5    Leader: 1    Replicas: 1,2    Isr: 1,2
At this point, we’re ready to go on the Kafka side. Let’s turn to ClickHouse.
ClickHouse Kafka Engine Setup
To read data from a Kafka topic to a ClickHouse table, we need three things:
-
A target MergeTree table to provide a home for ingested data
-
A Kafka engine table to make the topic look like a ClickHouse table
-
A materialized view to move data automatically from Kafka to the target table
Let’s take them in order. First, we will define the target MergeTree table. Log in to ClickHouse and issue the following SQL to create a table from our famous 500B Rows on an Intel NUC article.
CREATE TABLE readings (
    readings_id Int32 Codec(DoubleDelta, LZ4),
    time DateTime Codec(DoubleDelta, LZ4),
    date ALIAS toDate(time),
    temperature Decimal(5,2) Codec(T64, LZ4)
) Engine = MergeTree
PARTITION BY toYYYYMM(time)
ORDER BY (readings_id, time);
Next, we need to create a table using the Kafka engine to connect to the topic and read data. The engine will read from the broker at host kafka using topic ‘readings’ and a consumer group name ‘readings consumer_group1’. The input format is CSV. Note that we omit the ‘date’ column. It’s an alias in the target table that will populate automatically from the ‘time’ column.
CREATE TABLE readings_queue (
    readings_id Int32,
    time DateTime,
    temperature Decimal(5,2)
)
ENGINE = Kafka
SETTINGS kafka_broker_list = 'kafka-headless.kafka:9092',
       kafka_topic_list = 'readings',
       kafka_group_name = 'readings_consumer_group1',
       kafka_format = 'CSV',
       kafka_max_block_size = 1048576;
The preceding settings handle the simplest case: a single broker, a single topic, and no specialized configuration. Check out the Kafka Table Engine docs as well as our Kafka FAQ to learn how you can change the engine behavior.
Finally, we create a materialized view to transfer data between Kafka and the merge tree table.
CREATE MATERIALIZED VIEW readings_queue_mv TO readings AS
SELECT readings_id, time, temperature
FROM readings_queue;
That’s it for the Kafka to ClickHouse integration. Let’s test it.
Loading Data
It’s now time to load some input data using the kafka-console-producer command. Here’s an example that adds three records using CSV format.
kafka-console-producer --broker-list kafka:9092 --topic readings <<END
1,"2020-05-16 23:55:44",14.2
2,"2020-05-16 23:55:45",20.1
3,"2020-05-16 23:55:51",12.9
END
Transfer to the readings table will take a couple of seconds. If we select from it we get the following output.
SELECT *
FROM readings
┌─readings_id─┬────────────────time─┬─temperature─┐
│ 1 │ 2020-05-16 23:55:44 │ 14.20 │
│ 2 │ 2020-05-16 23:55:45 │ 20.10 │
│ 3 │ 2020-05-16 23:55:51 │ 12.90 │
└─────────────┴─────────────────────┴─────────────┘Great! Kafka and ClickHouse are now connected.
Rereading Messages from Kafka
The previous example started from the beginning position in the Kafka topic and read messages as they arrived. That’s the normal way, but sometimes it is useful to read messages again. For example, you might want to reread messages after fixing a bug in the schema or after reloading a backup. Fortunately, this is easy to do. We just reset the offsets in the consumer group.
Suppose we lose all the messages in the readings table and want to reload them from Kafka. First, let’s “lose” the messages using a TRUNCATE command.
TRUNCATE TABLE readings;Before resetting offsets on the partitions, we need to turn off message consumption. Do this by detaching the readings_queue table in ClickHouse as follows.
DETACH TABLE readings_queueNext, use the following Kafka command to reset the partition offsets in the consumer group used for the readings_queue table. (Important–this is not a SQL command. You run it against Kafka, not ClickHouse.)
kafka-consumer-groups --bootstrap-server kafka:9092 \
 --topic readings --group readings_consumer_group1 \
 --reset-offsets --to-earliest --execute
Now re-attach the readings_queue table. Here you are back in ClickHouse.
ATTACH TABLE readings_queueWait a few seconds, and the missing records will be restored. You can run a SELECT to confirm they arrived.
Adding Virtual Columns
It is often useful to tag rows with information showing the original Kafka message coordinates. The Kafka table engine has automatically defined virtual columns for this purpose. Here’s how to change our readings table to show the source topic, partition, and offset.
First, let’s disable message consumption by detaching the Kafka table. Messages can pile up on the topic but we won’t miss them.
DETACH TABLE readings_queueNext, we alter the target table and materialized view by executing the following SQL commands in succession. Note that we just drop and recreate the materialized view whereas we alter the target table, which preserves existing data.
ALTER TABLE readings
  ADD COLUMN _topic String,
  ADD COLUMN _offset UInt64,
  ADD COLUMN _partition UInt64
DROP TABLE readings_queue_mvCREATE MATERIALIZED VIEW readings_queue_mv TO readings AS
SELECT readings_id, time, temperature, _topic, _offset, _partition
FROM readings_queue;Finally, we enable message consumption again by re-attaching the readings_queue table.
ATTACH TABLE readings_queueYou can confirm the new schema by truncating the table and reloading the messages as we did in the previous section. If you select the data it will look like the following.
SELECT
    readings_id AS id, time, temperature AS temp,
    _topic, _offset, _partition
FROM readings
┌─id─┬────────────────time─┬──temp─┬─_topic───┬─_offset─┬─_partition─┐
│ 1 │ 2020-05-16 23:55:44 │ 14.20 │ readings │ 0 │ 5 │
│ 2 │ 2020-05-16 23:55:45 │ 20.10 │ readings │ 1 │ 5 │
│ 3 │ 2020-05-16 23:55:51 │ 12.90 │ readings │ 2 │ 5 │
└────┴─────────────────────┴───────┴──────────┴─────────┴────────────┘The foregoing procedure incidentally is the same way you would upgrade schema when message formats change. Also, materialized views provide a very general way to adapt Kafka messages to target table rows. You can even define multiple materialized views to split the message stream across different target tables.
Writing from ClickHouse to Kafka
We will end the tutorial by showing how to write messages from ClickHouse back to Kafka. This is a relatively new feature that is available in the current Altinity stable build 19.16.18.85.
Let’s start by creating a new topic in Kafka to contain messages. We’ll call it ‘readings_high’ for reasons that will become apparent shortly.
kafka-topics \
--bootstrap-server kafka:9092 \
--topic readings_high \
--create --partitions 6 \
--replication-factor 2
Next, we need to define a table using the Kafka table engine that points to our new topic. This table can read and write messages, as it turns out, but in this example we’ll just use it for writing.
CREATE TABLE readings_high_queue (
    readings_id Int32,
    time DateTime,
    temperature Decimal(5,2)
)
ENGINE = Kafka
SETTINGS kafka_broker_list = 'kafka:9092',
       kafka_topic_list = 'readings_high',
       kafka_group_name = 'readings_high_consumer_group1',
       kafka_format = 'CSV',
       kafka_max_block_size = 1048576;
Finally, let’s add a materialized view to transfer any row with a temperature greater than 20.0 to the readings_high_queue table. This example illustrates yet another use case for ClickHouse materialized views, namely, to generate events under particular conditions.
CREATE MATERIALIZED VIEW readings_high_queue_mv TO readings_high_queue AS
SELECT readings_id, time, temperature FROM readings
WHERE toFloat32(temperature) >= 20.0
Start a consumer in separate terminal window to print out messages from the readings_high topic on Kafka as follows. This will allow you to see rows as ClickHouse writes them to Kafka.
kafka-console-consumer --bootstrap-server kafka:9092 --topic readings_highFinally, load some data that will demonstrate writing back to Kafka. Let’s add a new batch to our original topic. Run the following command in another window.
kafka-console-producer --broker-list kafka:9092 --topic readings <<END
4,"2020-05-16 23:55:52",9.7
5,"2020-05-16 23:55:56",25.3
6,"2020-05-16 23:55:58",14.1
END
After a few seconds you will see the second row pop out in the window running the kafka-console-consumer command. It should look like this:
5,"2020-05-16 23:55:56",25.3Dealing with Failures
If you run into problems with any examples, have a look at the ClickHouse log. Enable trace logging if you have not already done so. You can see messages like the following that signal activity in the Kafka Table Engine.
2020.05.17 07:24:20.609147 [ 64 ] {} <Debug> StorageKafka (readings_queue): Started streaming to 1 attached viewsErrors, if any, will appear in the clickhouse-server.err.log.
Conclusion and Further Reading
As this blog article shows, the Kafka Table Engine offers a simple and powerful way to integrate Kafka topics and ClickHouse tables. There is obviously a lot more to managing the integration–especially in a production system. We hope this article will help get you started and enable you to explore other possibilities yourself.
For more information on the ClickHouse side, check out the Kafka Table Engine documentation as well as the excellent ClickHouse Kafka Engine FAQ on this blog. For Kafka, you can start with the Apache Kafka website or documentation for your distribution. For a higher-level understanding of Kafka in general, have a look at the primer on Streams and Tables in Apache Kafka published by Confluent.
Altinity maintains the Kafka Table Engine code. We also offer support for Kafka integrations, which are widely used in the ClickHouse community. If you have further questions about Kafka or need help–including help with addition of new features–feel free to contact us at info@altinity.com. Meanwhile, have fun running Kafka and ClickHouse together!
Hey I am trying to do first part only, Data from Kafka to Clickhouse. I followed each and every step still I’m not getting any data in my “readings” table. I am following this in Linux and using at “localhost:9092” in my broker_list. Please can anyone help ASAP.
I agree….. this not working for me too ….. i.e. the data is not being read into the ClickHouse Kafka table (and consequently nothing is pushed into the readings MergeTree table via the MV) ….
@Abhi did you find a way out?
Check the log for errors. One of the reasons for data not being read in is that ClickHouse can’t parse your data format.
If this happens to you, try to read all data in as String, then use a materialized view to clean things up. See the following article for a standard approach to error handling: https://kb.altinity.com/altinity-kb-integrations/altinity-kb-kafka/error-handling/
Writing from ClickHouse to Kafka
I try to write records to kafka. This works. But how can I set the key and message timestamp?
my body is raw JSON
“key” String,
“date” DateTime,
“message” String (this is valid JSON)
I tried different formats, without success.
In best case I end up with something like this
{
“Message”: “{\”id\”: \”#5…..
}
where the key ist NULL and the Date is current time
Any help would be appreciated
Regards
Marco