ClickHouse Networking, Part 1

ClickHouse has a rich set of features to control network connections for clients as well as other servers in a cluster. That said, it can be difficult for new users to work through the possible options or for experienced users to ensure deployed systems are fully accessible to apps and properly secured.
This post in two parts provides an overview of ClickHouse network configuration with lots of examples. In the first post we describe the overall connectivity design and configuration of listeners and ports. In the second post we describe how to enable encryption, solutions to common problems, and further reading.
Connectivity Overview
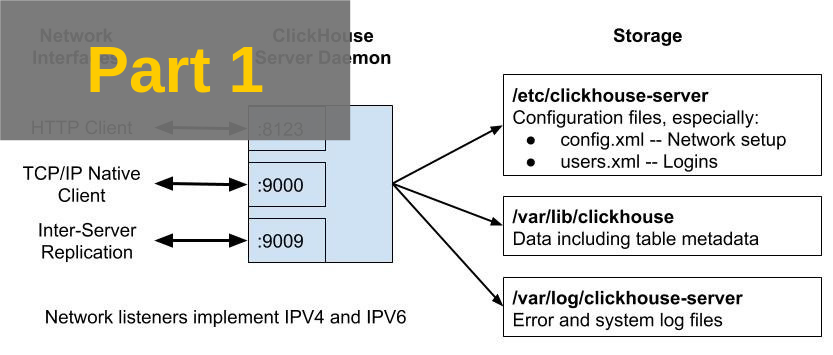
The following diagram shows communication ports and files for a single ClickHouse node after an out-of-box installation, for example using apt install clickhouse-server.
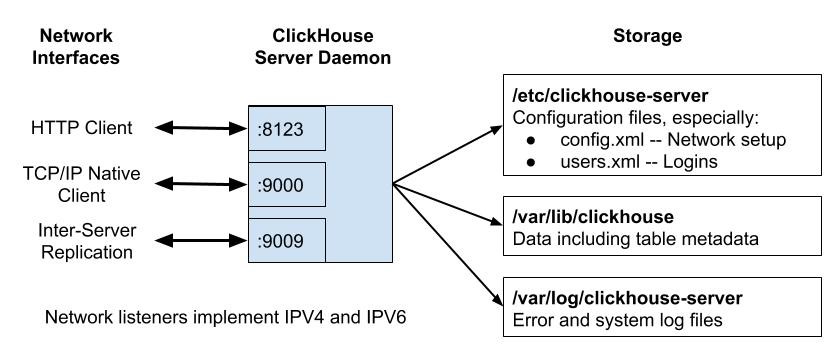
Network configuration settings are defined in /etc/clickhouse-server/config.xml. Here is a detailed description of each of the ports in the initial installation.
- Port 8123 is the default HTTP interface endpoint. You will use this port if you use curl commands to issue queries to the server. Also, a number of libraries like the Yandex ClickHouse JDBC driver use HTTP requests under the covers, so you may be using this without knowing it.
- Port 9000 is the default native TCP/IP protocol endpoint. This is widely used by clients, as shown by the following examples.
- Clickhouse-client, the standard command line client for ClickHouse, uses native TCP/IP protocol.
- Similarly the ClickHouse Distributed engine uses native TCP/IP protocol to send subqueries to underlying tables. It is also used in rare cases by replicated tables when sending requests to a leader replica.
- Finally drivers like the Python clickhouse-driver or Golang driver talk to ClickHouse using native TCP/IP protocol.
- Port 9009 is used for replication. Replicas access that port to transfer new parts between tables.
All of the foregoing ports are unencrypted by default. They have corresponding encrypted ports which you can enable.
Authentication is controlled by file users.xml. It’s important for security but not directly related to network connectivity. We’ll explore users.xml in a future article.
With this overview we can now dig into ClickHouse networking itself.
Getting Started
Let’s kick things off with a fresh ClickHouse server installation using the following commands.
sudo apt install clickhouse-server clickhouse-client
sudo systemctl start clickhouse-server
On my system this brings up ClickHouse version 19.4.0. We will use it for all examples that follow. You may (and probably should) use a different version for production deployments. Altinity currently recommends version 18.14.19. The behavior is largely the same at least so far as networking is concerned.
Before going any further let’s introduce a very useful tool for checking server network configuration: lsof. It offers a simple method to check open ports on clickhouse servers. Here’s a typical command and output for clickhouse version 19.4.0 after a fresh install.
sudo lsof -p $(pgrep clickhouse) -i -Pan
COMMAND   PID         USER   FD   TYPE DEVICE    SIZE/OFF  NODE NAME
clickhous 32268 clickhouse   16u  IPv6 325459218      0t0  TCP [::1]:8123 (LISTEN)
clickhous 32268 clickhouse   18u  IPv6 325459219      0t0  TCP [::1]:9000 (LISTEN)
clickhous 32268 clickhouse   22u  IPv6 325459220      0t0  TCP [::1]:9009 (LISTEN)
clickhous 32268 clickhouse   24u  IPv4 325459221      0t0  TCP 127.0.0.1:8123 (LISTEN)
clickhous 32268 clickhouse   26u  IPv4 325459222      0t0  TCP 127.0.0.1:9000 (LISTEN)
clickhous 32268 clickhouse   27u  IPv4 325459223      0t0  TCP 127.0.0.1:9009 (LISTEN)
We see that the default installation listens only on the loopback interface ports, which is a good setting to limit attacks from remote clients. We will use lsof and other tools like openssl and clickhouse-client to check that settings are correct and that ClickHouse is behaving as expected.
Network Listener Configuration
Network configuration is controlled by parameters within the
yandex tag in file config.xml. The listen_host tag defines a server network listener. It can have multiple values, which allows the ClickHouse server to create multiple listeners. On a newly installed server the listen_host parameter is commented out and therefore defaults to the following settings:
<yandex>
    ...
    <listen_host>::1</listen_host>
    <listen_host>127.0.0.1</listen_host>
    ...
</yandex>
This corresponds to the lsof output we saw in the previous section.
If you do not need IPV6, removing it is easy and a good security practice as well. Just enable IPV4 explicitly. Here is an example of a configuration that does so.
<yandex>
    ...
    <listen_host>127.0.0.1</listen_host>
    ...
</yandex>
If you need to listen on multiple IPV4 network interfaces you can use IP address 0.0.0.0 like the following example. Bear in mind this will cause ClickHouse to listen on all ports, even those you have not thought about. If you add a NIC to the host later, ClickHouse will happily listen on the IP address for that interface as well.
<yandex>
    ...
    <listen_host>0.0.0.0</listen_host>
    ...
</yandex>
For the truly paranoid you can specify interfaces individually using their corresponding IP addresses, like the next example. IP addresses must correspond to network interfaces on the host or the ClickHouse server will fail to start.
<yandex>
    ...
    <listen_host>127.0.0.1</listen_host>
    <listen_host>192.168.128.110</listen_host>
    ...
</yandex>
Here is lsof output from the previous settings.
lsof -p $(pgrep clickhouse) -i -Pan
COMMAND     PID       USER   FD   TYPE    DEVICE SIZE/OFF NODE NAME
clickhous 13946 clickhouse   24u  IPv4 326772752      0t0 TCP 192.168.128.110:8123 (LISTEN)
clickhous 13946 clickhouse   25u  IPv4 326772753      0t0 TCP 192.168.128.110:9000 (LISTEN)
clickhous 13946 clickhouse   26u  IPv4 326772754      0t0 TCP 192.168.128.110:9009 (LISTEN)
clickhous 13946 clickhouse   27u  IPv4 326772755      0t0 TCP 127.0.0.1:8123 (LISTEN)
clickhous 13946 clickhouse   28u  IPv4 326772756      0t0 TCP 127.0.0.1:9000 (LISTEN)
clickhous 13946 clickhouse   29u  IPv4 326772757      0t0 TCP 127.0.0.1:9009 (LISTEN)
Unfortunately it’s not possible to assign individual ports to different network interfaces. In clustered settings it would be convenient to separate replication listeners to a different network to avoid unnecessary port exposure, but this is not possible using ClickHouse settings alone.
There is a setting called interserver_http_host which sounds as if might do the job. This is actually the host name that other servers can use to contact the current server. It affects the network interfaces that callers use when doing replication, which is useful for performance and network management reasons. However, it does not affect ports on the server where it is defined.
Listener Port Configuration
ClickHouse makes it easy to enable and disable listener ports as well as assign them new numbers. There are simple config.xml tags for each port type, as shown in the following table. The conventional value column shows the port number that most clients assume for a particular connection. If you change the value you may need to alter clients accordingly.
| Tag | Description | Conventional Value |
|---|---|---|
| http_port | Port for unencrypted HTTP queries | 8123 |
| https_port | Port for encrypted HTTPS queries | 8443 |
| interserver_http_port | Port for unencrypted HTTP replication traffic | 9009 |
| interserver_https_port | Port for encrypted HTTPS replication traffic | |
| tcp_port | Port for unencrypted native TCP/IP queries | 9000 |
| tcp_port_secure | Port for TLS-encrypted native TCP/IP queries | 9440 |
It’s easy to disable any port. Just comment (or leave out) the corresponding port entry. Similarly you can change the port number by putting a different value in the XML tag.
It is a good security practice to remove ports that are not required. Here is a simple example that leaves only ports for HTTP and native TCP/IP traffic. It only uses IPV4 protocol listeners.
<yandex>
    ...
    <http_port>8123</http_port>
    <tcp_port>9000</tcp_port>
    <!-- <interserver_http_port>9009</interserver_http_port> -->
    <listen_host>127.0.0.1</listen_host>
    ...
</yandex>
Here is the resulting lsof output showing listeners and ports in use.
lsof -p $(pgrep clickhouse) -i -Pan
COMMAND     PID       USER   FD   TYPE    DEVICE SIZE/OFF NODE NAME
clickhous 32015 clickhouse   24u  IPv4 326943167      0t0  TCP 127.0.0.1:8123 (LISTEN)
clickhous 32015 clickhouse   25u  IPv4 326943168      0t0  TCP 127.0.0.1:9000 (LISTEN)
As mentioned above ClickHouse port numbers are conventional rather than fixed. You can renumber them for your convenience. Of course, you’ll need to test applications as many of them default to the port conventions and may require additional configuration settings to make them work properly.
To Be Continued…
This article scratched the surface of ClickHouse networking. We surveyed the connectivity architecture, then reviewed listener and port configuration. See the follow-on post where we dig into encryption, fault diagnosis, and sources for further reading.
c/Bear in mind this will cause ClickHouse to listen on all ports/Bear in mind this will cause ClickHouse to listen on all interfaces