Clickhouse-copier in practice

Introduction to Clickhouse-copier
Clickhouse-copier is a tool designed to copy data from one ClickHouse environment to another. The tool is a part of standard ClickHouse server distribution. It can work in a fully parallel mode and distribute the data in the most efficient way. In this article, we review a few typical examples when clickhouse-copier can be used.
In order to copy the data from one location to another, we need to prepare an XML-schema configuration where we would specify both source and destination cluster configurations, and a list of tables to copy. Clickhouse-copier configuration format is described in the documentation: https://clickhouse.yandex/docs/en/operations/utils/clickhouse-copier/ Configuration XML file then needs to be uploaded into Zookeeper node, located under the specific path (/<task-path>/description).
Once you have Zookeeper task configured, you can execute clickhouse-copier tool in the command line with respective parameters as below:
clickhouse-copier --config zookeeper.xml --task-path /task/path --base-dir /path/to/dir --logs-dir /path/to/logsParameters:
config— The path to the zookeeper.xml file with the parameters for the connection to ZooKeeper.task-path— The path to the ZooKeeper node. This node is used for syncing clickhouse-copier processes and storing tasks. Tasks are stored in$task-path/description.base-dir— The path to auxiliary files. When it starts, clickhouse-copier createsclickhouse-copier_YYYYMMHHSS_<PID>subdirectories in$base-dir. If this parameter is omitted, the directories are created in the directory where clickhouse-copier was launched.logs-dir— The path to log files. When the tool starts it creates log files and outputs everything there. Note: clickhouse-copier does not write anything to thestdoutduring the process.
Use Case #1: Transferring data from one cluster to another
Let’s say some data needed to be transferred from one cluster to another. There are multiple ways to do that:
- Dump data into files on source cluster and re-load on a destination cluster
- Use
insert into … select from remote(...) - Detach or freeze partitions on source cluster, move them manually to the destination one and attach there
- Clickhouse-copier
The first two options work fine for small tables and single node systems. If the table size is significant, however, it becomes problematic. So moving the data files might be a better approach, but it requires quite a lot of manual work. Especially if the configurations of the source and destination clusters are different. This is what clickhouse-copier has been originally designed for. Internally it works with insert into … select from remote(...) approach, but also takes into account source and destination cluster topology.
In this example, we will show how to transfer data from the cluster with two sharded nodes to the cluster with two replicated nodes.
Solution
Let’s say we need to copy source_database.test_table.
The source cluster is defined as:
<remote_servers>
<source_cluster>
  <shard>
    <weight>1</weight>
    <replica>
      <host>192.168.11.1</host>
      <port>9000</port>
    </replica>
  </shard>
  <shard>
    <weight>1</weight>
    <replica>
      <host>192.168.11.2</host>
      <port>9000</port>
    </replica>
  </shard>
</source_cluster>
The destination cluster is defined as:
<yandex>
<remote_servers>
<target_cluster>
  <shard>
    <weight>1</weight>
    <replica>
      <host>192.168.11.3</host>
      <port>9000</port>
    </replica>
    <replica>
      <host>192.168.11.4</host>
      <port>9000</port>
    </replica>
  </shard>
</target_cluster>
</remote_servers>
</yandex>
Here is a complete XML-schema for the clickhouse-copier task:
<yandex>
<remote_servers>
    <source_cluster>
        <shard>
            <weight>1</weight>
            <replica>
                <host>192.168.11.1</host>
                <port>9000</port>
            </replica>
        </shard>
        <shard>
            <weight>1</weight>
            <replica>
                <host>192.168.11.2</host>
                <port>9000</port>
            </replica>
        </shard>
    </source_cluster>
    <target_cluster>
        <shard>
            <weight>1</weight>
            <replica>
                <host>192.168.11.3</host>
                <port>9000</port>
            </replica>
            <replica>
                <host>192.168.11.4</host>
                <port>9000</port>
            </replica>
        </shard>
    </target_cluster>
</remote_servers>
<max_workers>1</max_workers>
<tables>
    <table_events>
        <cluster_pull>source_cluster</cluster_pull>
        <database_pull>source_database</database_pull>
        <table_pull>test_table</table_pull>

        <cluster_push>target_cluster</cluster_push>
        <database_push>target_database</database_push>
        <table_push>test_table</table_push>

        <engine>Engine=MergeTree(...)</engine>
        <sharding_key>rand()</sharding_key>
    </table_events>
</tables>
</yandex>
Once we have that schema we can upload it into Zookeeper using following commands:
./zkCli create /clickhouse/copytasks ""
./zkCli create /clickhouse/copytasks/task2 ""
./zkCli create /clickhouse/copytasks/task2/description "`cat schema.xml`"
Zookeeper configuration file is also required for the clickhouse-copier. It may look like this (zookeeper.xml):
<zookeeper>
<node>
  <host>192.168.11.1</host>
  <port>2181</port>
</node>
</zookeeper>
After that we are good to go with running clickhouse-copier tool using all the data we have:
clickhouse-copier --config-file=zookeeper.xml --task-path=/clickhouse/copytasks/task2Once the tool started it will take a while to complete the task, depending on the size of the tables being copied. Also, it will not show anything until the process is finished. After that, you should check log files to confirm there were no errors.
Then we can verify that the data is consistent and after that, we can simply remove an old schema.
Use Case #2: Extending a single node server to a multiple nodes cluster
In this example, we start with a single ClickHouse server. The goal is to extend this server into two nodes cluster with data distributed equally between the nodes. For the new cluster, we use an existing server and one new server.
Solution
Clickhouse-copier is not ideal for this use case, because it can not copy a table to the same database on the same server. Since we are going to re-use one server we need to create a new database. So the plan is the following:
- Create a new database for distributed table
- Copy data into a new database and a new table using clickhouse-copier
- Re-create the old table on both servers
- Detach partitions from the new table and attach them to the old ones
Steps 3 and 4 are optional in general but required if you want to keep the original table and database names.
Let’s review the process in more detail.
Let’s say we have source_database.test_table the needs to be re-distributed. Create a separate database sharded_database and table test_table with the same table structure on existing and new server. Taking all of that into account we need to configure both servers to work in a cluster mode so we need to update their configurations first.
Let’s add section <clickhouse_remove_servers> into clickhouse configuration file on both our servers like so
<yandex>
<remote_servers>
<test_cluster>
  <shard>
    <weight>1</weight>
    <replica>
      <host>192.168.11.1</host>
      <port>9000</port>
    </replica>
  </shard>
  <shard>
    <weight>1</weight>
    <replica>
      <host>192.168.11.2</host>
      <port>9000</port>
    </replica>
  </shard>
</test_cluster>
</remote_servers>
<macros>
  <shard>shard1</shard>
  <replica>replica1</replica>
</macros>
</yandex>
Note: use shard number within tag respectively on each server.
ClickHouse doesn’t need to be restarted after that, so we can proceed with creating a distributed table on top of our test_table shards located on both nodes. Here is an example of such table
CREATE TABLE `sharded_database`.`distrib_table` (...)
ENGINE = Distributed(`test_cluster`, `sharded_database`, `test_table`, RAND())
This table will help us to make select queries from our new distributed schema.
So from now on, we have an empty distributed table based on two nodes and we need to fill the data with clickhouse-copier. To start that process we need to prepare the schema which should include:
- Source cluster configuration (this will be our single server)
- Destination cluster (this will be our new cluster)
- Tables to pull data from
- Tables to pull data to
And here is our configuration schema:
<yandex>
<remote_servers>
    <source_cluster>
        <shard>
            <weight>1</weight>
            <replica>
                <host>192.168.11.1</host>
                <port>9000</port>
            </replica>
        </shard>
    </source_cluster>
    <target_cluster>
        <shard>
            <weight>1</weight>
            <replica>
                <host>192.168.11.1</host>
                <port>9000</port>
            </replica>
        </shard>
        <shard>
            <weight>1</weight>
            <replica>
                <host>192.168.11.2</host>
                <port>9000</port>
            </replica>
        </shard>
    </target_cluster>
</remote_servers>
<max_workers>1</max_workers>
<tables>
    <table_events>
        <cluster_pull>source_cluster</cluster_pull>
        <database_pull>source_database</database_pull>
        <table_pull>test_table</table_pull>

        <cluster_push>target_cluster</cluster_push>
        <database_push>sharded_database</database_push>
        <table_push>test_table</table_push>

        <engine>Engine=MergeTree(...)</engine>
        <sharding_key>rand()</sharding_key>
    </table_events>
</tables>
</yandex>
Once we have that schema we can upload it into Zookeeper like so:
./zkCli create /clickhouse/copytasks ""
./zkCli create /clickhouse/copytasks/task1 ""
./zkCli create /clickhouse/copytasks/task1/description "`cat schema.xml`"
The one before final step is to create an XML config for Zookeeper connections like so:
<zookeeper>
<node>
  <host>192.168.11.1</host>
  <port>2181</port>
</node>
</zookeeper>
After that we are good to go with running clickhouse-copier tool using all the data we have:
clickhouse-copier --config-file=zookeeper.xml --task-path=/clickhouse/copytasks/task1In the end, we can verify that the data is consistent in both the new and old tables:
SELECT COUNT(*) FROM source_database.test_table;
SELECT COUNT(*) FROM sharded_database.distrib_table;
Now if we need our table to reside in initial ‘source_database’ DETACH/ATTACH PARTITION technique can be used. So basically we detach all partitions from our destination table(s) like this:
ALTER TABLE sharded_dataabase.test_table DETACH PARTITION '<name>'Then move files from /var/lib/clickhouse/data/sharded_database to /var/lib/clickhouse/data/source_database for respective table(s) at every server and then attach partitions like so:
ALTER TABLE source_database.test_able ATTACH PARTITION '<name>'More information about ATTACH and DETACH partitions could be found here: https://clickhouse.yandex/docs/en/query_language/alter/#manipulations-with-partitions-and-parts
Once we reattach all partitions sharded_database is not needed anymore and can be removed.
Performance Notes
While preparing use cases above we became curious about clickhouse-copier performance. So now let’s do some benchmarks. We could also compare those results to direct select … insert queries.
For the benchmarks, we used the following tests:
- Copy data from one cluster with a single node to a different cluster with one node
- Copy data from one cluster with a single node to a cluster with two nodes
- Copy one cluster with two nodes to another cluster with two nodes.
Basically what we did in all these cases, is that we had clickhouse-copier do the job based on properly configured XML-schema. And then we had a simple call of clickhouse-client like so:
clickhouse-client --host <source> -q "SELECT FROM <source_distributed_table> FORMAT CSV" | clickhouse-client --host <target> -q "INSERT INTO <target_distributed_table> FORMAT CSV"Just before we get into the results let’s define our database. For all those use cases we will use one of a public test datasets based on US Airline database which contains about 150 million records.
And here is the table of results:
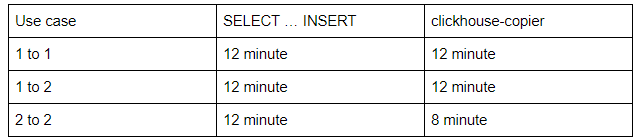
As the conclusion, we can see that performance of clickhouse-copier is similar to SELECT … INSERT statements but when it gets to a distributed database it gets more efficient because it uses the most of parallel resources. Since clickhouse-copier has been originally designed to copy 500-nodes Yandex clusters, it really shines in huge systems.
Conclusion
Clickhouse-copier is a powerful tool to move data between ClickHouse clusters of any topology. It can also be used for resharding or changing the primary key of the table. In a simple environment, its performance is the same as ‘insert … select’, but when it goes to big ClickHouse clusters it shows significant performance improvements and also hides all potential troubles managing multiple copy jobs.
hi Andrey, Thanks for the sharing. Does clickhouse-coplier keep checkpoint to resume from crashes?
Yes, it does. It keeps the track in Zookeeper, so can be resumed if something happens.
Is there a way to have clickhouse copier copy all tables from source to the target? or does each table have to be specified manually?
Each table has to be specified manually
Found a typo in article:
remote* 😉
In previous comment text disappeared because of tags, here:
clickhouse_remove_servers
Howdy! Any idea if clickhouse-copier supports user authentication? I can’t seem to get it to work and I don’t see any documentation around user access config for clickhouse-copier anywhere.
You can specify a user in the remote_servers section of the task configuration file.
Hi Altinity Team, thanks for the blog. I am trying to migrate clickhouse db from one cluster to other. We have materialized column “event_date” and a partition PARTITION BY toYYYYMM(event_date) in every table. While clickhouse copier since it is materialized column, I am getting some error. So is there any other way to use clickhouse copier?
Here is the error:
Will retry: Code: 47, e.displayText() = DB::Exception: Missing columns: ‘event_date’ while processing query: ‘SELECT DISTINCT toYYYYMM(event_date) AS partition FROM _local.`.read_shard_0.target_cluster.default.migration_test` ORDER BY partition DESC’, required columns: ‘event_date’, Stack trace (when copying this message, always include the lines below):
Hi Teja,
I’m facing a similar issue, did you, by any chance, figure out a way to work around it?
Ok, found the solution:
Setting property to true in task configuration.
Setting allow_to_copy_alias_and_materialized_columns property to true in task configuration.
Thank You Altinity Team for the blog.
One correction I would like to suggest, it may or may not be required but worked for me.
In zookeeper.xml file we need to put tag under , I was getting error zookeeper configuration not found without it and it was fixed after adding yandex in conf file.
Thanks again for the blog, helped alot.